Interim Install Guide: KDE Neon User Edition for a professional digital painter workstation
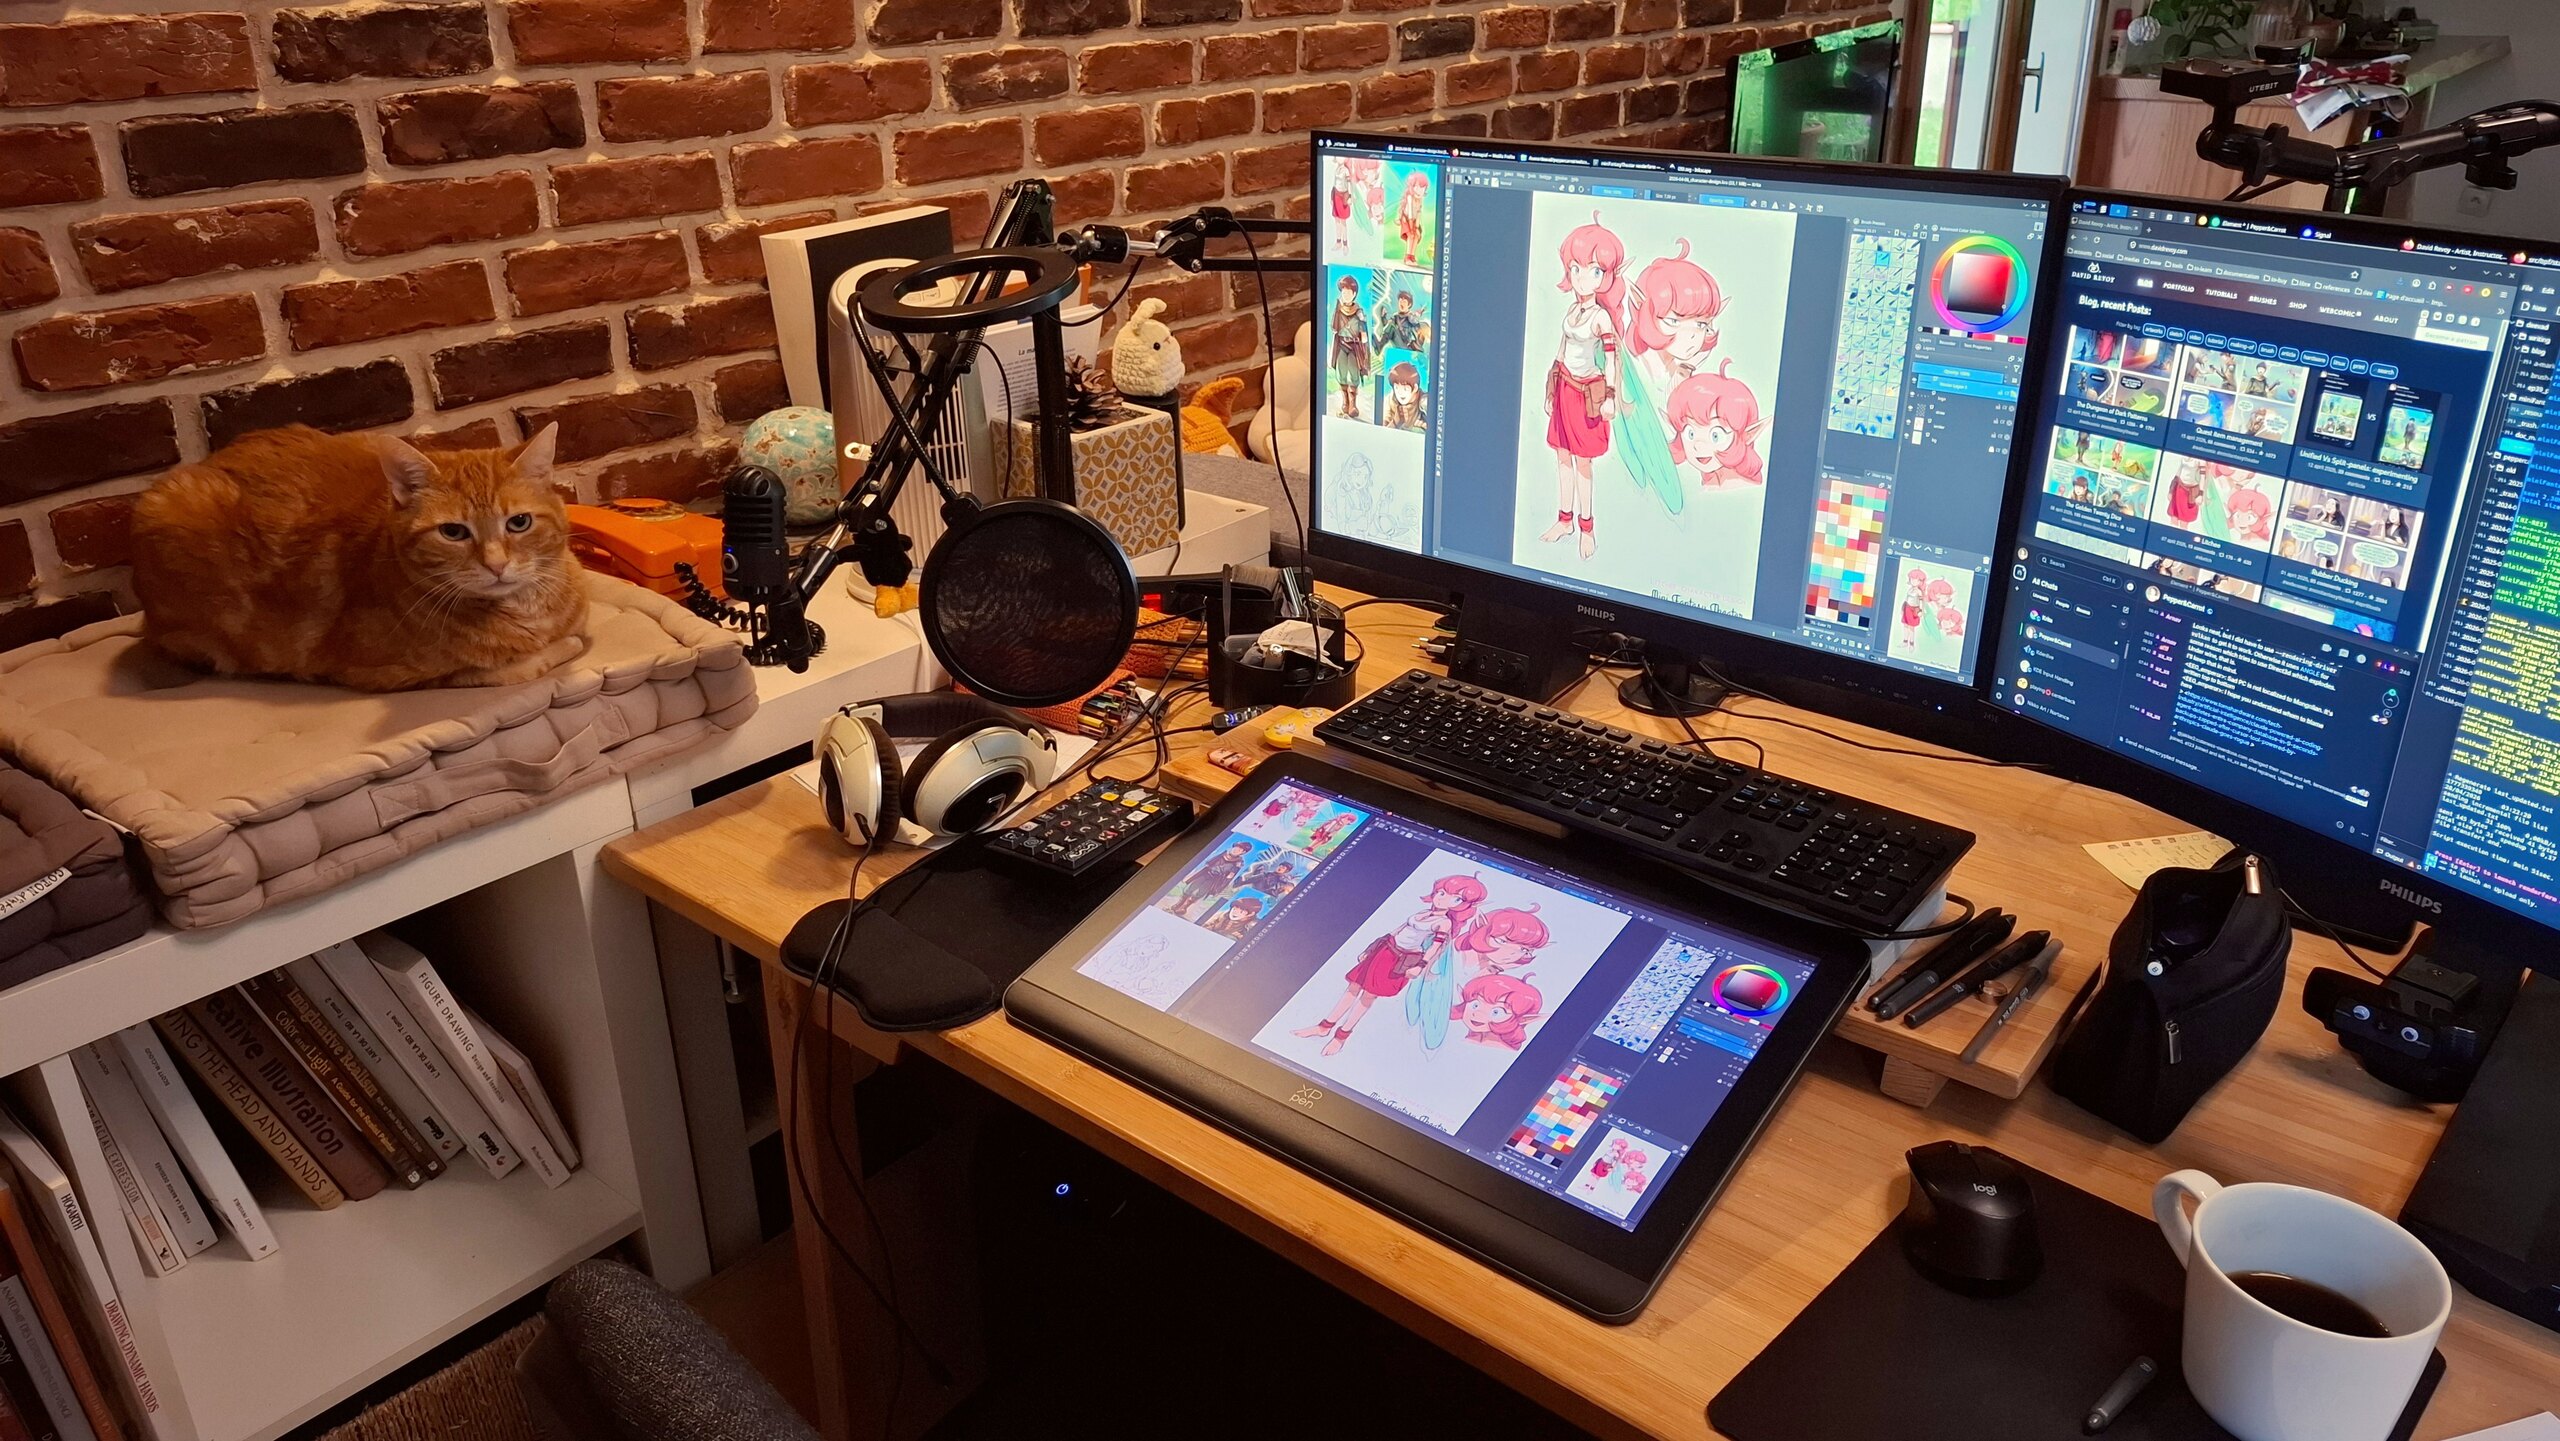
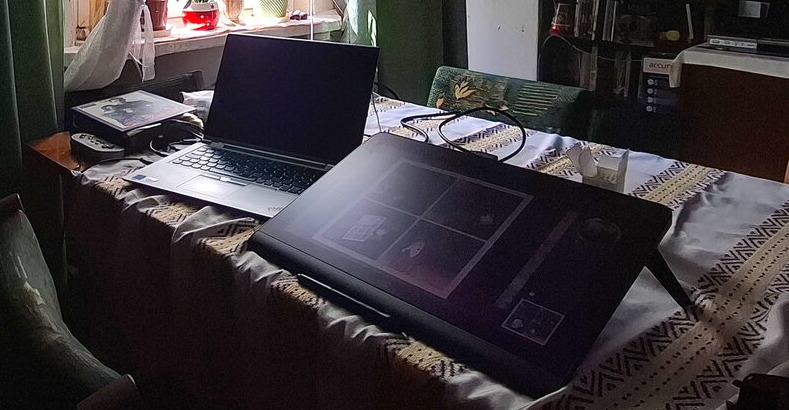
My main setup, with also the best co-worker ever
ℹ️ This page here is a temporary clone of the real page published davidrevoy.com while this one is overloaded due to its sucess (thank you). I hope this quick setup will help!
Disclaimer: this article was not written, prompt or proofread using AI/LLM. If my sentences are weird, and with typos: all my apologies. Blame the fact that I’m French and I’m mostly self-taught when it comes to English.
1. Introduction:
Hey, here is my new GNU/Linux Distribution Install Guide. It’s not a step-by-step tutorial, but a central hub with all the information, tips and links to replicate my setup. Sharing this is a tradition, I do that since 15 years.
And recently with proprietary operating systems adding more ads, surveillance, and AI features, many digital artists (graphists, painters, etc.) want to switch to GNU/Linux but struggle. This guide serves as a proposition I can share when helping other professional digital artists (comic artists, digital painters, concept artists, graphic designers, game developers, illustrators, etc…) who often have:
- High-end workstations (with multiple monitors)
- Drawing tablets with styluses they need to customise
- Colorimeters and color management requirements
- Cameras, microphones, for video and streaming content
2. Interim?
A. After years of broken Wayland distro for artists
We are in the aftermath of what I called last time the largest GNU/Linux regression for artists, graphists and painter I ever see over my last 17 years of GNU/Linux daily usage. Every distros and major Desktop Environments moved to Wayland, but without porting the tools I used for my drawing tablets and color management in the process (read: the three major problems from 2024 to know more).
That’s how I spent the two last years, in a strategical retreat move, on Debian 12 KDE 5, Plasma X11, the distro of my previous guide. There wasn’t many options around and it wasn’t really user friendly to install. During this period, I even personnaly assisted to more than three long date GNU/Linux artists and contributors who prefered to go step back …to Ms Windows. I also don’t count the emails, the comments I received, the DM of artists who wanted to migrate their process in this mess.
So, fortunately, with this Debian 12 Plasma 5 X11, I had my little corner of happy place and documented and shared it. Once setup correctly (not that easy), Debian 12 was a wonderful and peaceful operating system, based on old but robust technologies. It allowed me to use 2023’s “frozen in time” technology for two more years, just before the big mess. I had a really good time and could be productive with a new long Pepper&Carrot episode, many video tutorials and reviews, and a new weekly comic series. Not bad!
Unfortunately, this distro couldn’t be maintained forever, and with its end of life in june 2026, I had to move to a new distro.
B. A brighter future
But over the course of this two last years, the drawing tablet and color management situation on Wayland/Plasma became brighter, thanks to the incremental efforts of a hand full of contributors.
But to use those new features of Plasma 6 on Wayland, we have to switch to the latest Plasma releases, and move to an unstable territory. That’s why I put “Interim” in the title. I know this KDE Neon solution is not a durable one, and in itself, a workaround. Each big update will be a risk. In one month, this Linux Distribution might become worst than what I share in this guide, or better.
This is a sketchy guide compare to the previous one. I don’t recommend this guide for video game and movie studios or classrooms for this reason. But among everything I tested… It was the ‘less worst’ choice. So, expect some paper-cut, things “not ready” and mega workarounds in this KDE Neon User Edition guide.
Maybe later, far later, by summer 2027, a Debian 14 KDE will become the new perfect stable distro. But until that, I’m really happy to finally move to 2026’s GNU/Linux tech and be able to propose a guide. I also now see my future with hope in this ecosystem.
A big bravo to the Wayland, LibInput, Plasma and Krita teams for reaching this achievement.
3. Why KDE Neon User Edition:
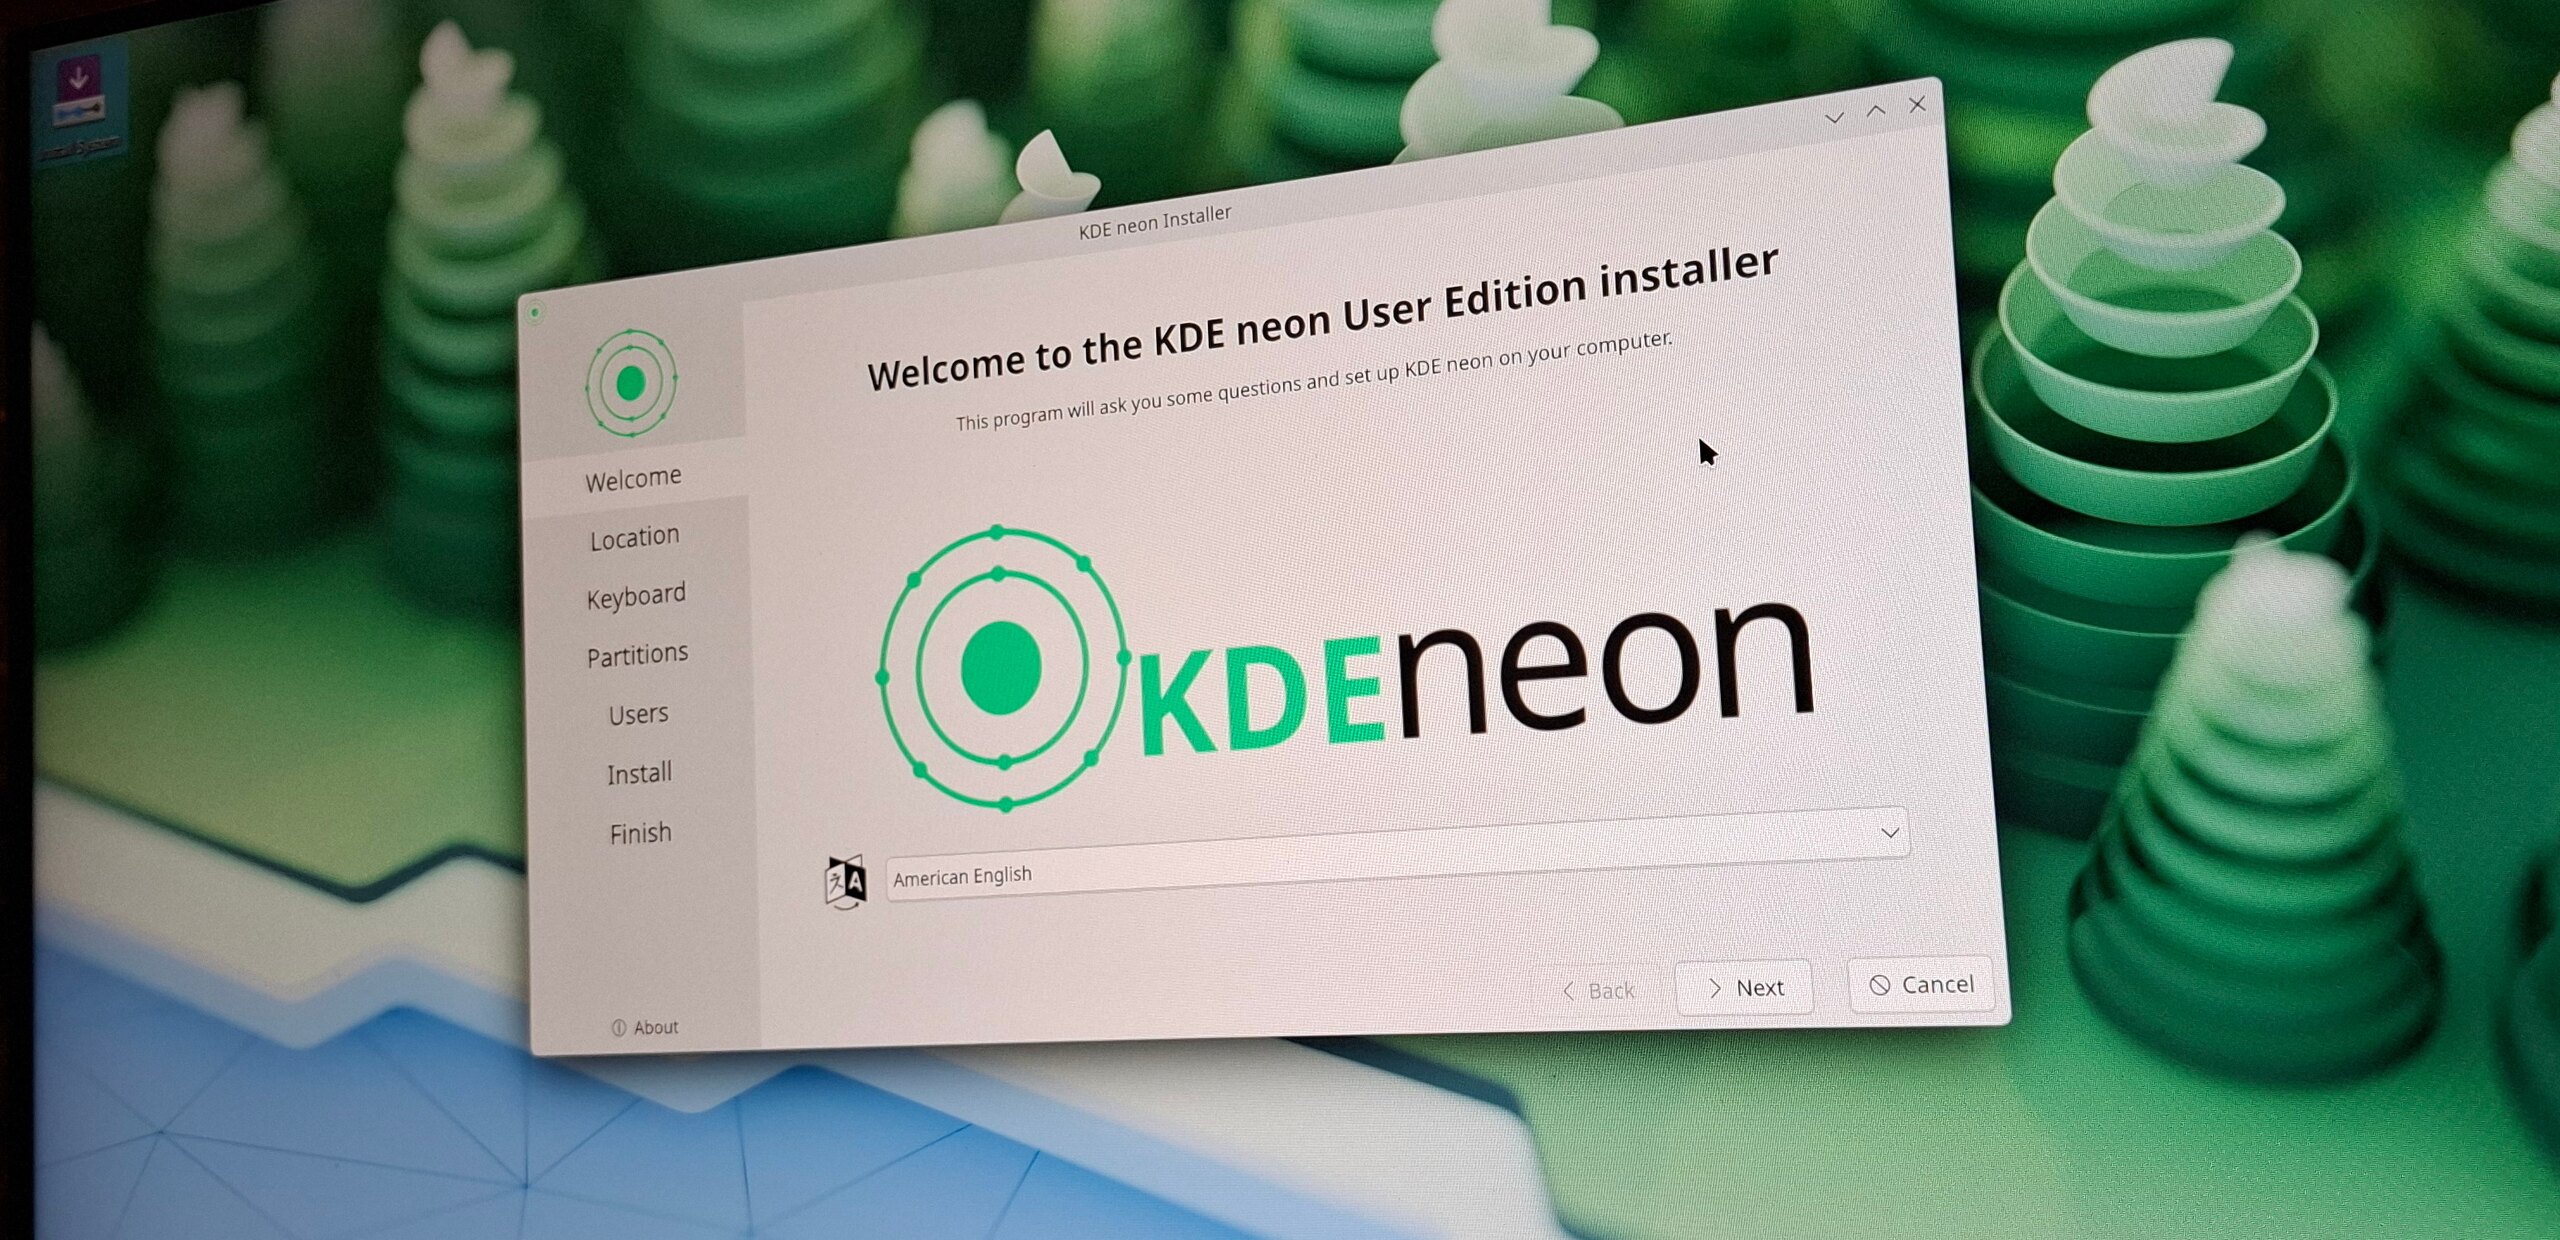
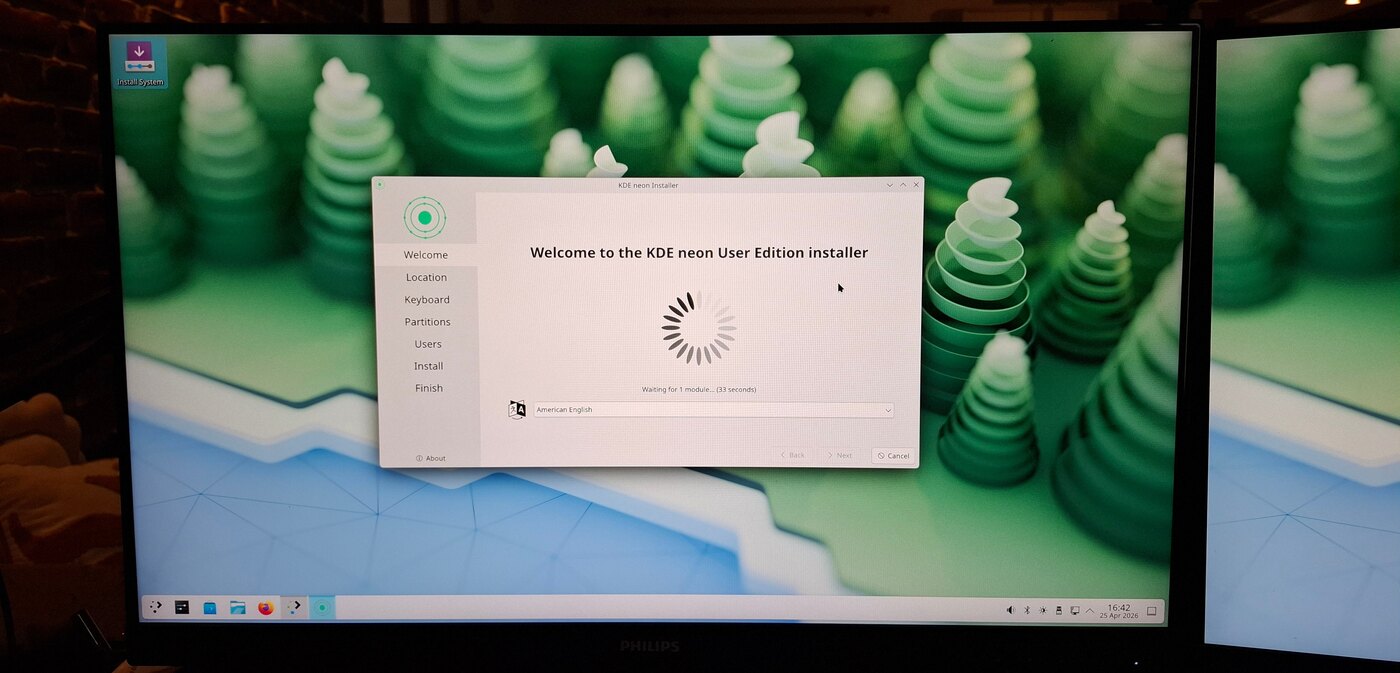
Kde Neon User Edition logo splash screen during the install
process.
A. Requirements
I had to find a distro with these requirements:
- KDE Plasma 6.5.4 or above: For fixes in the tablet interface and color management in symbioses with Krita (src: Plasma changelog, Krita 6 prerelease).
- A Kernel enabling BPF: For installing udev-hid-bpf, with drivers for many drawing tablets.
- Stability: It’s for a workstation: setup once, then get update for security or bug-fix release.
- User oriented: A distro that care for the users: nice installer, drivers, firmware, and a large ecosystem of package selection.
- Ethic: A project that has a Code of Conduct, not centered on X, LinkedIn, Github, or Discord servers and a LLM/AI ban policy, or not forcing a tech (eg. Snap) on user.
B. A long phase of testing
Unfortunately, on the landscape right now, I couldn’t find something 100% compliant with my list… I tested:
- Debian-Testing KDE: Stability issues, a too crude installer and webpage, and a long post-install process (eg. replacing Firefox ESR, install Flatpak, etc…), nothing came ready out of the box. No real AI ban Policy.
- Kubuntu 26.04 LTS: Snap centric imposed, openly advertise AI usage.
- Ubuntu Studio 26.04 LTS: Idem, snap centric imposed, openly advertise AI usage.
- Fedora KDE: 6 month semi-rolling, break things and move fast philosophy, openly advertise AI usage.
- KDE Linux: Rolling but immutable, alpha installer/webpage, every user apps have to be Flatpak. No real AI ban Policy.
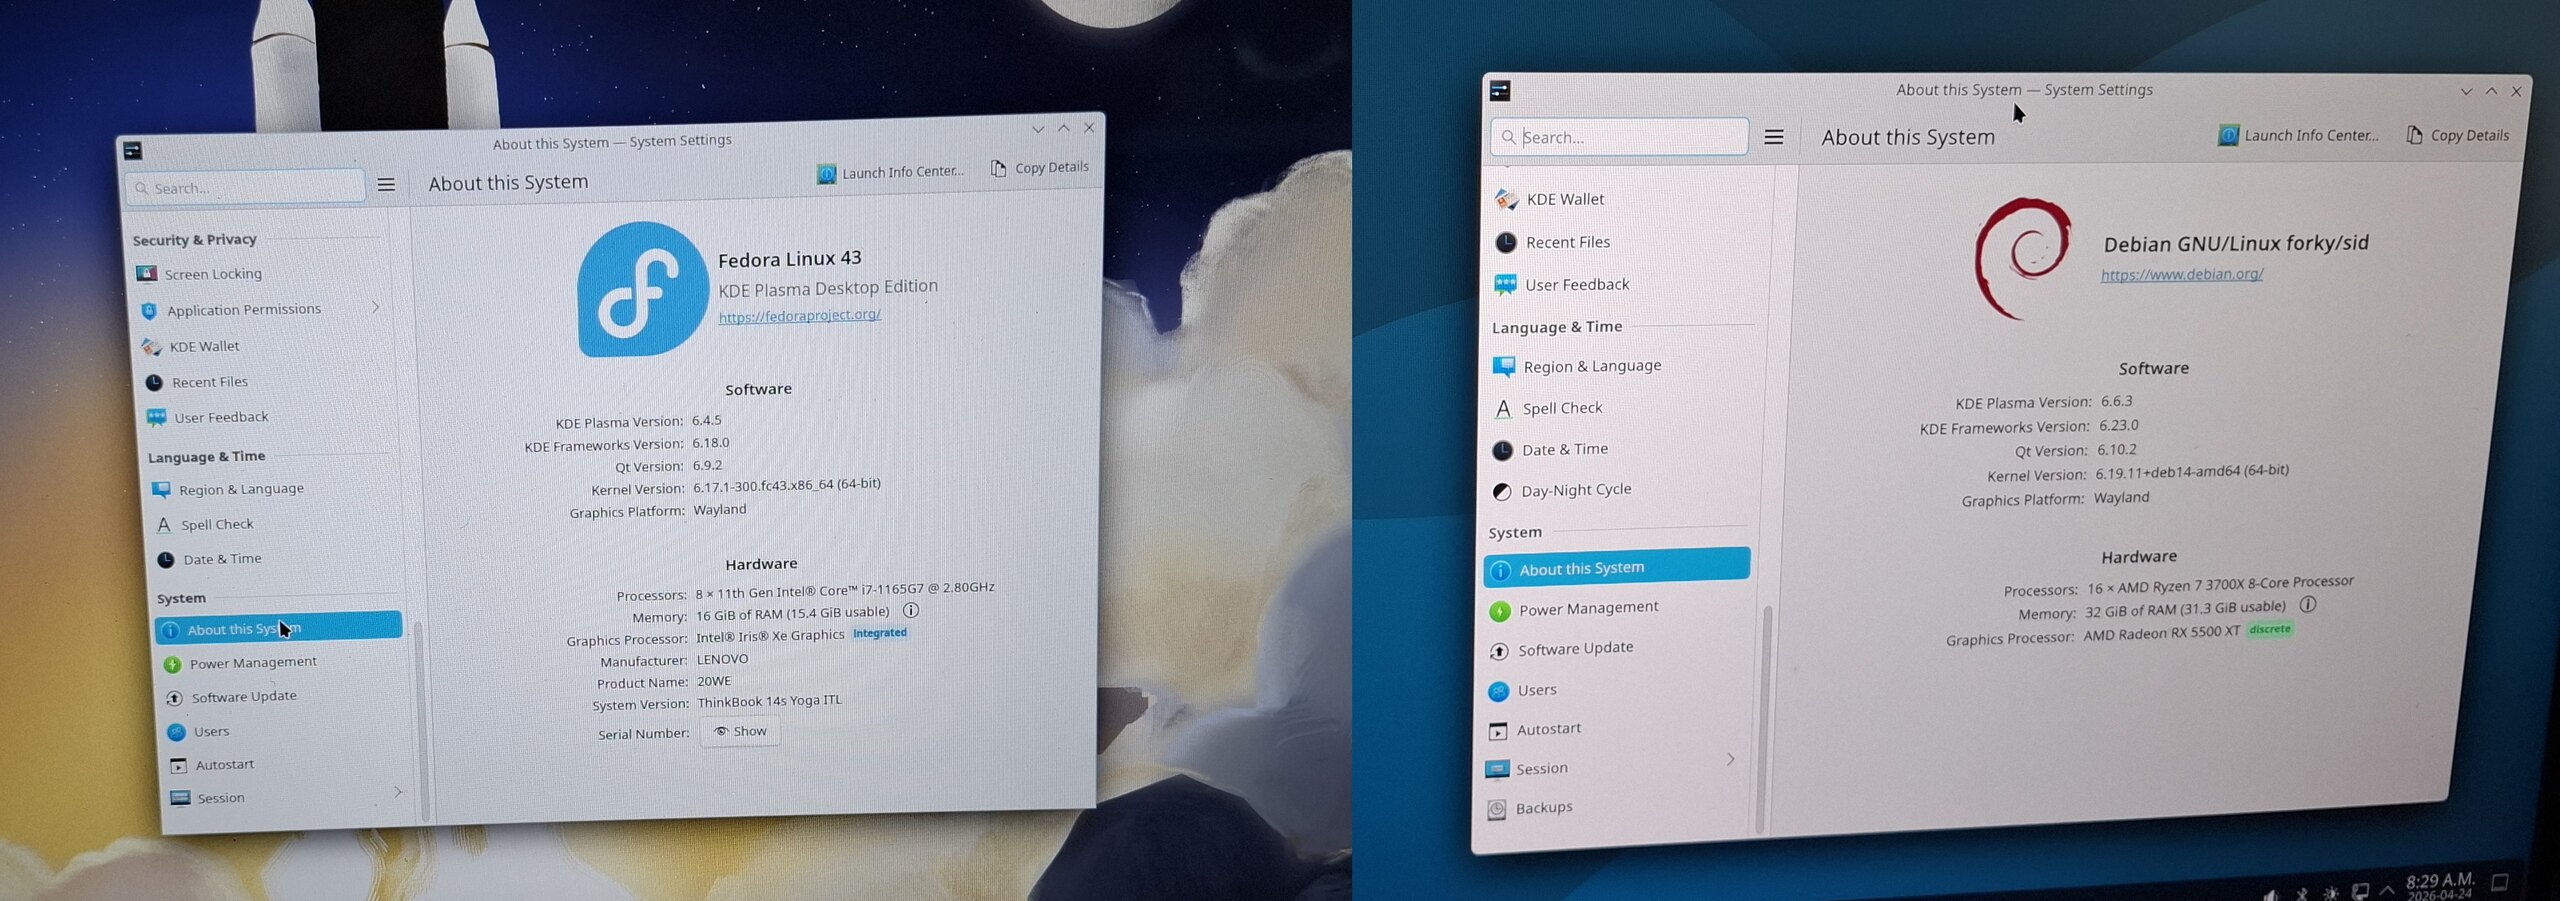
Fedora 43 KDE and Debian Testing KDE are probably the one I tested
the most.
C. Compromises
I finally came to KDE Neon UE after accepting these compromises:
- Compromise on ethic: KDE Neon UE is built on top of the Ubuntu ‘noble’ 24.04LTS (Noble Numbat) ecosystem, and Cannonical is openly pushing AI. Meh. At least, it’s not a pure Canonical product and usage of Snap is optional on it. Also KDE not yet has a real AI/LLM ban policy.
- Compromise on stability: KDE Neon UE receives each new release of the Plasma desktop environment. It’s not frozen to a specific version: you’ll have novelties, and with it, probably new behavior you dislike or bug you don’t expect. Following “This week in Plasma” is a good idea.
On the bright side, KDE Neon UE has simple website and installer, and a user friendly approach in general. You can add to that a large compatibility with hardware like graphic cards, scanner and printers because of the 24.04LTS ecosystem. Also plenty of online documentation, workarounds and resources, and, cherry on the top of the cake, a default kernel that can run udev-hid-bpf.
Around October 2026, KDE Neon User Edition will probably propose an upgrade to the new 26.04LTS ‘Resolute Raccoon’ (supposition, based on the previous release schedule compared to LTS releases). I spied a bit the upgrade process of the previous versions, and it felt user friendly enough to not worry about this future upgrade.
But I’m not eager to try the 26.04LTS ecosystem, especially when I read here and there that you can’t draw on Krita with it. It sounds too new and buggy.
4. Hardware
A. General recommendation:
PC:
If you are brave enough to buy a computer in the current economy, here are my recommendations for the minimum machine that can paint well with Krita on KDE Neon.
- CPU: something above 10,000CPUmark, most important: 2500 single ( check CPUmark: https://www.cpubenchmark.net )
- GPU: something above 2600 GPUmark ( check GPUmark: https://www.videocardbenchmark.net/ )
- Avoid Nvidia GPU: They are still problematic on GNU/Linux, you’ll save headaches and bugs.
Also, know that many high-end machines of around the year 2020 are still valid today, so check the second hand market (refurbished products). You’ll also contribute to reduce the production of e-waste this way.
Drawing tablet:
I recommend here also the second hand market (refurbished products), especially of the brand “Wacom”. That’s because all models, older than a year and within the last 10 years are well supported ‘out of the box’ on GNU/Linux. Plug and play to say so.
About the type of model, if you begin, a non display tablet A5/Medium size will be perfect. If you want to draw on a display: a 13” or 15” will be good enough for a first experience.
For cheaper brands, like XpPen, Huion, Gaomon, prepare for having to tweak things to install them properly without having to use their proprietary software. And don’t think a ‘brand’ is fully compatible: some specific models of a brand can be compatible (I’m maintaining on my blog a “hardware” tag with them), but it doesn’t mean all tablets from a manufacturer are. Wacom is the exception because they share the specification directly with Red Hat. I’m working since years to get XpPen, Huion and Gaomon to so the same.
See the “Drawing Tablet” chapter for more info about the driver situation.
B. My hardware
a. PC Workstation:
- CPU: AMD Ryzen 7 3700X - 22,415 CPUmark (2655 single)
- GPU: Sapphire Radeon RX 5500 XT 8GB - 9073 GPUmark
- Motherboard: Asrock B450M-Pro4
- Ram: 4x8GB G.Skill DDR4 @ 3200Mhz
- Monitors: 2x Philips 245E QuadHD 24 inch 2560x1440, Color space ability: almost full sRGB.
- Drawing tablet: XPPen Artist Pro 19 (Gen 2), my review is here.
- Colorimeter: Xrite Colormunki Smile, got also a Pantone Huey Pro to compare.
- Webcam: Logitech HD 1080p.
- Camera: Sony Alpha 6400, connected with an Elgato CamLink.
- Microphone: Samson USB Meteor condenser.
See also the full article about it here.
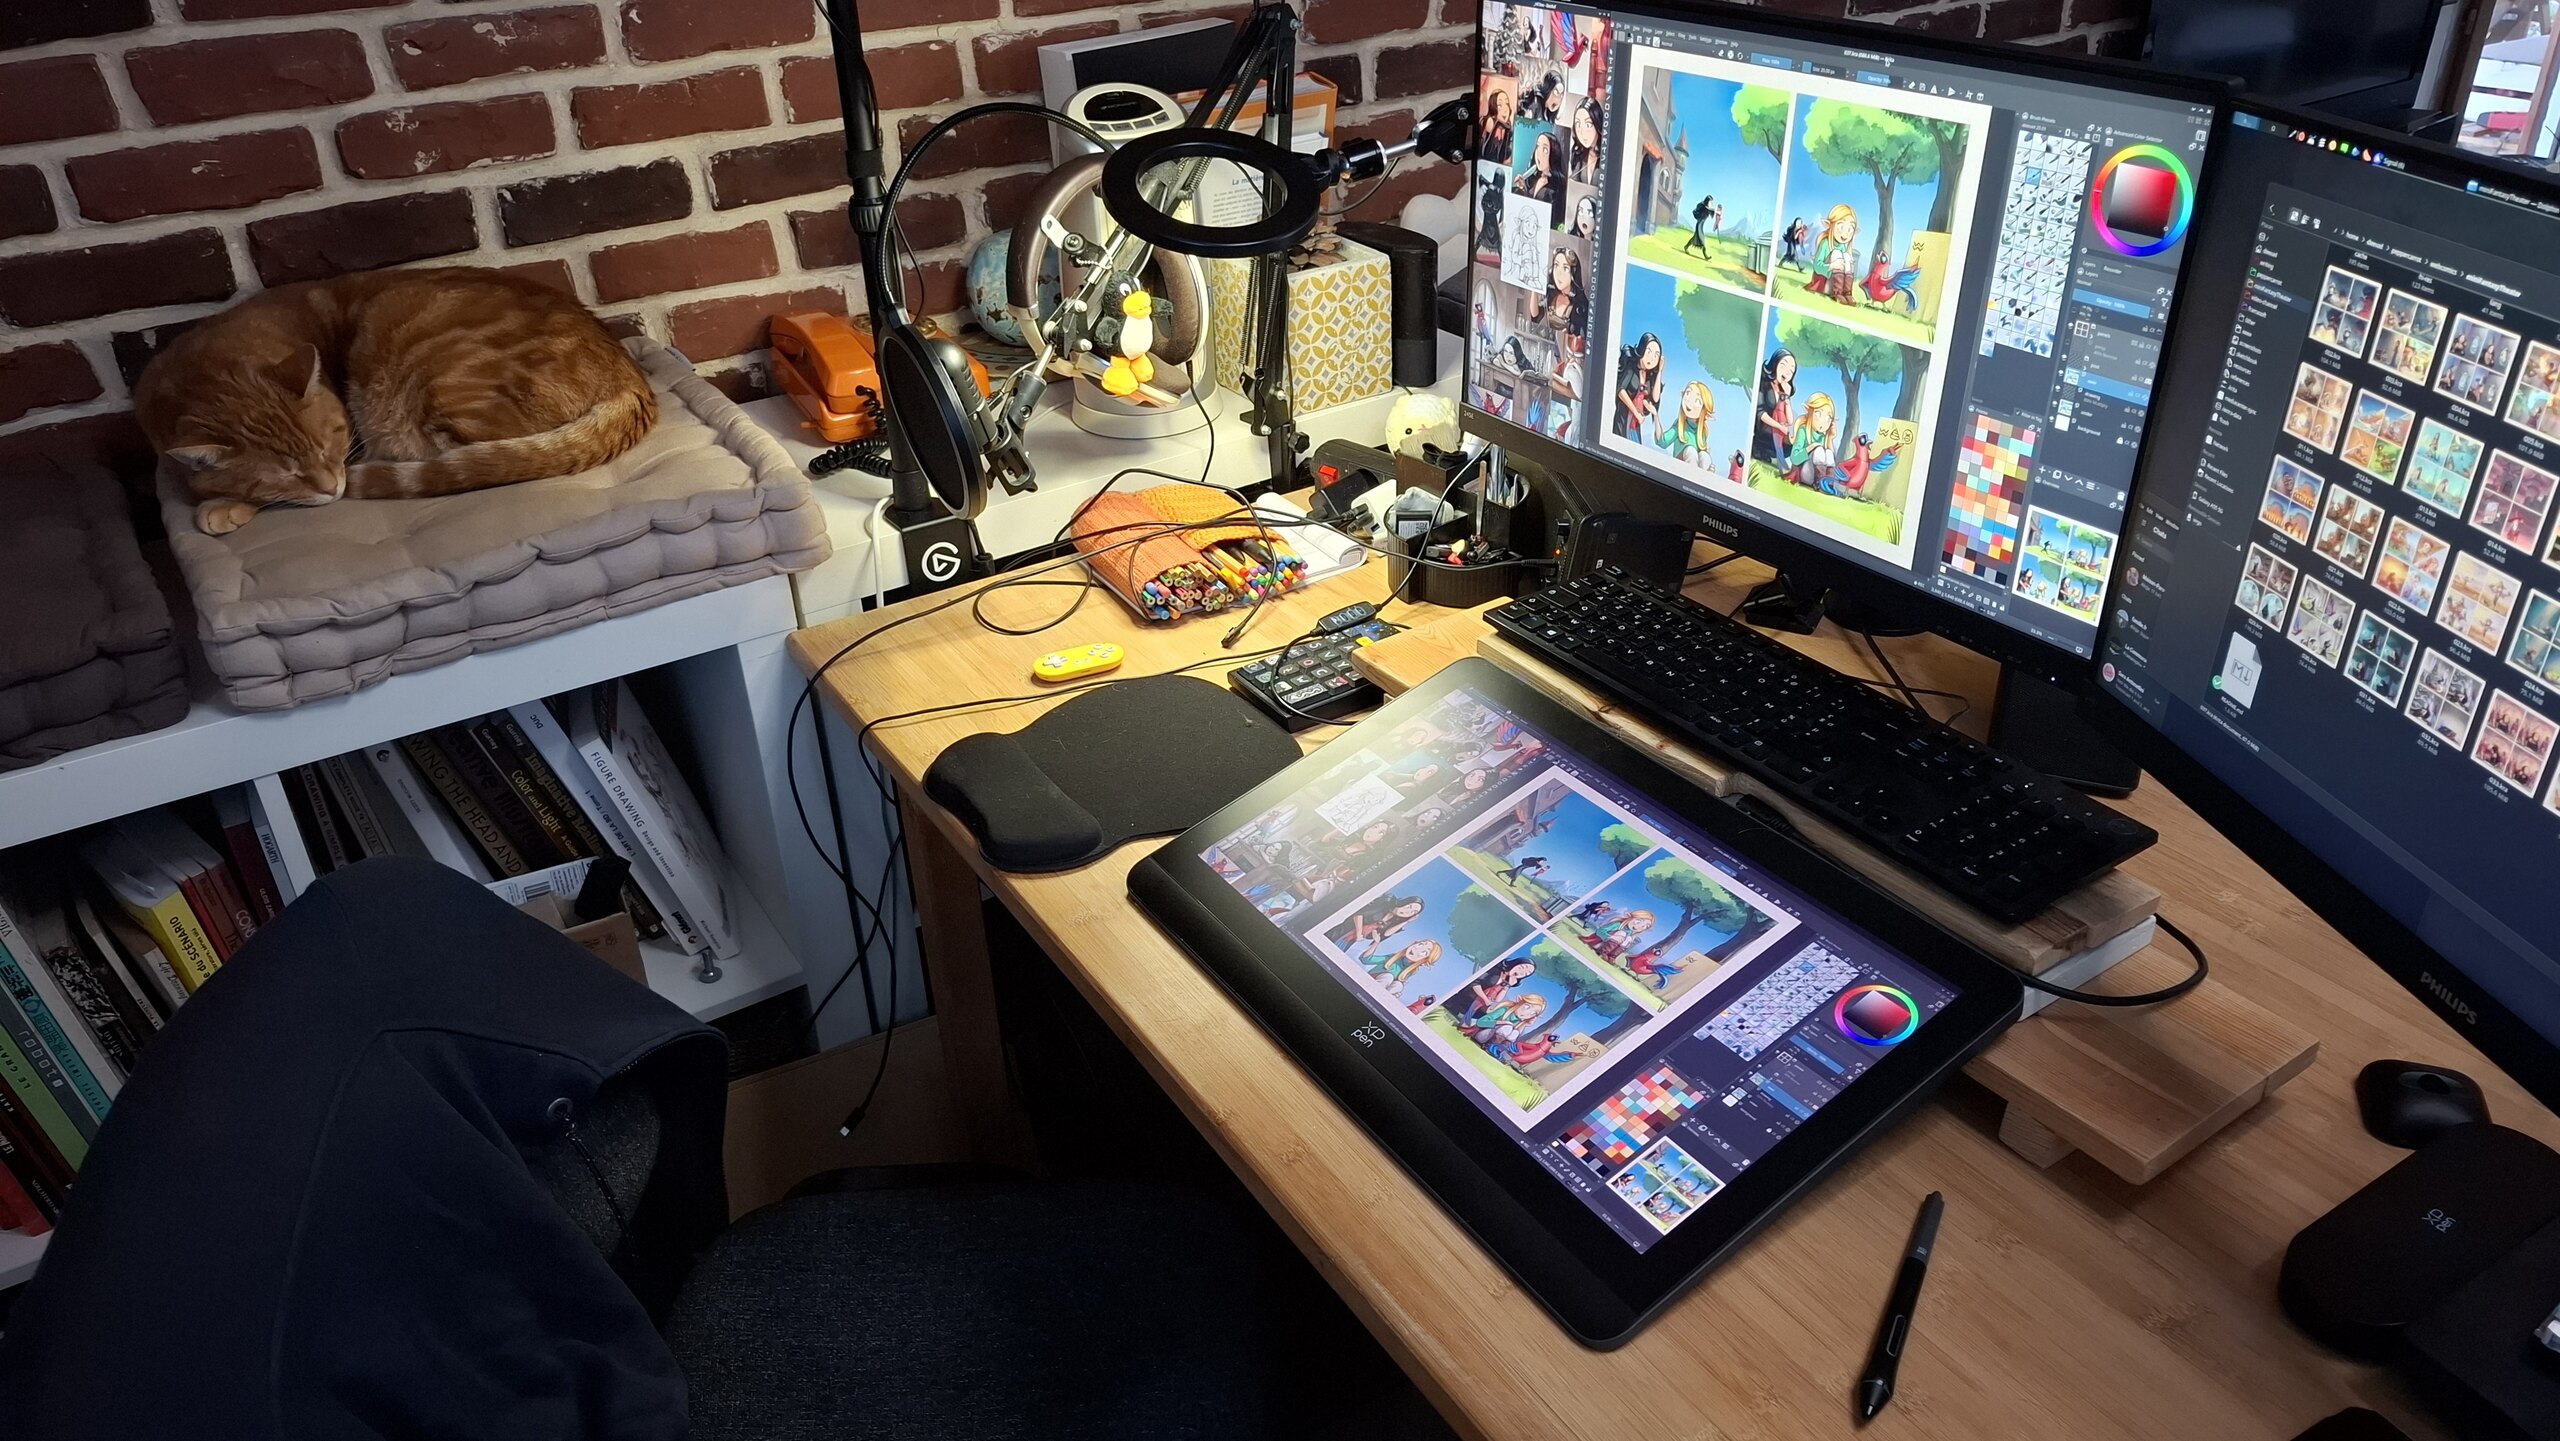
My PC in January 2026 during my weekly comic production (
MiniFantasyTheater ep37). Running Debian 12 X11 Plasma 5 at that
time.
b. Laptop:
For conferences, demo and travel, I use a Lenovo ThinkBook 14S Yoga
- Size: 320 x 216 x 16.9 mm, 1.5 kg
- Display: 14”, 1920 x 1080, touchscreen
- Thunderbolt 3 USB-C
- CPU: Intel Core i7-1165G7 @ 2.80GHz - 9,822 CPUmark (2731 single)
- GPU: integrated Iris Xe Graphics - 2610 GPUmark
- SSD: 1TB
- RAM: 16GB (unfortunately, the mem slot is soldered, bad in case of Ram issue but another slot is free)
- Drawing tablet: This laptop has a touch screen built-in, with a stylus AES technology (like my previous Lenovo Yoga 370 laptop) but I don’t like using it to draw. I prefer connecting to it, with a single cable thanks to the Thunderbolt 3 USB-C, my XPPen Artist Pro 16(Gen2). I made one weekly comic so far fully roaming. But it’s heavy on the backpack, and I usually prefer for demo and train a non-display tablet like my XpPen Deco 01V3, very slim and lightweight.
My mobile workstation: laptop and a XpPen 16 Artist Pro(gen2) while
traveling for event in family, August 2025.
5. Installation
A real user friendly installer! Finally! (not like in
Debian)
A. The Live/Intall Image
Download the Live/Install KDE Neon User Edition image here: https://neon.kde.org/download
For Windows users, you can find many articles and how-to, if you search for it. A short video like “How to Install KDE Neon” by Gary Newell will give you the full overview. When you’ll boot the image for the first time, you’ll be able to test this desktop without installing anything, it’s live, running only in your RAM and your USB pen drive. Take advantage of this time to check what’s working, and what’s not. Check if your computer plays audio, videos, if your mic works, etc…
If it is your first time, I recommend to: - Do full backups on a external drive before doing anything. - Take a full day or afternoon for this step. - Take notes, and get another access to the web in parallel (spare tablet/laptop/mobile) to search terms you don’t understand.
Still too afraid? Do not hesitate to ask for help: local Linux user groups, Fab labs, install party… There is many opportunities to meet volunteers who are ready to help you.
B. My partition setup
For my partitions, I use the ‘manual’ partitioner part of the installer, it’s advanced and if you go this path, you better know what you are doing. But because this is what I use, I document it here. I do that on a 1TiB SSD drive:
- Partition 1: FAT32, 500MiB, mounted to
/boot/efi, the boot loader (more info here). - Partition 2: EXT4, 120GiB, mounted to
/, the operating system. - Partition 3: SWAP, 32GB (= the size of my RAM)
- Partition 4: EXT4, (all remaining space), mounted
to
/home, my user data.
Note: with the modern usage of Flatpak and their huge size, I recommend over 100GB for the system ‘/’ partition.
6. KDE Plasma 6
Konqi, the lovely mascot of KDE Plasma (CC By Tyzon Tan)
I used to say in this section “they are many defaults you need to change in KDE Plasma”, and then give a long list of settings to tweak. But KDE Plasma 6 really evolved in a good way in comparison to Plasma 5. The main menu, the default theme, the file explorer new default. My list is melting. Thank you KDE Plasma team.
A. Notable KDE Neon UE bugs
Here is a list of bugs that gave me a very bad first impression of the distro, some are workaroundable, some I can live with it:
- Persistant pop-up window preview or tooltip: when using a graphic-tablet bug 518549, Workaround: Go to the System Settings. Search for ‘General Behavior’ and disable the top checkbox in front of “Panel and widget tooltips” option.
- Can’t reboot after an update: All my ‘restart after an update’ triggered a grub menu and… a black screen. Impressive at first, I felt the update broke the distro. Fortunately, just forcing a shutdown (pressing button for 6 seconds) during this black screen and re-starting the PC boots normally. Apparently a known issue since more than a year, check discuss.kde.org thread.
- Choppy Audio via Bluetooth: if the audio is totally ruined on your Bluetooth headset or sound system, a workaround exists. bug 513536
- Bad submenus placements: Sub-menus of drop down menus are often blocking you in your menu selections bug 519429
(Note: due to the ‘rolling’ nature of Plasma updates, this section might become obsolete soon. Please visit the bug reports linked to see their status.)
B. Notable improvements VS Plasma 5 X11
After two years of Plasma 5 X11, here are the main improvements (within the scope of my activity) that would give me a hard time to go back, now I tried this:
- Image selection in Dolphin (File Explorer): The selected thumbnails of a selected image used to turn totally to a camaieu of the ‘color accent’ of the theme. It was problematic for multiple reasons. It is now fixed with just an outline decoration around the selected image (I’ve been struggling with this for more than a decade!)
- Persistent tablet settings and ICC color No more need for a custom bash script that was handling the loading of Drawing tablet preference (xsetwacom on X11) or argyll’s dispwin for Color Management! KDE Plasma 6 auto handles with success the loading of drawing tablet settings and color management preferences, even after sleep or hot plugging a device. A life changer.
- Smooth animations Wayland improvements I guess: kwin is super smoother in general.
- Dolphin (file manager) velocity: I have directories with thousands of items, new Dolphin browse them almost instantly compare to my old version. I also don’t feel slow down or bottle neck before copying a lot of files, or deleting ones.
- Spectacle (screenshoter) options: You can now annotate, draw arrows, underline directly after taking a screenshot.
- Calibration of Pressure Range: You can now put a range for the calibration of the pressure on the stylus, more on that later.
- Dolphin’s new batch file renamer: Select mulitple files, press F2 (or right-click > Rename) and get many new options to rename group of files: prefix, substitution of pattern, etc… So powerful!
C. Theme and screenshot gallery
Breeze, the default theme in Plasma 6, contains some blueish hue (especially in the dark variant). It’s a problem for working on color balance, as this hue will influence your eyes when painting or doing color grading decision. That’s why you’ll need a neutral grey interface. Yes, it looks boring, but your artworks and thumbnails will quickly color your operating system: not the reverse.
Installation: You’ll find for each section of the System Settings under Color & Themes, an icon “Get New” (top-right). Click on it. Then search for the name of the theme I write under here, press ‘install’ and done:
- Plasma Style: Unity-Plasma, I like how the flat black for task bar merges with the edges of my screens.
- Colors: OrchisDark (or Unsaturated Dark Plasma) are both great, I also use the edit icon (over the thumbnail of the theme) go to Options, and reduce the “Frames and Outlines” Contrast to 10%. Save, and Apply. I use also a custom color accent: #4a90d9
- Windows Decoration: on the top, tab named “Configure Titlebar Buttons”, remove the icon on the left of the title bar.
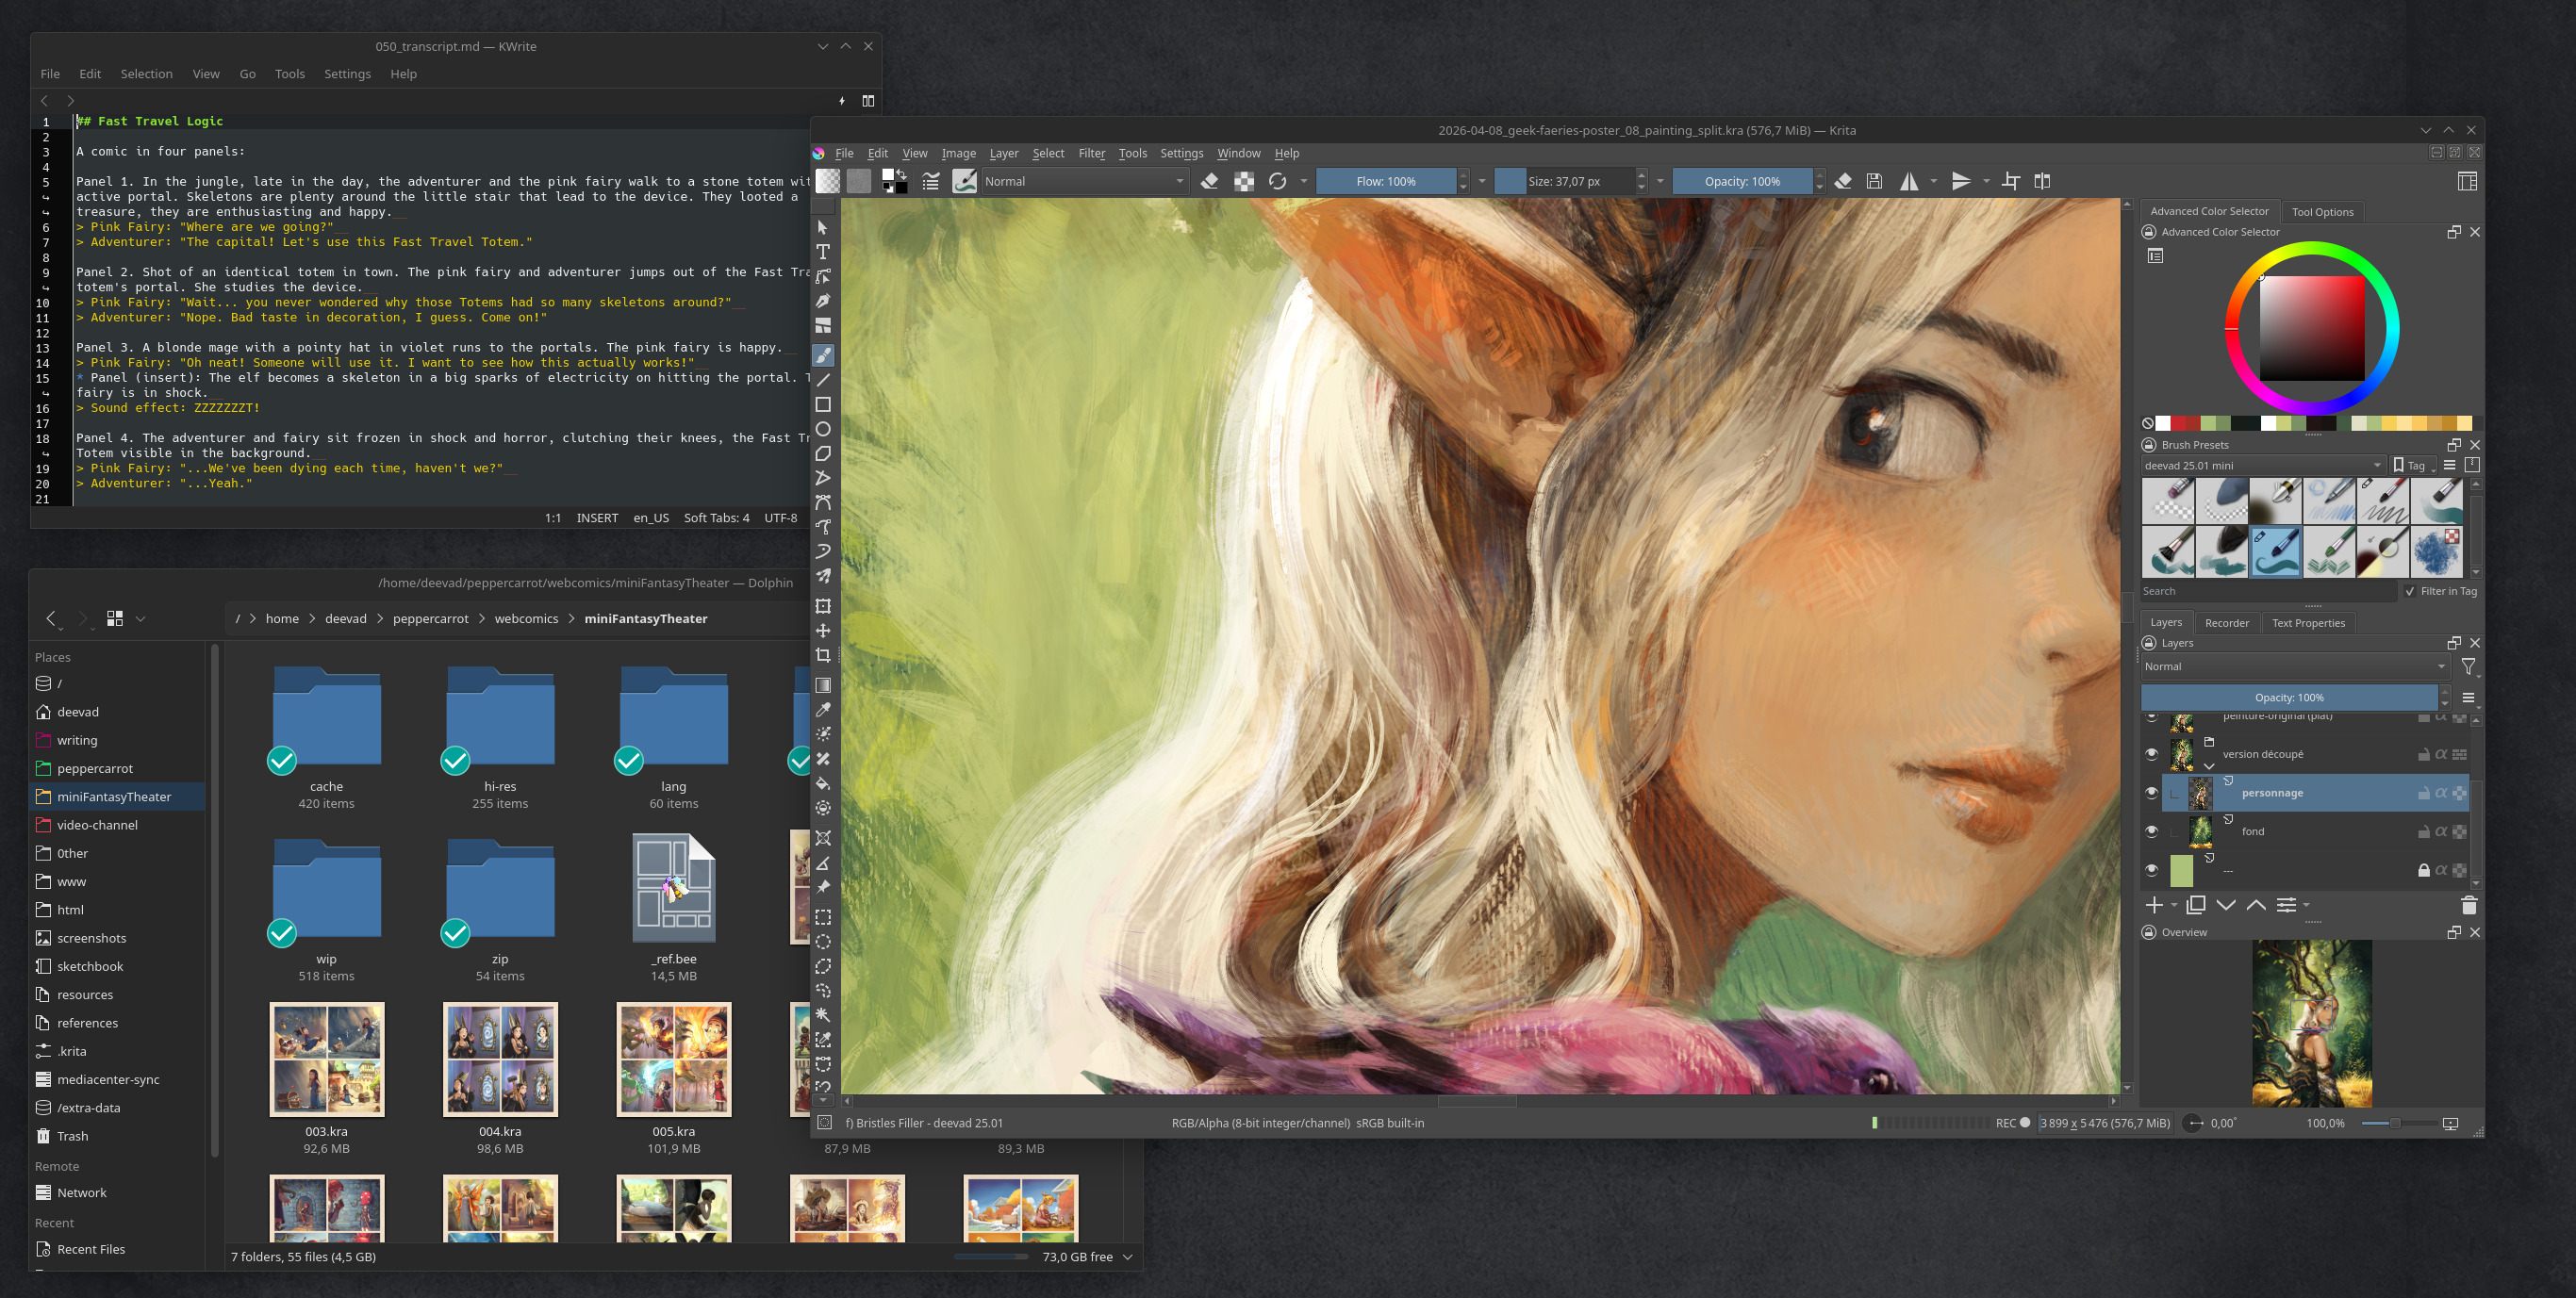
Gallery 1, screenshot of my install: Krita, Kate, Dolphin
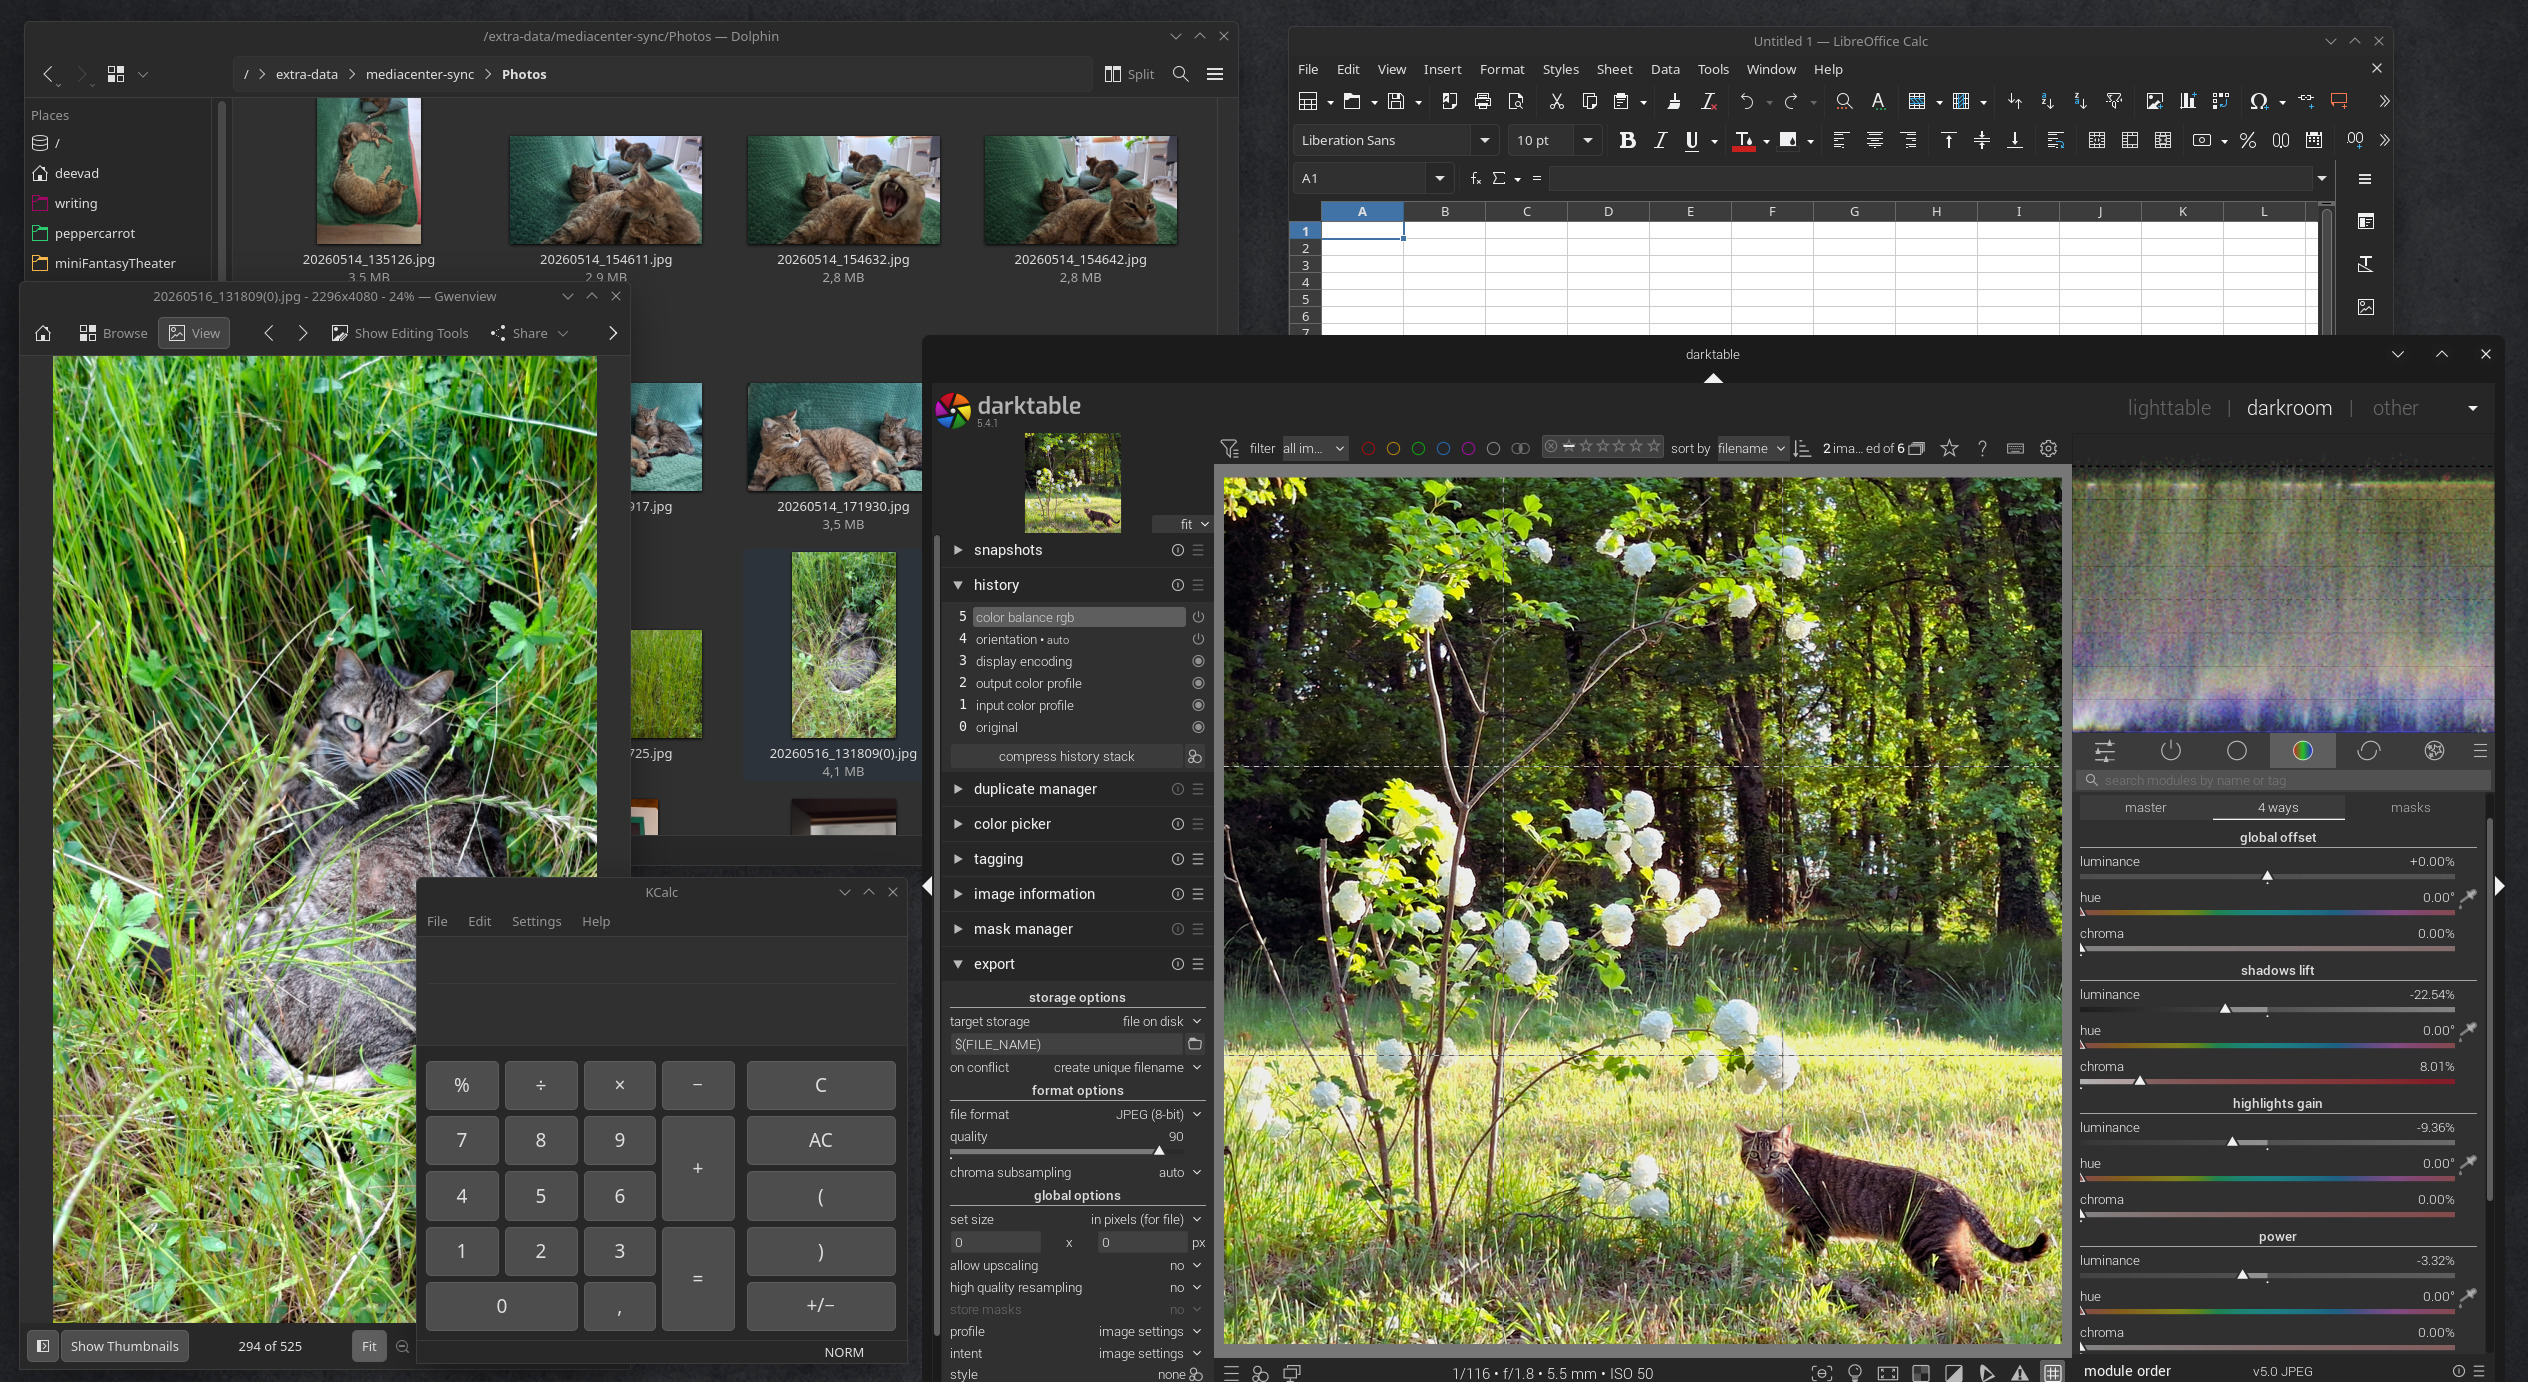
Gallery 2, screenshot of my install: Darktable, Dolphin, Kcalc,
Libre Office Calc
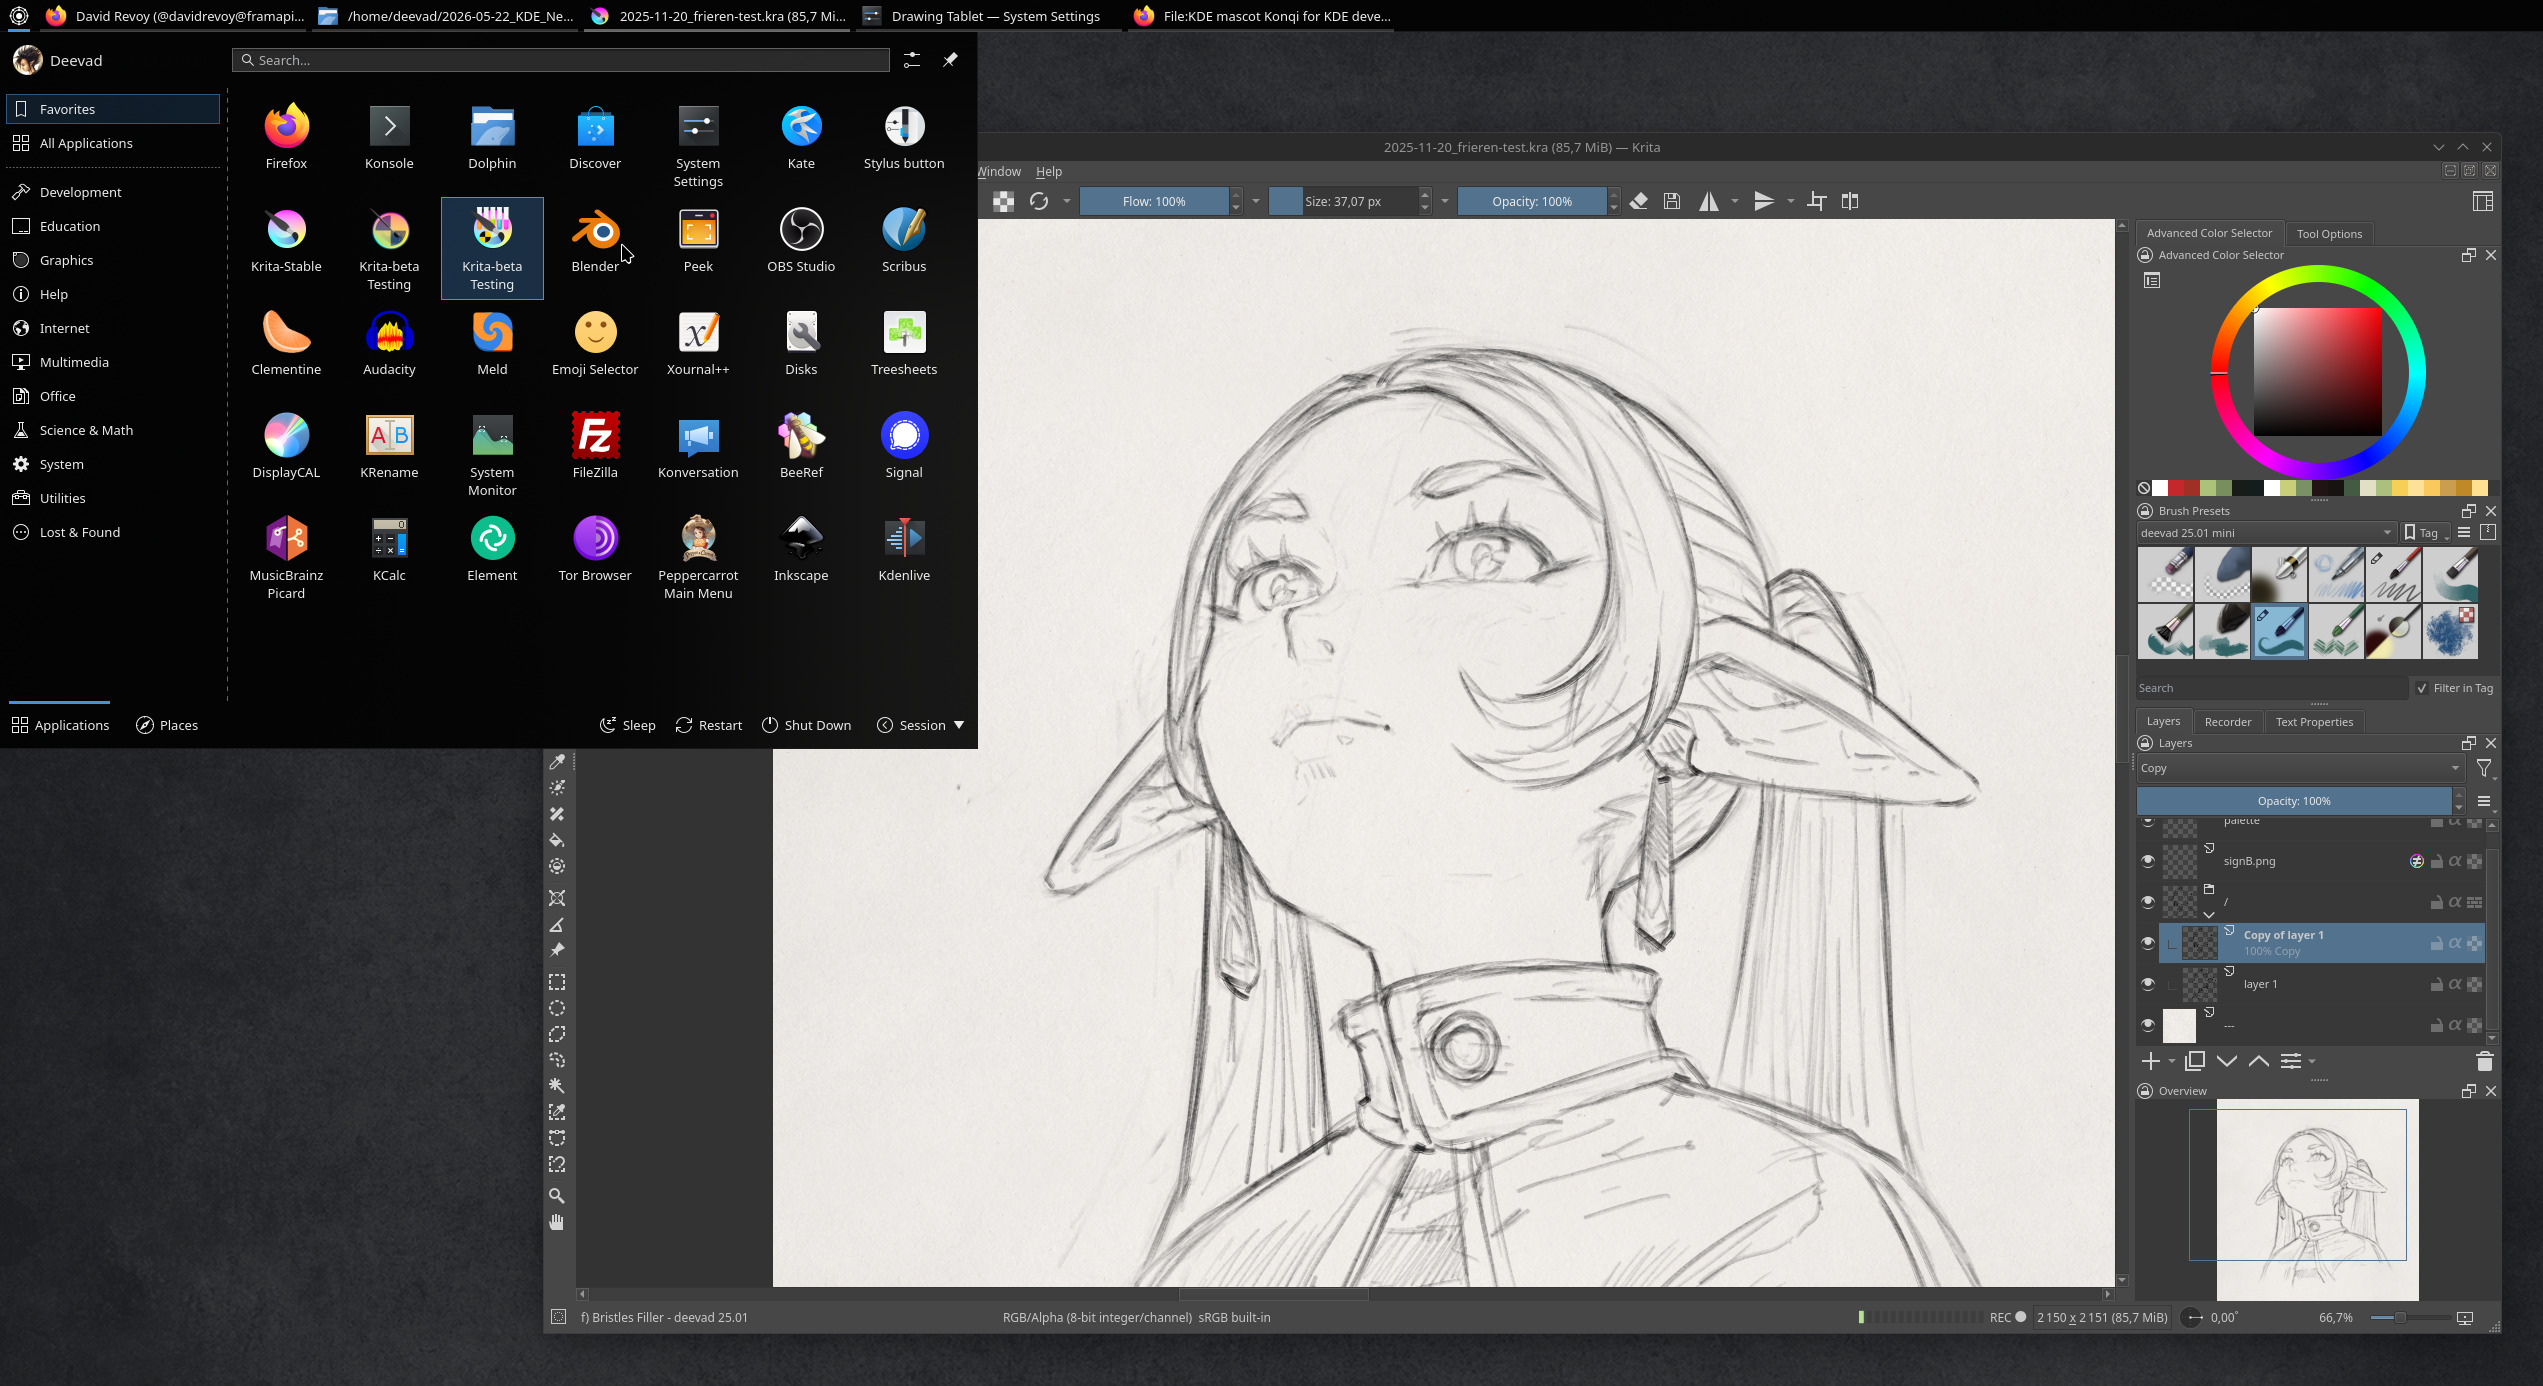
Gallery 3, screenshot of my install: Krita Frieren challenge and the
main KDE menu
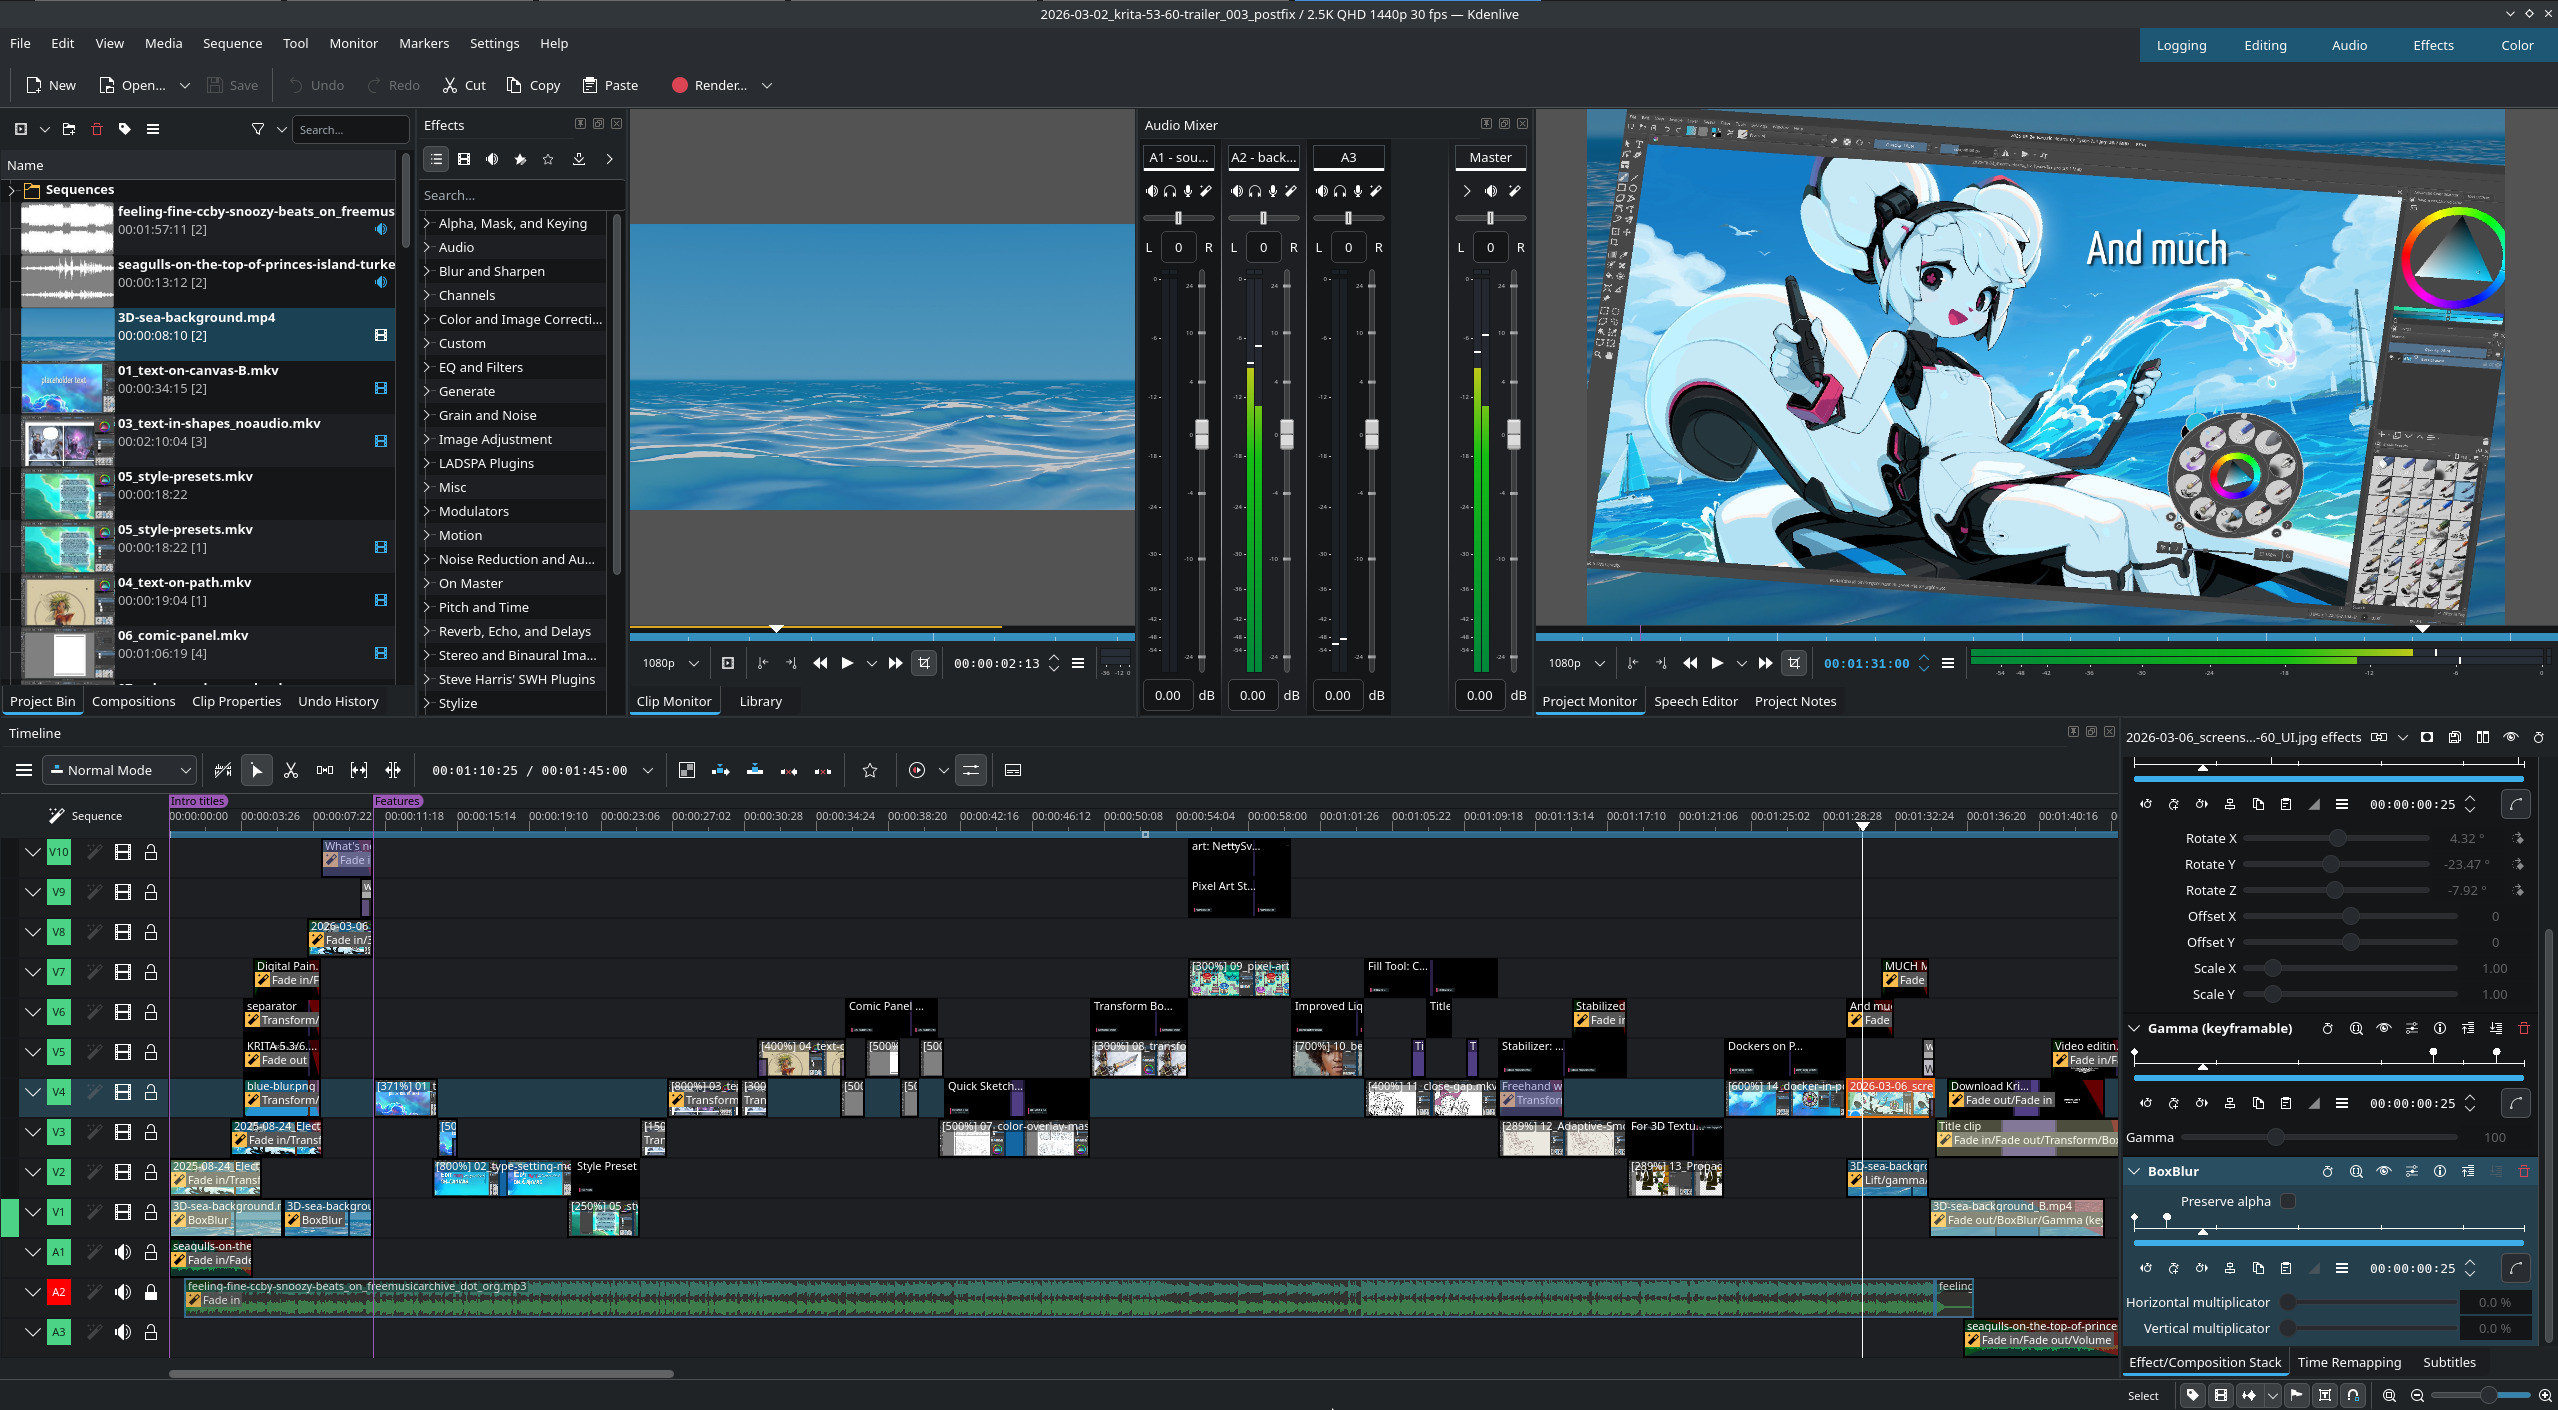
Gallery 4, screenshot of my install: Kdenlive while editing Krita
5.3/6.0 trailer
D. Adjustments
a. Don’t auto upscale
Ok: I understand it: with Wayland and scaling factor now a thing, the desktop environment will try to guess an automatic scaling factor depending of the resolution in pixel and size of your monitor. If you have 4K pixel width crammed into a 13inch display, this upscale make sens, but if like me you have 24” QuadHD (2560x1440px), you can enjoy having a lot of sharp and small user interface on your screen. Especially useful with Blender, Krita, and Kdenlive where having a lot of room for many dockers on their user interface is a clear workflow advantage.
System Settings > Display & Monitor > Display Configuration > Scale: 100%.
b. Don’t “edge barrier” on multi monitors
If you have multiple monitor, you might feel like a new weird behavior of Plasma 6: the mouse will get stuck at the edge of the screen, a magnetic resistence to move to the other screen. Before this change was introduced, it was smooth. I’m not sure what was the motivation or what this new default is supposed to fix, but it’s annoying as hell. Fortunately, a setting exist to remove it.
System Settings > Display & Monitor > Screen Edges > Edge barrier: set it to None (you have for that to turn it to 0).
c. Don’t darken the parent window
In many situations, Plasma will darken the entire interface (grayscale, turns it black and white) when a modal dialog pops up. It can be a file manager to open or save a file, or any dialog that needs your attention. While I understand the concept, it’s often counterproductive: because many of these dialogs can still be related to the information you need to access and read in windows that are ‘shaded in the background’ (especially when you need to color pick the parent window). So it is better to remove this effect.
System Settings > Windows Management > Desktop Effect > Uncheck “Dialog Parent” in “Focus” subsection.
d. Disable the hot corner
By default, you can ‘hit’ the top left corner of the screen with your cursor and Plasma will go into overview mode. I never like this behavior.
System Settings > Display & Monitor > Screen Edges > and set the little white square to “no action”.
e. Dolphin’s thumbnails
A lot of thumbnail previews are enabled by default but you can activate more on:
(Dolphin) Burger menu > Configure > Configure Dolphin > Interface > Previews
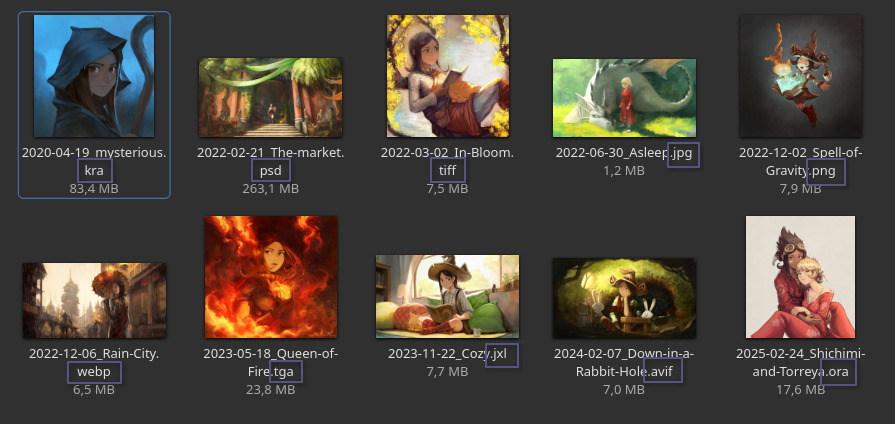
Dolphin’s thumbnailer: a lot of image format supported!
For the directory thumbnail, I have another personal preference than the default: I dislike the four little thumbnails on top of directories that symbolize the content of it. I find it visually messy, and the four files picked rarelly represent well the content of my directory. To disable them:
(Dolphin) Burger menu > Configure > Configure Dolphin > Interface > Previews, and uncheck “Folders”.
Last, I work with Git repositories for everything on my comics, and I love to see the changed files, up-to-date files with emblems directly in Dolphin. To install this:
sudo apt install dolphin-pluginsThen:
(Dolphin) Burger menu > Configure > Configure Dolphin > Context Menu > check “Git”.
A git project I have with emblems in Dolphin: super useful to manage
versionning.
f. Misc
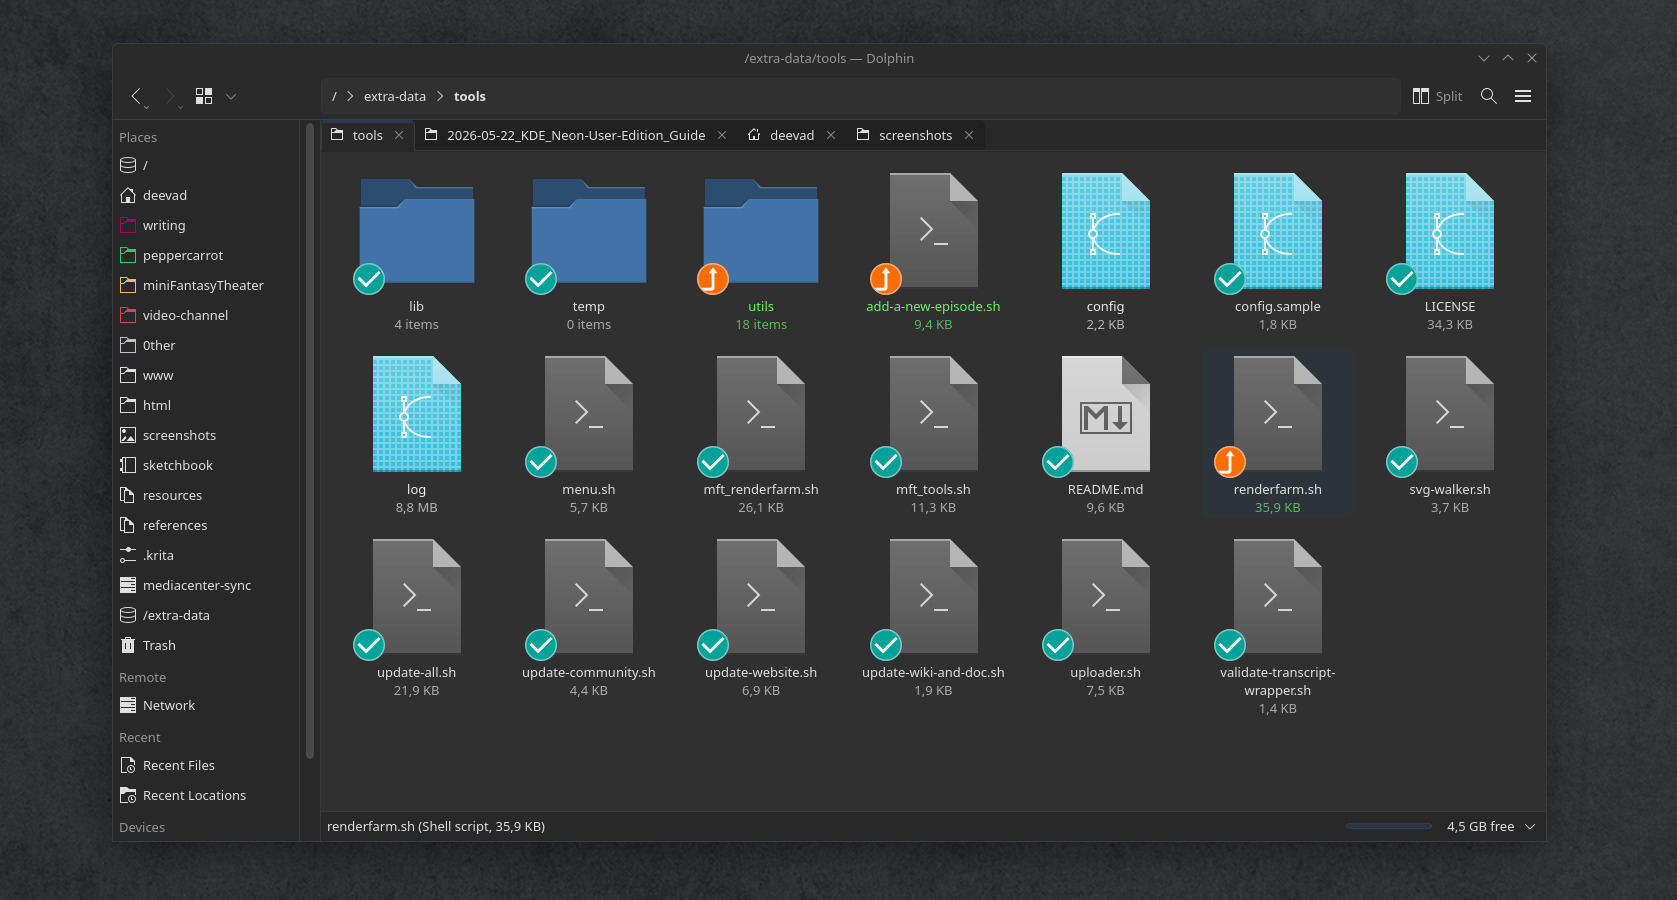
If you had on Plasma5 many scripts as Dolphin services like I had
located on ~/.local/share/kservices5/ServiceMenus, they
moved to ~/.local/share/kio/servicemenus and you’ll have to
move them manually.
Reference: Official service-menu documentation
7. Color management
A. Create an ICC
The creation of an ICC color profile is not a feature of KDE Plasma Wayland, so we’ll need to use the biggest workaround of this guide here.
For that, you’ll need a Color Calibrator device, and DisplayCAL, a deprecated software (last dev news in 2019), but a life saver for graphists in the current situation on Linux. DisplayCAL can run as a Flatpak (see the Software/Flatpak chapter to know how to install it).
But before running DisplayCAL and start a calibration and profiling, you’ll need to manually go in the System Settings, Display & Monitors and make sure to remove any Color Profile there. It should mention “None”. Also, be sure to switch the “sRGB color intensity” slider to 0% (if you applied “None” this slider shouldn’t do anything, but better sure than sorry). We are doing all of that, because DisplayCAL can’t trigger that anymore by itself before starting a Calibration/Profiling. It still tries to communicate with X11 because the software wasn’t updated to be used on Wayland.
Once this step is done, you can launch a calibration, then profiling, and do all the process until completion. This part and interaction with the software is not changing and works well.
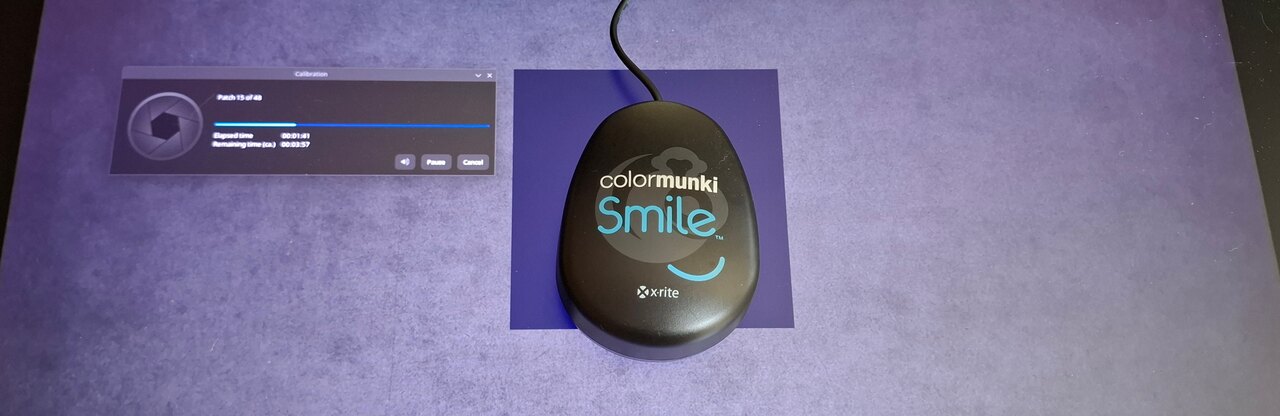
Once using the Flatpak and deactivating Color Management manually,
DisplayCAL runs normally.
However, once the calibration and profiling is done: DisplayCAL will start to contain a few bugs to workaround: forget its message proposing you to preview the profile: it cannot. Same about auto installing the profile (because again, the path and signal are ‘meant for X11’).
But if you skip this last screen, go back to the starting page “Display and Instrument”, you’ll be able to “Create a Compressed Archive” of the current Settings. Once you have this 7-Zip file, you can extract it, and within all the files, you’ll find the ICC profile file with the icc extension.
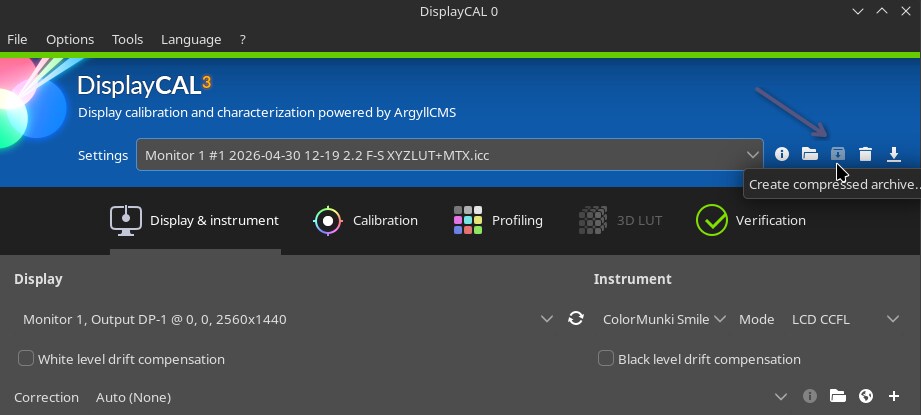
The Create Compressed Archive button allows to retrieve manually the
new ICC.
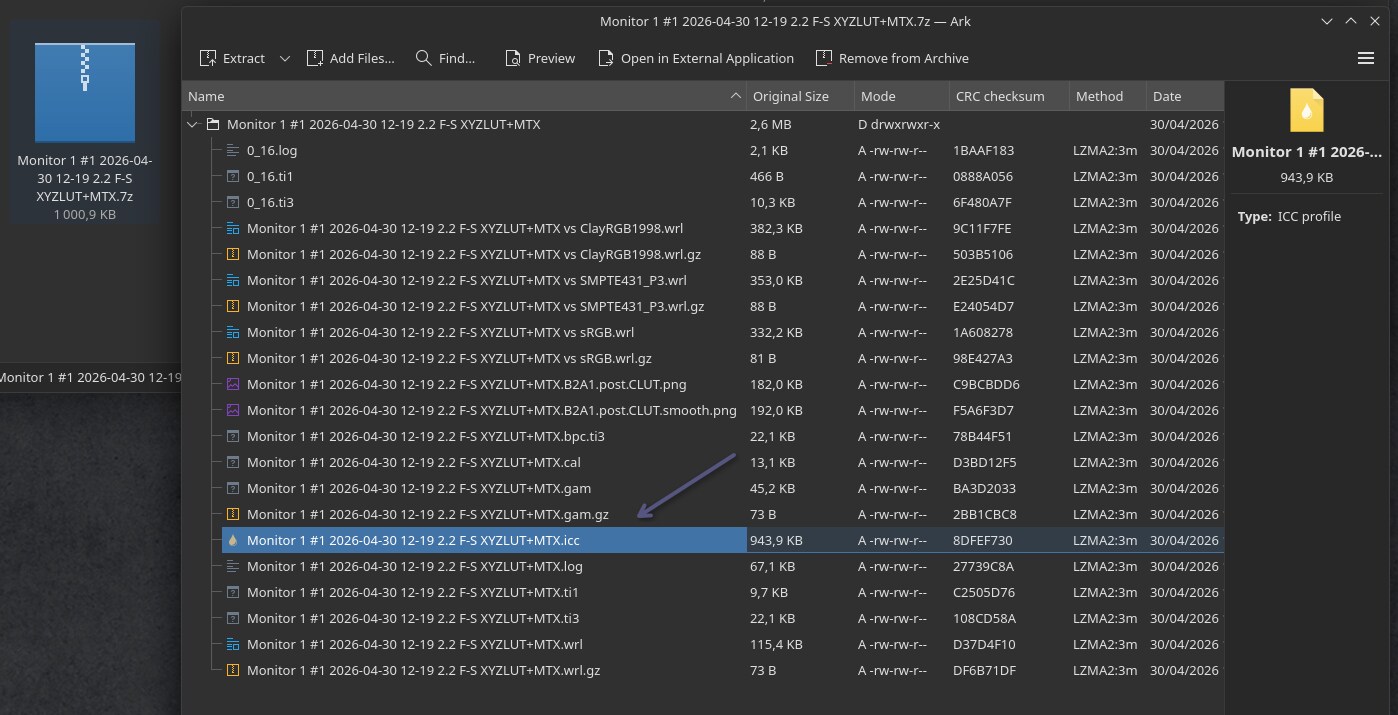
Ark, the KDE archive manager, can find in this 7zip the ICC and
extract it
B. Load an ICC
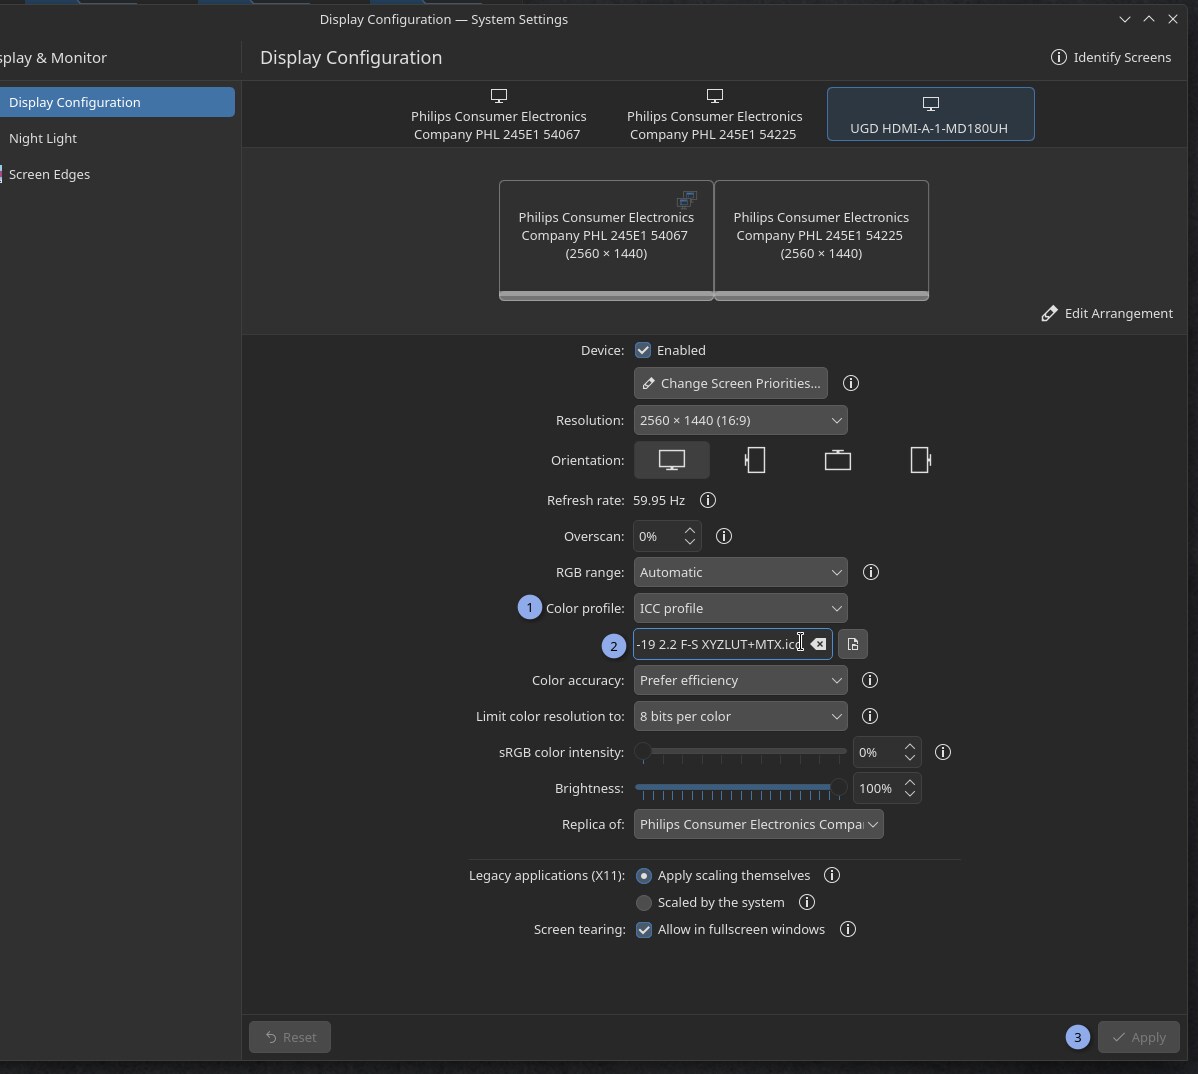
Once you have the ICC file, store it where you want, and it’s easy to load it in Plasma 6: go to the System Settings > Display & Monitors > Display Configuration, and you’ll have a “Color Profile” (1) option where you can load your ICC file (2). Done! Now repeat the process every two months or so for your display for a good color hygiene. Yes, I wish the previous part was a bit easier. The workaround takes a bit of extra time here.
C. sRGB color intensity
In case your monitor has a way larger color space than sRGB, the usual non color managed application and Xwayland windows (many) will fallback to sRGB surfaces. They’ll look faded, darker and greyish compare to when you were watching them with an “unmanaged monitor” where all the colors were stretching to whatever the max was.
Because on modern monitor, sRGB looks really sad, a setting (I really like) was introduced by the Plasma team: “sRGB color intensity”. This one slider allows you to decide how much to enlarge the small sRGB color space to whatever your monitor is capable.
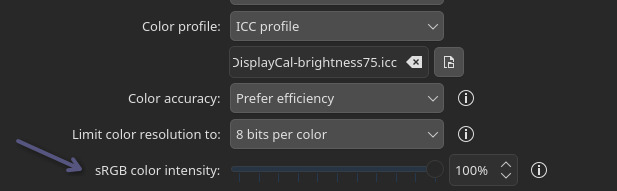
The sRGB color intensity in action
Example:
As an example, on a wider gamut display (near to AdobeRGB, the max I
have at home) here is under a photo of Gwenview showing a personal photo
of sunset with my camera that also has a large color space (on left),
the color are intense and the sun is almost in your face, plenty of
vibrants orange and violet specific of the AdobeRGB color space.
The same picture now open on Qimgv (on right), that is just interpreted as a sRGB surface. The color are more greish, less intense because the rendering is accurate to sRGB that is a smaller space than what my display can fully display.
That’s for this type of situation (sRGB app, video games, icons on wider gamut monitor) that the Color Intensity slider can fix things by stretching a bit sRGB rendering.
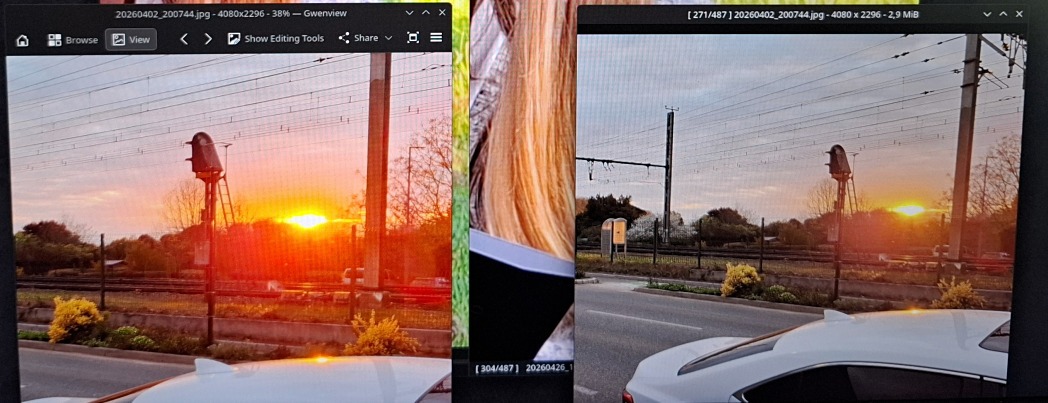
Photo of a color managed app -left- and non color managed -right-
falling back as a sRGB surface
8. Drawing tablet
A. Drivers
The situation about Drawing tablet drivers is a bit complex and fractionated. I’ll do my best to give you here an overview with the knowledge that I gathered. It will help you to understand what’s going-on with your device on GNU/Linux.
a. Devices that works “out-of-the-box”
A happy few number of drawing tablets devices will work “out of the box” on any GNU/Linux systems. This is not because they are good device, or well thought, or dark magic: it’s because someone else did the work to make this tablet compatible with your system before you started using it. This is the case of most of Wacoms drawing tablets. This is possible thanks to Wacom sharing the specifications with the Hid/input team at Red Hat Linux. I wrote most here because I’m excluding the models released last months, still too new to had the possibility to get a driver done by the community.
Sometime, other specific drawing tablets; Hanwang, N-Trig, Waltop and other built-in “laptop with stylus” joined the out-of-box list by batch. Another times, deprecated projects like Digimend made possible the support of many drawing tablet and are now part of the kernel. And many times, it was the individual work of contributors who coded the support for their own model.
b. The Microsoft Stylus Surface standard
Modern Gaomon, XpPen, Huion tablet (and many more) adopted a strategy: in absence of drivers, the device, once connected to your computer, will behave and report itself as a Microsoft Surface Stylus. This Microsoft standard was implemented in the Linux Kernel, so the stylus will feels like working out of the box.
However, the second button on the stylus barrel will be hardcoded to be a ‘hold the button and draw eraser’ instead of a right-click mouse button. On GNU/Linux Desktop Environments, it’s hard to operate the system without a right-click (and same for using Krita without a right-click). Microsoft could afford to use this buttons for an eraser because their operating system has a ‘long click/touch’ action that trigger a right-click context menu.
The developpers of libinput already found and merged a solution a year ago to lift up this hardcoded limitation. It’s unfortunately still not exposed on the Plasma drawing tablet interface as an option. So you’ll have this bug: you’ll have a setting for the second button, but whatever you put into that, it will be a ‘hold and erase’ action.
For the buttons of the tablet, the Microsoft standard (made for Ms compatible tablets and laptop with stylus, eg: Msi, Hp, Lenovo, Acer…etc… ) usually did not encompass a ‘pad’ buttons standard. However, the tablet brands used another strategy in this case: the buttons/dial/stripes will works, but presenting themselves to the operating system as a keyboard, with a hard-coded set of shortcut keys. As they are keyboard input, if you don’t have a proper driver and need to customise them, it’s possible. I did it with a udev/hwdb rule on a XP-Pen Artist Pro 24 but it has some limitations. You can also check my tutorial for customising keypad/numpad as it has similar steps.
c. Udev-hid-bpf (and install guide)
Udev-hid-bpf is a software that has the ability to plug new rules for your HID devices (Human interface device, keyboards, mouse, trackpad, and drawing tablets) into your linux kernel without having to recompile it. It works for kernels above 6.3, BPF enabled.
It right now has rules for many tablets from XpPen, Huion and more, you can read the supported drawing tablets on this listing. Also, this listing is directly the code, some rules cover multiple models (eg. XpPen Artist Pro 16 (gen2) rules contains definition for the 19 Pro and 14 Pro). I collaborated with Peter Hutterer and Benjamin Tissoires (who works on udev-hid-bpf) to report the specifications of all the tablets I tested and reviewed on my blog.
Installing Udev-hid-bpf
It’s pretty simple, you just need to go to the releases: https://gitlab.freedesktop.org/libevdev/udev-hid-bpf/-/releases and then pick the most recent package (eg. udev-hid-bpf_2.2.0-20251121.tar.xz right now). Extract it somewhere temporarely on your disk, then with a terminal(Konsole), go to the extracted directory and run:
./install.sh (Note: the script will require your admin password, because we are doing a system modification.)
Once installed you can delete the udev-hid-bpf_2.2.0-20251121.tar.xz
archive and the directory with the files you just extracted. Personally,
I keep them under a ~/sources/ directory to later know what
version I’m running right now.
If your tablet is supported, just unplugg it, and replugg it. No need restart and that’s amazing, because you can also test this from a Live USB install media session.
I can also be patched with new rules ‘live’. A good tool for those with development skill as they can test their device quickly after coding, and share rules easy to install. See “9. Misc > B. Patch for the XpPen Deco 01 V3 Pen” section to see an example.
d. User-space drivers
Last option in case of no driver, it’s the interception of signal, or the creation of virtual devices in the User Space. I usually dislike these methods, because they are less reliable, and will always conflict with settings of the desktop environment.
Huion, XpPen, Gaomon (etc) proprietary drivers
The brands like Huion, XpPen, Gaomon (and more) offer on their website
proprietary drivers made this way. I assume all their drivers come from
a third party company because all the executable and libraries inside
the package they distribute are structured the same way. Last year, a
contributor of Pepper&Carrot made a detailed audit of the XpPen
proprietary driver, and found no telemetry inside it but it might have
changed, we don’t know what they are putting on this proprietary
executable.
That’s why I’m still not using them. I tried to send many emails to all these companies and request to open their drivers (or their specifications), but, in the end, it was never a decision ‘in their hands’.
OpenTabletDriver
On the Free/Libre projects attempting something in the User Space, we
have OpenTabletDriver.
The project is cross-platform and benefited of many contributions from
user un-happy with the enshitification
or deprecation
of their drivers on Windows or Mac.
They have an impressive list of supported devices with a dedicated page about it, a full featured interface, and a well made documentation for adding new tablet.
B. Keep aspect ratio
It’s one of the most important setup you can do to improve your drawing skill for your non display tablet. The problem? It’s rare the active surface of your tablet has the same aspect ratio than your display. But, by default, the operating system will insist to use the max area of the tablet. As a (bad) result, you might obtain non consistent axis while moving vertically and horizontally with your tablet, making the feeling of drawing on it particularly uncomfortable.
How to check a bad ratio? Simply go to take a glass, or any object that can help you to trace a perfect circle. Open Krita, and try to trace the contour of the glass with your stylus over your drawing tablet active area. You can then create a new layer on the top and draw a digital pure circle with the circle Krita tool and keeping a 1:1 ratio with holding shift. You’ll quickly see if your circle drawn with the glass is squished or deformed into one axis this way.
To set the ratio on KDE Plasma, go in the System Settings, Drawing tablet, set the screen in “Map to screen” (1) and switch Map Area to “Keep Aspect Ratio and Fit” (2). Done.
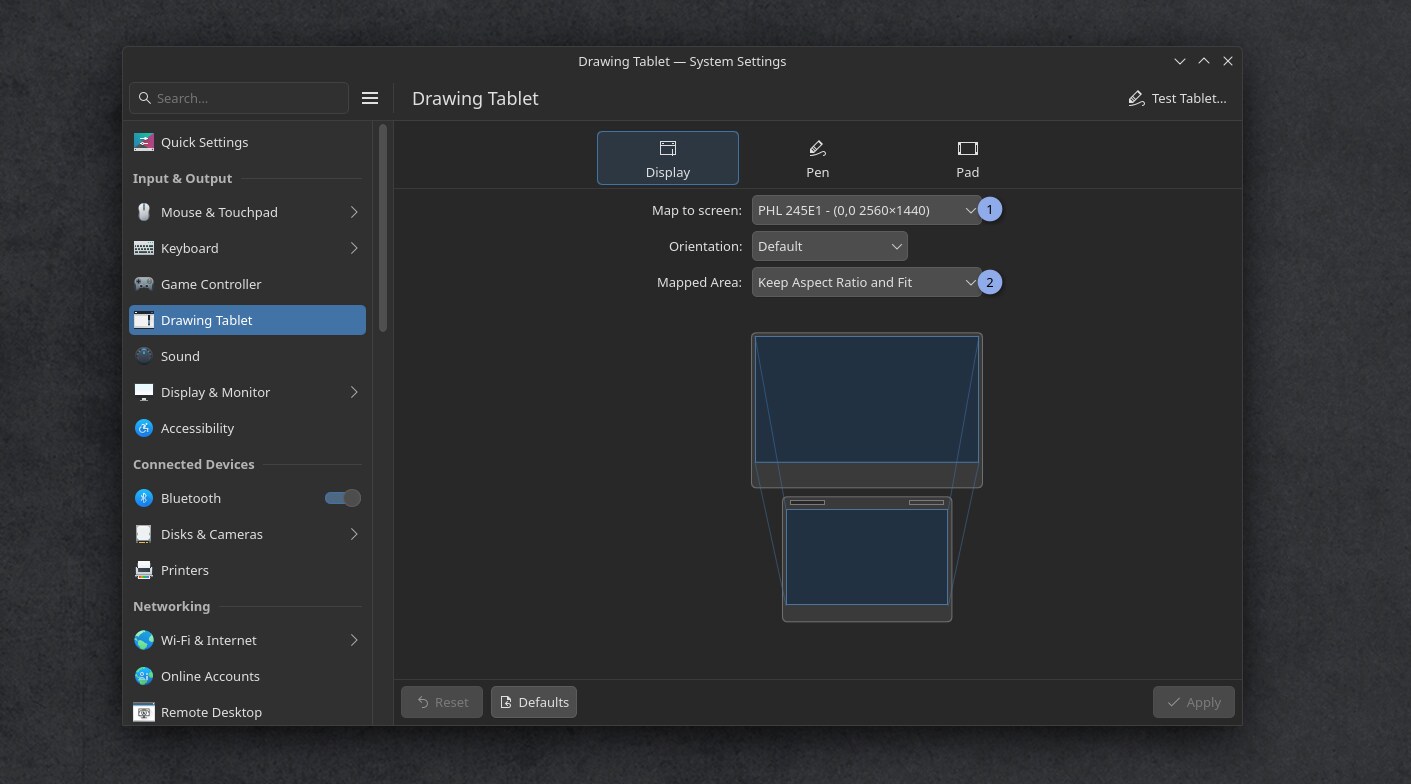
The drawing tablet setup interface to set the display
mapping
C. Parallax calibration and correction
On some display drawing tablet model, the distance between your cursor will require a calibration. You’ll find a classic “four points calibration” method in System Settings, Drawing tablet, Pen tab, at the bottom “Calibrate”.
If you want to refine the coordinate numbers manually to control the offset with more precision, you can use Ktabletconfig for that. See the chapter “Loading custom profiles”
While calibrating a display drawing tablet: the first
corner
D. Calibrate stylus pressure
a. A dangerous setting for your device and hand
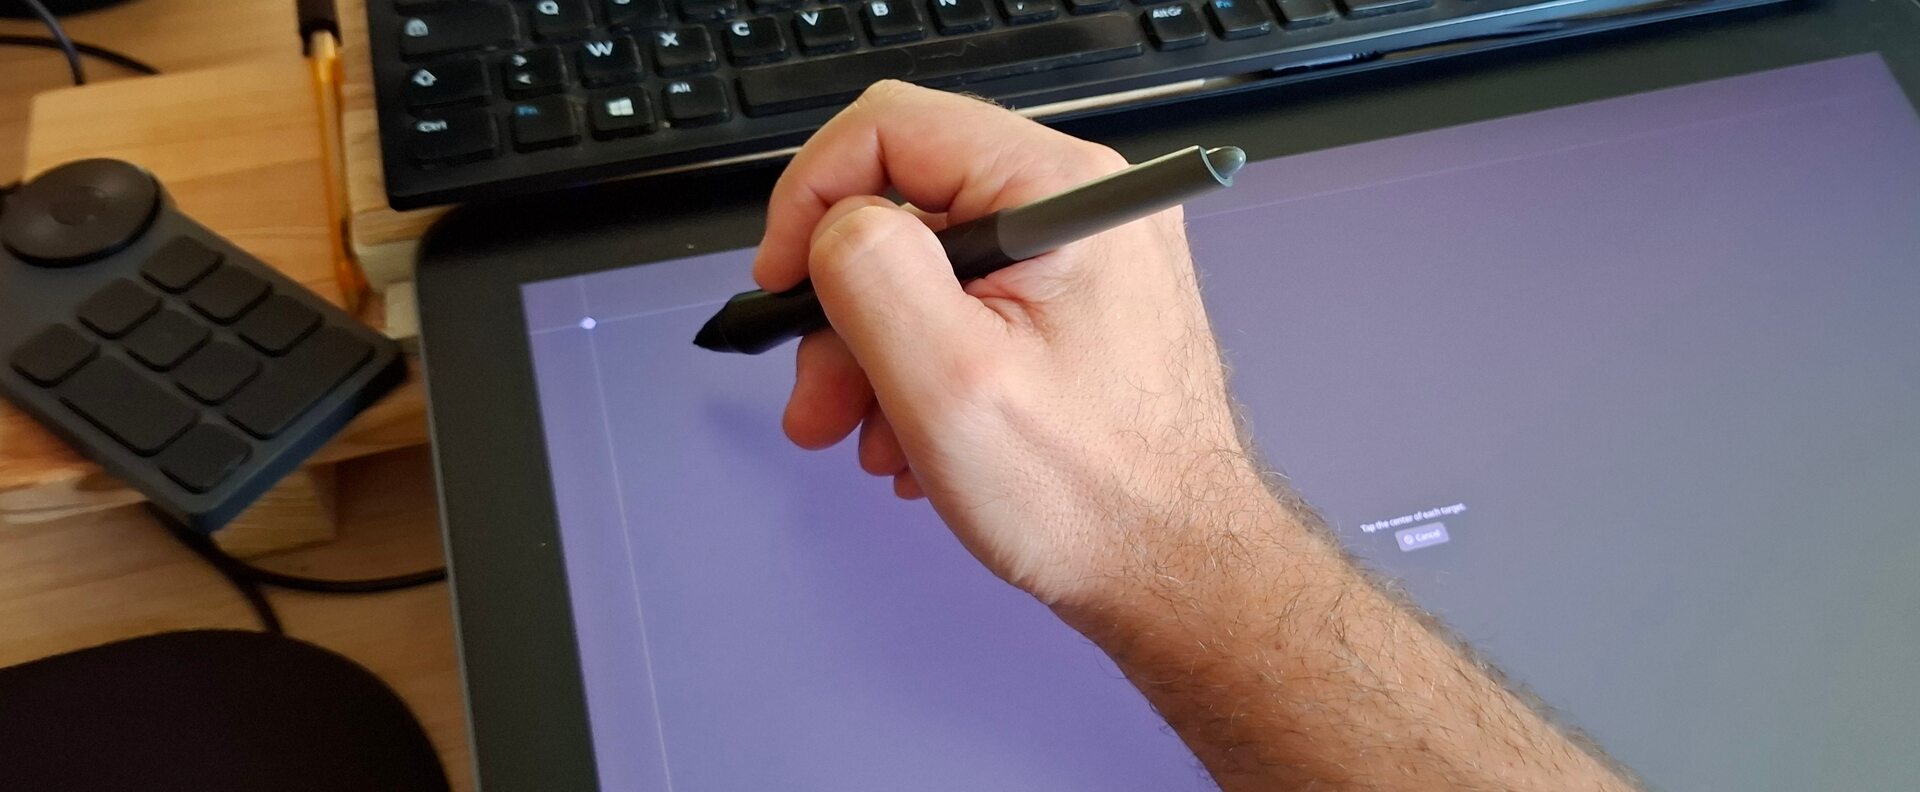
Calibrating the pressure always has been really important on drawing tablets, but more than ever, it’s something for your health nowadays.
On my latest video reviews of tablets, I tested each time the weight necessary to reach 100% pressure (something you’ll want to reach often on any brush preset as I design them for my brush preset: the one I share for Krita, or the default I made). And the result was surprising! On the Huion Kamvas 19 Pro, the stylus required by default more than 633gr of pressure to reach 100%! (~1.4pounds, or two can of Soda on your hand). It was a bit better on my main, the XPPen 19 Artist Pro (gen2) with its 430gr to reach 100%, but still.
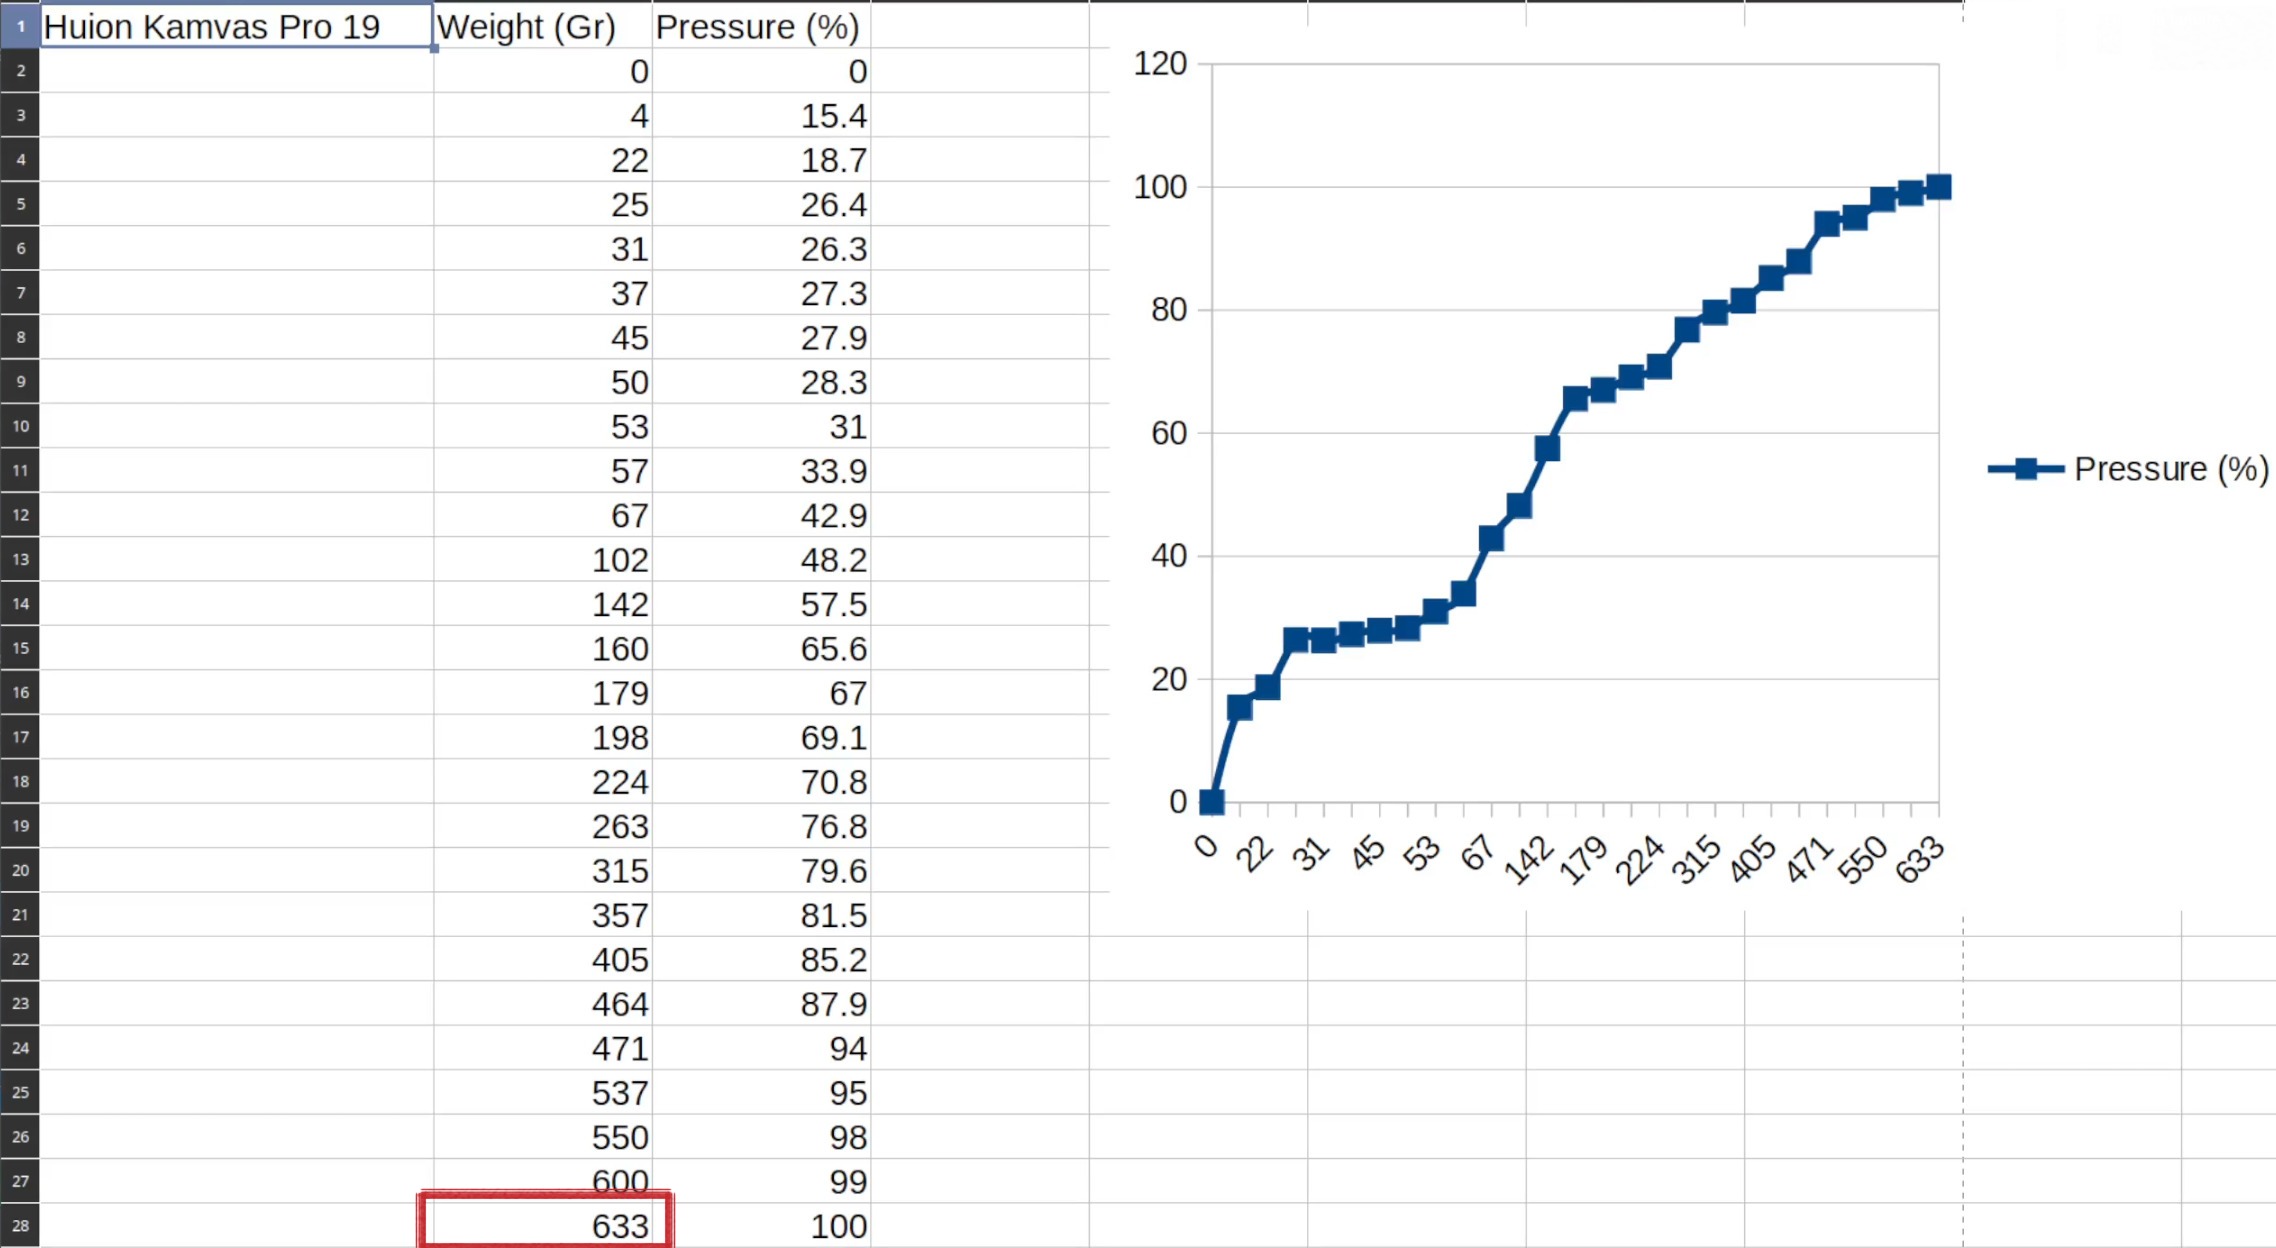
screenshot from my video review of the Huion Kamvas Pro 19: 633gr of
pressure required to reach 100% signal! Outch! You’ll soon need to press
with both hand on stylus to draw…
This attrocious tendencies of “more weight to reach 100% effect” is pushed by the tablet manufacturers, and it’s justified to give the illusion of more level of pressure sensitivity to the end user. That’s the enshitification logic of years of useless marketing war on the “level of pressure” number. A myth I already busted in dedicated article in 2013.
Unfortunately, 13 years later, the default tablet reviewers on Youtube now just read out loud the spec given by the brand, like brainless parrot without questioning them or imagine the brand could… I don’t know… lie? So, this trick for selling always larger and larger number is starting to backfire, and this type of long range of heavy pressure will build only a single thing: carpal tunnel disease early for the hand of new digital artists with bad calibrated pressure.
So we have now to calibrate both aspect: the pressure curve AND the full range of it. To give you an idea I keep only 55% of the 430gr range of my XPPen 19 Artist Pro (gen2), so roughly around 240gr to reach max 100% is comfortable for my hand.
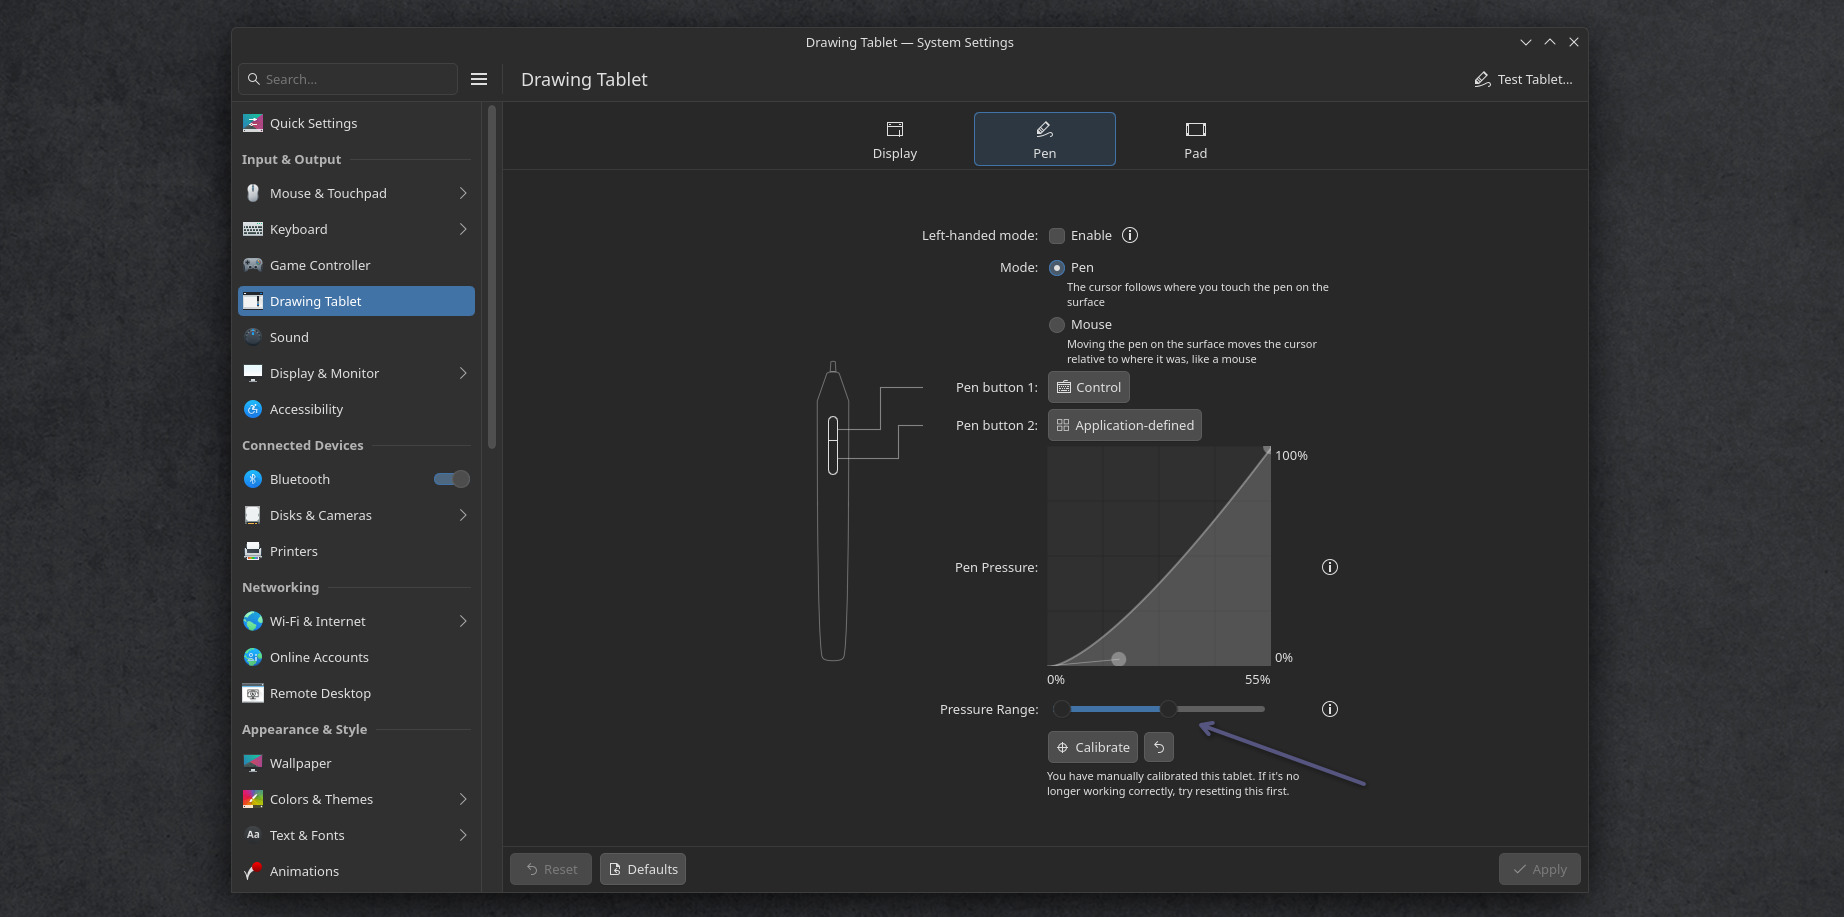
The pressure curve and Pressure range can finally be setup with a
graphic interface
b. What type of curve you need?
This can’t be automatically guessed by the computer as all drawing tablet’s styluses are built different. Different default built-in curve and range. Even on the same drawing tablet model, two similar styluses might react differently (eg. because of the aging of the internal spring, or the sensor itself).
You can check my article “Calibrating stylus pressure” for learning about how to read a pressure curve, and set one. Once you know what you’ll need, you can apply that on the KDE settings.
c. What type of pressure range you need?
On the KDE System Settings, Drawing Tablet, Pen tab, we can set the pressure curve (screenshot above) but you also have a “Test Tablet” button on the top-right of the interface. This one will report how much pressure you need to put on your stylus to reach 100%. If you find this weight excessive, slide down the Pressure Range slider. Repeat the process until you find a good setting for your device.
Note: it’s a bit sad this slider doesn’t have the number written on it, it’s hard to replicate the same Pressure Range on another PC.
E. Pad Buttons
If your tablet has pad or buttons (and if your tablet has a driver) Plasma will catch them and allow you to customise each key, dial and stripe with the keyboard shortcut of your choice. You can also have the possibility to map modifiers like Shift, Alt, Ctrl or combination of keys.
If your tablet was delivered with a remote USB pad, such as the XpPen ACK05, or the Huion pad, and if this ones are supported (they are in recent udev-hid-bpf), Plasma will list them also as “pad”.
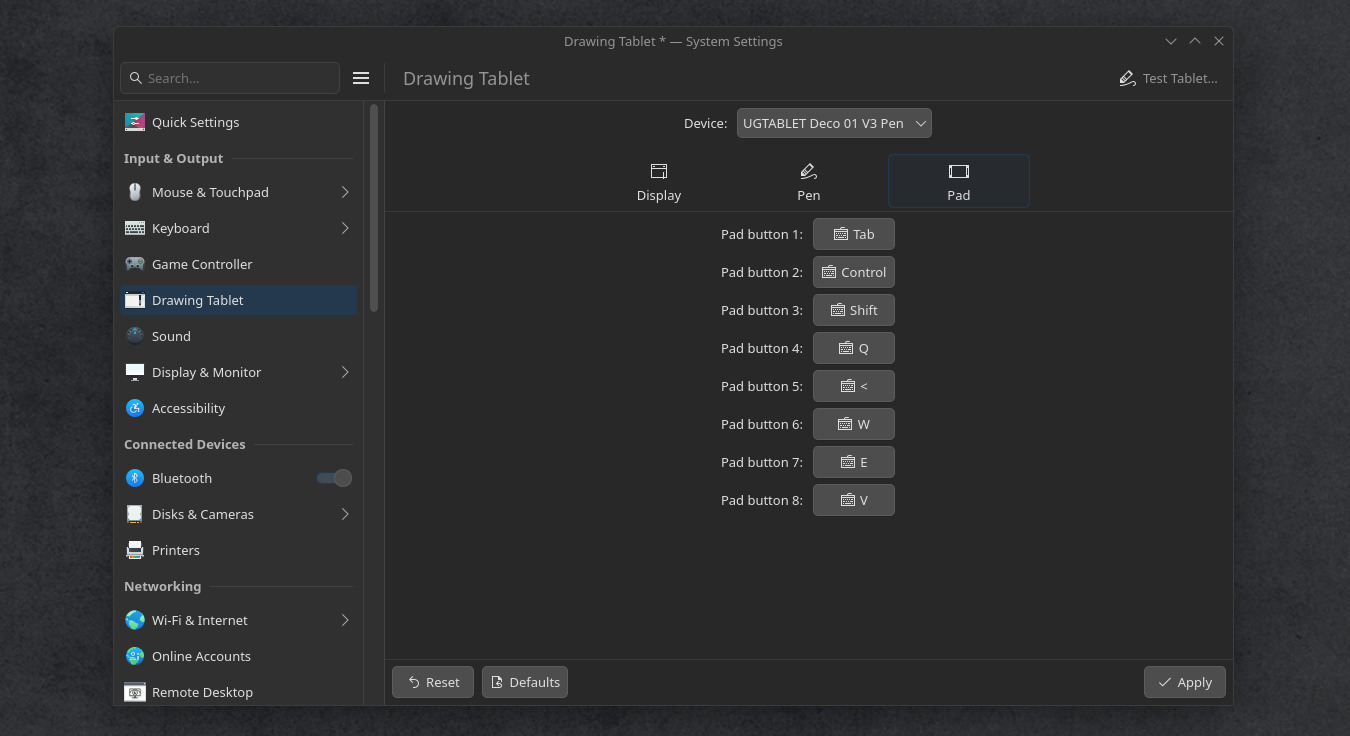
The buttons of the XpPen Deco 01V3 ready to be customised
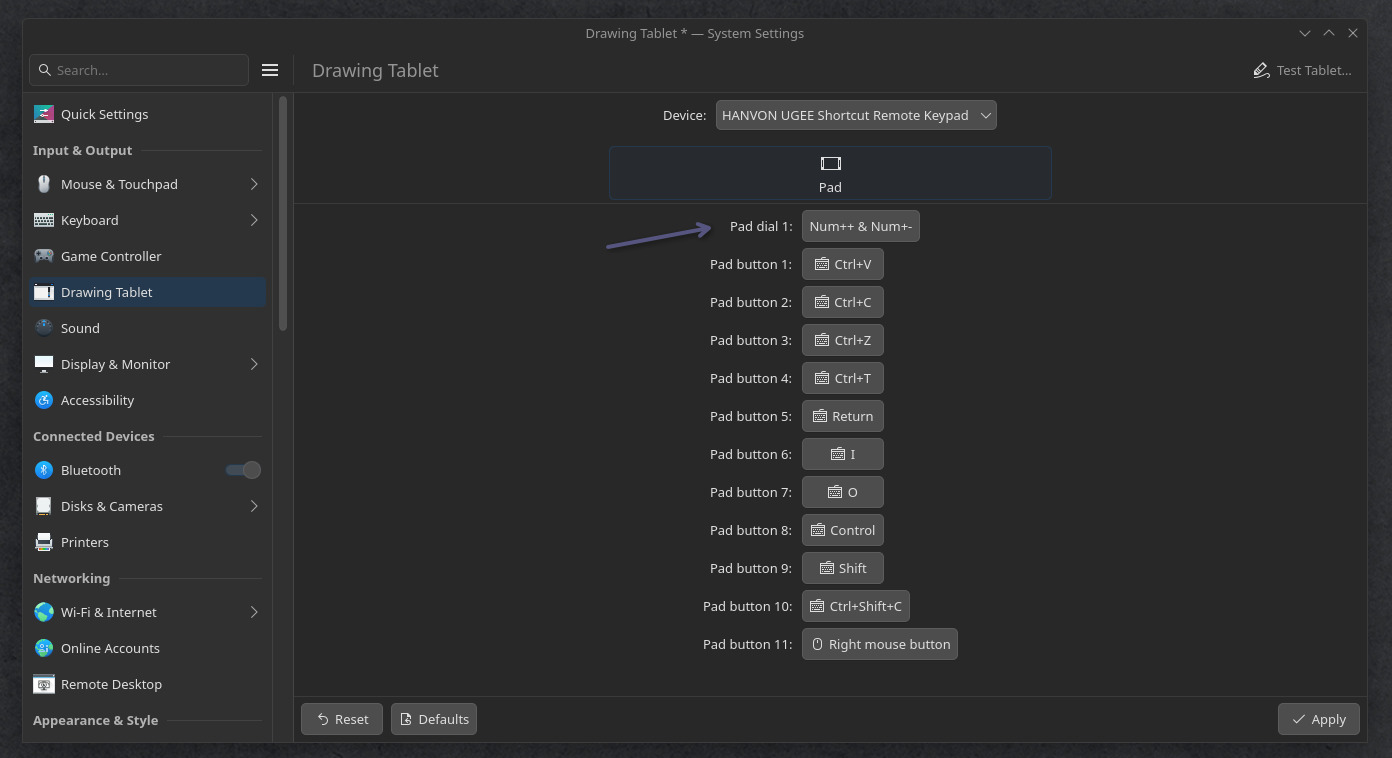
The buttons of the XpPen ACK05 remote, with the dial, ready to be
customised
If you need to map an action to a pad button, you can do this: make a Bash Script with your desired action (see ktabletconfig chapter under), like a toggle switch of display, then System Settings > Keyboard > Shortcuts plug (1) your own bash script (2) with a complex shortcut like Meta key (Win key) plus a function key or a symbol, I’ll use Meta+À (3) for this example (a special key of my french azerty keyboard). Then, you just need to map this Meta+À on your drawing tablet’s pad or remote to enjoy the effect. A very powerful way to extend your setup, and take control of all your buttons.
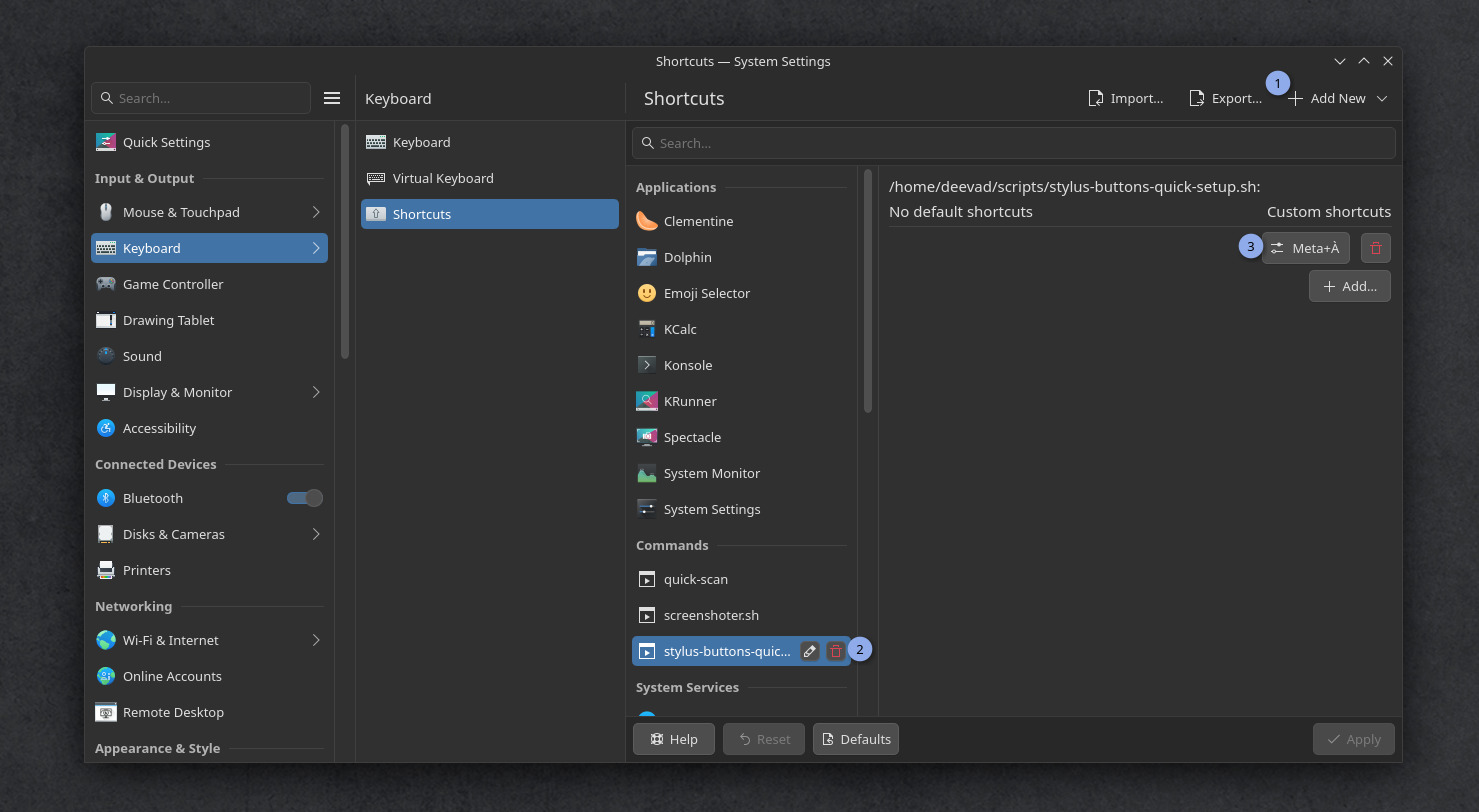
Launching a bash script on the press of a drawing tablet’s button?
Possible!
F. Loading custom profiles
Loading custom tablet profiles is still not yet a feature of KDE Plasma, but you can workaround it.
You might want custom profiles to:
- Load on another computer the exact same layout of buttons and pressure curve
- Load different profile on demand
- Map your stylus to various display
- etc…
In my case, I like to control the behavior of the buttons on my stylus. Sometime to pick the visible color in Krita (Ctrl+click) and sometime to pick only the color of the active layer (Ctrl+Alt+click). I’ll share my script at the end of this section.
Because before that, we will need a software named ktabletconfig to load settings from the terminal or Bash scripts. We’ll then be able to call this script with a keyboard shortcut, or a desktop icon, or a menu entry; the limit is your imagination here.
Unfortunately ktabletconfig is still not packaged by distro, nor precompiled: only the source code exists. So, we’ll have to put our hacker hat on, and do an extra work to compile it ourselves… In my opinion, this package is so important that it should be part of any default KDE Plasma install.
a. Compiling ktabletconfig
We start by installing the dependencies on a terminal (Konsole):
$ sudo apt install git cmake extra-cmake-modules qt6-base-dev libkf6i18n-dev libkf6coreaddons-dev libkf6config-dev kwin-devThen, we download the sources using git. Mine will be stored in
sources inside my home directory (it has an alias:
~).
$ cd
$ mkdir ~/sources
$ cd ~/sources
$ git clone https://invent.kde.org/redstrate/ktabletconfig.git
We now need to configure this source code. Enter in the git cloned
directory, create inside a subdirectory build, and enter it
too, then launch the configuration process:
$ cd ktabletconfig
$ mkdir build
$ cd build
$ cmake ..
If everything goes well, the terminal should print something like
-- Configuring done on the last paragraph of the output.
Then you can build the software. I indicate here -j4 to use 4 cores of
my processor unit to speed things up. Adjust if your CPU has more core.
This is not a big software, so it will take just a few seconds to reach
100% anyway.
$ make -j4Now the binary of the software is built, and ready but it’s not
connected to our operating system: the executable stands in our
sources directory. To make it part of our system, we
do:
$ sudo make installA line like -- Installing: /usr/bin/ktabletconfig means
we can now call the command line ktabletconfig in any terminal, from
anywhere on this system and we can start to use it.
b. Troubleshooting compilation errors
Oh no! You had an issue while configuring? (in case you are trying this on a later version or another distro) and have a big pack of text and a red message! (Note: orange warnings are OK). It looks like:
[...]
-- Performing Test HAVE_DATE_TIME - Success
-- Could NOT find KF6I18n (missing: KF6I18n_DIR)
-- Could NOT find KF6I18n: found neither KF6I18nConfig.cmake nor kf6i18n-config.cmake
-- Found KF6CoreAddons: /usr/lib/x86_64-linux-gnu/cmake/KF6CoreAddons/KF6CoreAddonsConfig.cmake (found version "6.23.0")
-- Found KF6Config: /usr/lib/x86_64-linux-gnu/cmake/KF6Config/KF6ConfigConfig.cmake (found version "6.23.0")
CMake Error at /usr/share/cmake-4.2/Modules/FindPackageHandleStandardArgs.cmake:290 (message):
  Could NOT find KF6 (missing: I18n) (found suitable version "6.23.0",
  minimum required is "6.15")

      Reason given by package: Missing the following required components: I18n

Call Stack (most recent call first):
  /usr/share/cmake-4.2/Modules/FindPackageHandleStandardArgs.cmake:654 (_FPHSA_FAILURE_MESSAGE)
  /usr/share/ECM/find-modules/FindKF6.cmake:100 (find_package_handle_standard_args)
  CMakeLists.txt:31 (find_package)
It’s normal: having a red error at this time is totally part of the process. You are not failing, and the computer is not screaming at you (even if I admit, it does look like that). The red color, all caps and tone is just here to attract your attention. Just read the output, it’s often a missing dependency message, and the output guide you to know the one missing. In this case, this is the part that is interesting for us (just under the ‘Error’ line):
Could NOT find KF6I18nHere it looks like the main issue of our compilation is the missing
KF6I18n package. You’ll then have to use your package manager and search
for the missing dependency and install it. Unfortunately, the package
may have another name on your system (or it would have been too easy to
find). On Neon (and all Debian based operating system) we can use
apt search <package name> to see what the operating
system has in stock for us:
$ apt search kf6i18n
Sorting... Done
Full Text Search... Done
libkf6i18n-data/noble,noble 6.25.0-0zneon+24.04+noble+release+build44 all
  Dummy transitional

libkf6i18n-dev/noble,noble,now 6.25.0-0zneon+24.04+noble+release+build44 all [installed]
  Dummy transitional

libkf6i18n-doc/noble,noble 6.25.0-0zneon+24.04+noble+release+build44 all
  Dummy transitional

libkf6i18n6/noble,noble 6.25.0-0zneon+24.04+noble+release+build44 all
  Dummy transitional

libkf6i18nlocaledata6/noble,noble 6.25.0-0zneon+24.04+noble+release+build44 all
  Dummy transitional
Usually, the library we need are development packages. We can
recognise them in the wild because they often have lib as
prefix (short for library) or -dev as suffix (short for
development). Let’s install the second item of our search,
libkf6i18n-dev, and see:
$ sudo apt install libkf6i18n-devand then configure again:
$ cmake ..

[...]
-- Configuring done (0.3s)
-- Generating done (0.1s)
-- Build files have been written to: /home/deevad/local/sources/ktabletconfig/build
Done. Sometime, you’ll have to do loops in this process to configure
your operating system properly before building your software.
Be patient.
c. ktabletconfig usage
Many usage are already part of the README.md, but
you might have a longer list of options available by requesting the
-h ‘help’ flag:
$ ktabletconfig -hFirst, we need the identifier name of the stylus, on mine:
$ ktabletconfig --list-stylus
XPPen Artist Pro 19(Gen2)
Then we can use the System Settings interface of KDE Plasma for the tablet to setup a profile, and ask ktabletconfig to export all the current settings:
$ ktabletconfig --stylus="XPPen Artist Pro 19(Gen2)" --export-config

ktabletconfig --stylus "XPPen Artist Pro 19(Gen2)" --set-output-name "DP-1"
ktabletconfig --stylus "XPPen Artist Pro 19(Gen2)" --set-output-area "0,0,1,1.00156"
ktabletconfig --stylus "XPPen Artist Pro 19(Gen2)" --set-orientation "default"
ktabletconfig --stylus "XPPen Artist Pro 19(Gen2)" --set-pressure-curve "0.569101,0.211176;0.997709,0.996837;"
ktabletconfig --stylus "XPPen Artist Pro 19(Gen2)" --set-left-handed "0"
ktabletconfig --stylus "XPPen Artist Pro 19(Gen2)" --button 0 --set-binding "Key,Control"
ktabletconfig --stylus "XPPen Artist Pro 19(Gen2)" --button 1 --set-binding ""
ktabletconfig --stylus "XPPen Artist Pro 19(Gen2)" --button 2 --set-binding ""
This way, ktabletconfig gives us the exact command lines to replicate the settings we changed. And we can even tweak them (eg: if you want to manually tweak the pressure curve to match the exact settings you had while using xsetwacom command line previously on X11 distro)
Note: (If your tablet has buttons, you can do the same with
--list-pad)
d. Custom scripts for Drawing Tablet profiles
Once you have your collection of ktabletconfig command
lines, you can launch profiles via script. Save this scripts with a .sh
extension (eg. toggle-screen.sh) and add execution
permission to them (Right Click on the file, Properties, Permission,
“Allow executing file as program”). Then, to launch the script with a
nice icon, you can create a launcher. For that, right click on the
menu/start/launcher of KDE, “Edit Application”. You can create on this
user interface a New Item, put an icon, and the path to your script.
Once the item is created, you can plug the icon where you want: in your
task bar, on the desktop, in your favorites. You can also execute the
script via System Setting, Keyboard, Shortcut and create your own
keyboard shortcut.
The script I’m sharing under are example of how you can manage
multiple profile. You’ll need to modify them: for example to replace my
drawing tablet Identifier "XPPen Artist Pro 19(Gen2)" with
yours. And also the identifier for your display in example 1.
Script 1: a toggle display switch:
This script will apply a setting if you run it once, and another one if
you run it twice. Then, the third time, it come back to the first
profile. Just a simple way to handle a toggle of two profiles for your
workflow. It saves the state with the presence of a
.drawingtablet-tokken empty file saved as a hidden file at
the root of your /home/<username>/ directory. It also
use notify-send (
sudo apt install libnotify-bin notify-osd) to send to your
operating system a visual notification feedback, so you know in what
profile you are using your hardware.
The example under is minimal: just a single ktabletconfig line. In the first case, the stylus coordinate maps to an external monitor named DP-1 here, allowing the user to draw on the display in front of them, using their display tablet as a non-display tablet. In the second case, it restore the stylus mapping to the built-in screen.
#! /bin/bash
# Stylus button quick setup
# License: CC-0/Public-Domain license
# author: deevad
# Note: on Kwin Wayland, to list screens ID:
# $ kscreen-doctor --outputs

if [ -f ~/.drawingtablet-tokken ]; then
  # Profile 1: Tablet on External Display Port 1 screen
  ktabletconfig --stylus "XPPen Artist Pro 19(Gen2)" --set-output-name "DP-1"
  notify-send -i tablet "Drawing Tablet" "Mapped on external DP-1"
  rm ~/.drawingtablet-tokken
else
  # Profile 2: Tablet on Built-in HDMI screen
  ktabletconfig --stylus "XPPen Artist Pro 19(Gen2)" --set-output-name "HDMI-A-1"
  notify-send -i tablet "Drawing Tablet" "Mapped to internal screen"
  touch ~/.drawingtablet-tokken
fi
Script 2: A quick menu for the shortcut on the barrel
button:
Or one I use with the Zenity library
(sudo apt install zenity) to have a little user interface
to quickly switch the role of the barrel button on my stylus.
#! /bin/bash
# Stylus button quick setup
# License: CC-0/Public-Domain license
# author: deevad

if answerGui=`zenity --entry --title "Stylus Button setup" --text "Behavior of the first button" --entry-text "Control" "w" "Control+Alt" "Mouse,273"`
  then
    favShortcut="${answerGui}"
  else
    echo "Setup cancelled"
    exit
fi

ktabletconfig --stylus "XPPen Artist Pro 19(Gen2)" --button 0 --set-binding "Key,${favShortcut}" 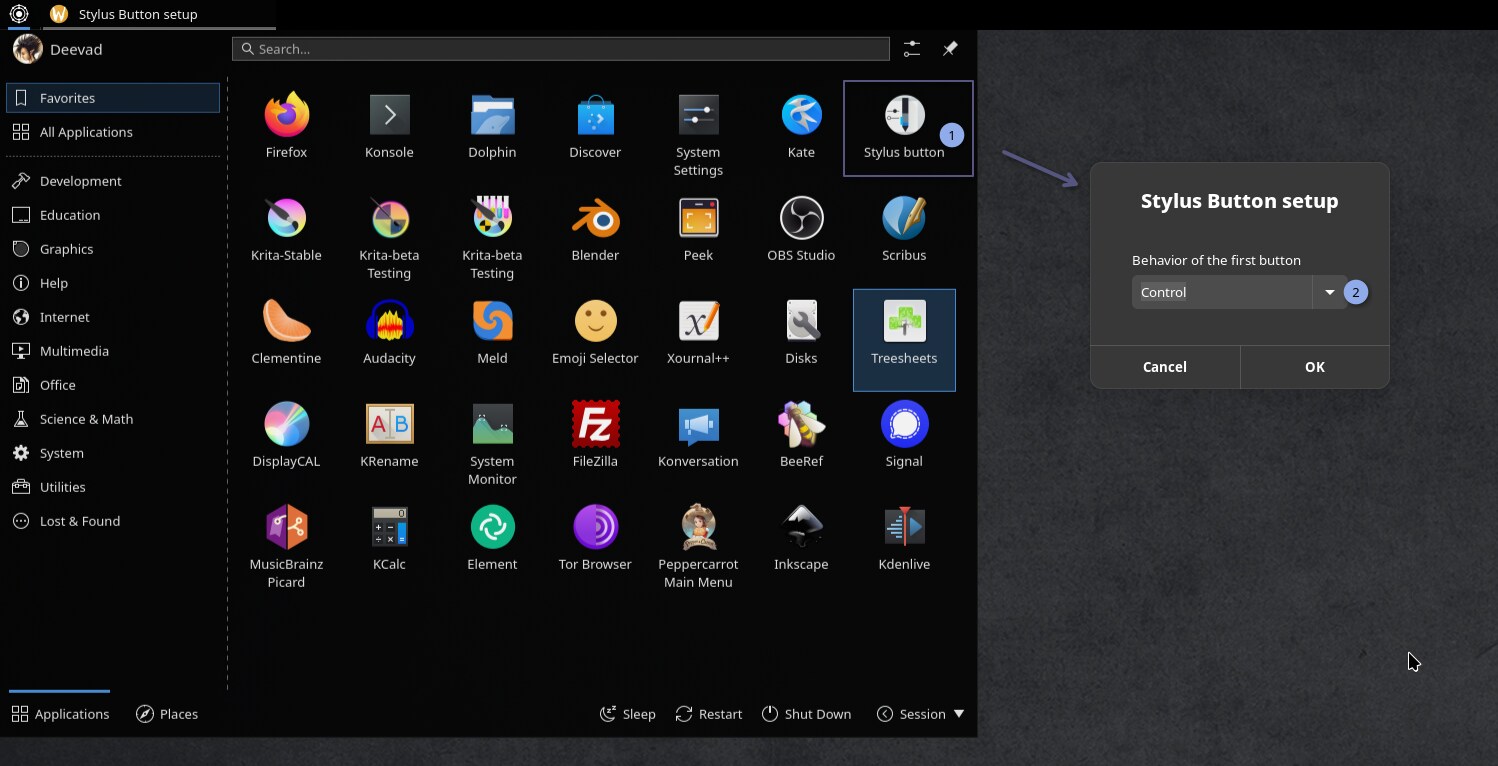
Result of a custom icon (1) launching a bash script with a Zenity
menu interface (2)
I kept here just two short example, but with a bit of tweaking with Zenity, you can make yourself nice launcher and script that will take over the full control of your tablet.
9. Software
A. A problematic fractioned landscape
You now have on GNU/Linux TOO MANY ways to install the same package:
- Default package: built-in the distro (eg. deb packages via apt for KDE Neon UE).
- Package on the web: A package built by an external source on the web (eg. a deb package found on the web).
- Appimage: container, often distributed by the projects themselves.
- Flatpak: container, often adopted by every distro except Cannonicals ones.
- Snap: container, imposed by default on all Cannonical Ubuntu distro. Known for their poor quality.
- External repository: An external extension to the built-in catalog of your distro (eg. ppa on KDE Neon UE).
- Third party package installer: pip for Python, Docker, Steam client, etc…
- Building from source: The classic ‘get the code’, ‘configure’ and ‘make’ to install something that hasn’t been packaged yet.
Unfortunately, the method of packaging can produce many bugs in software nowadays. The same software packaged with two different method will not have the same quality, system integration, version, or stability. And because most of the packages are built automatically by scripts running on large server, they are rarely tested. So, you might, many time feels like the first user who ever try a package and wonder if someone even launched this build before (and you might be right!). It will require you a lot of patience to find a version that is not too buggy.
This part of my guide here is here to share with you my observations and what I tested.
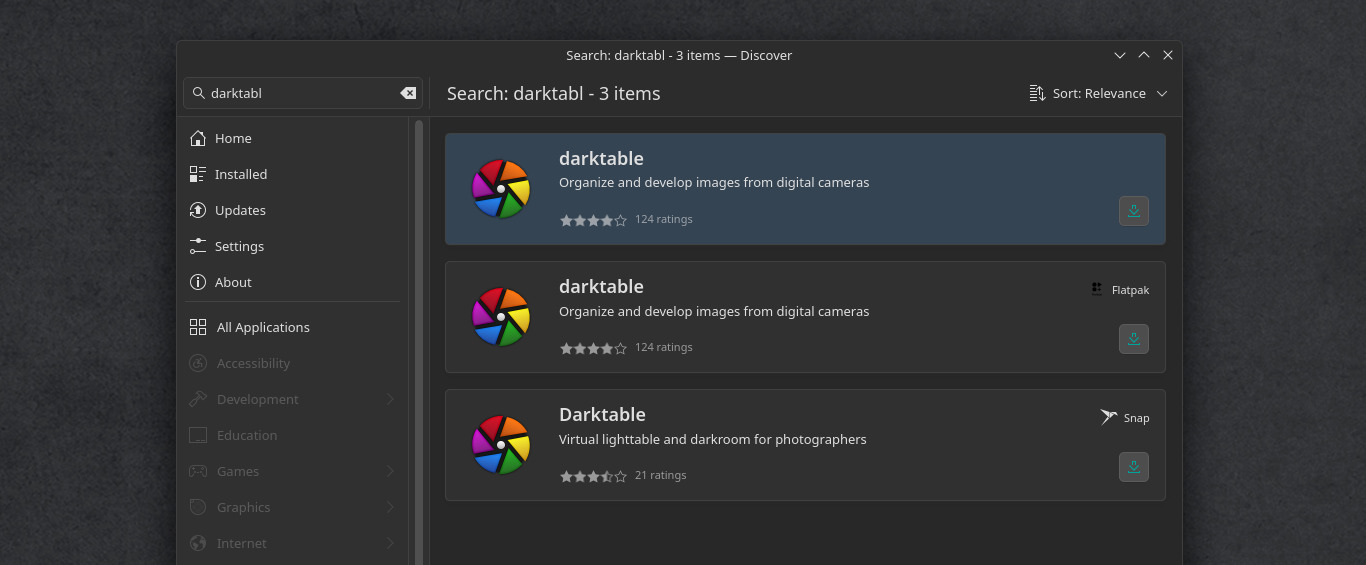
Discover, sometime, will list three options for the same package
(also ewww Snap, it is supposed to be deactivated, but still
appear)
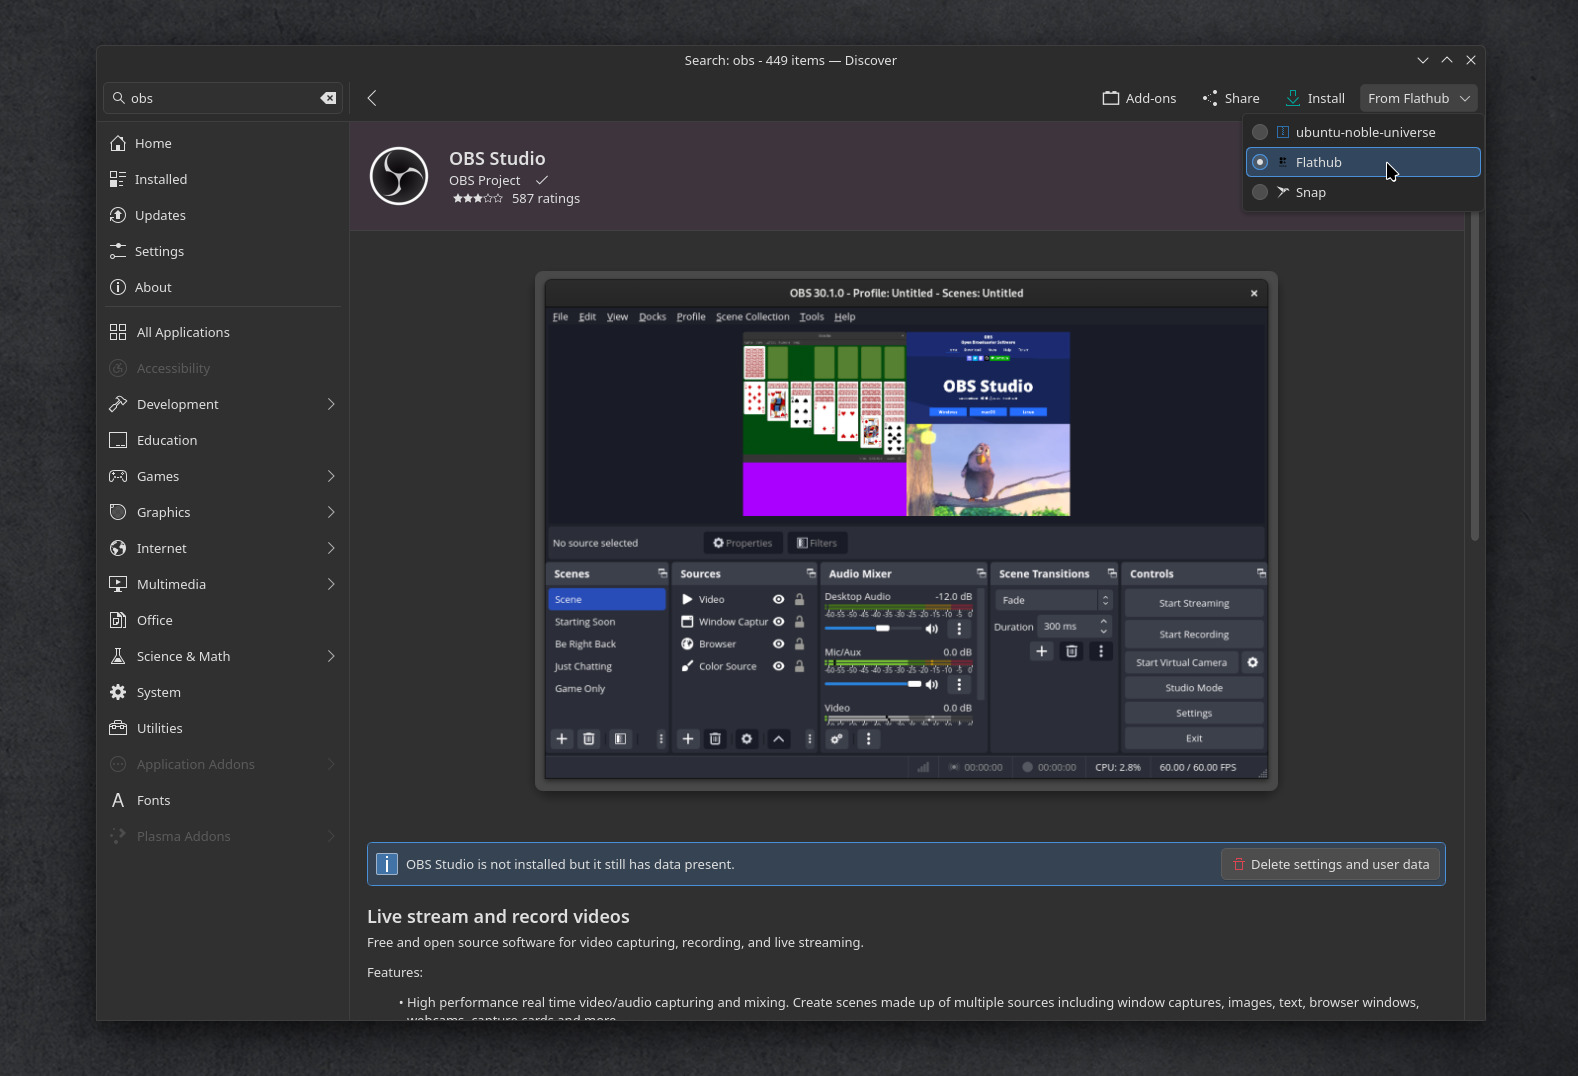
Discover, most of the time, hides the type of package on the
top-right corner. You’ll be used to click this one if you use Flatpak on
KDE Plasma 6.
B. The distro packages
a. Compensate the crude KDE Neon default
KDE Neon User Edition is crude by default. Too crude. It’s a minimal approach done on purpose: without many apps installed, services, themes, extras, or wallpapers. This approach has both pros and cons. But meanwhile, don’t be surprised if you’ll need to install manually some classics that almost all other distro ship by default: an office suit, a calculator, etc… At least, we can’t accuse KDE Neon of being “bloated”. That’s why You might focus at first on getting back your default utilities tools. Here is my list:
sudo apt install kate kcalc okular okular-extra-backends krename kdeconnect kcron anacron filelight ffmpeg ffmpegthumbnailer kdegraphics-thumbnailers ffmpegthumbs dolphin-plugins samba smbclient plasma-browser-integration Details:
- kate My favorite text/script/code editor, my scenarios, Pepper&Carrot website, renderfarm, all was done in Kate.
- kcalc, A calculator utilities.
- okular A universal document viewer (eg. PDF)
- krename If you need an advanced batch renamer for your files, it’s krename.
- kdeconnect Share files, links, media player control and more with your smartphone.
- kcron A cron task scheduler, directly in your System Setting, I use it to launch my backup rsync script daily.
- filelight A diagram representation of your disk space usage. Useful when cleaning disk.
b. Package I use from the default repository:
Here is a list of what I install directly from the deb packages of the 24.04LTS KDE Neon repositories. I’m usually fine with their version as they were in 2024 when the 24.04LTS entered into freeze.
sudo apt install mc micro zim qimgv audacity audacious clementine vlc treesheets gnome-disk-utility meld fontforge peek filezilla konversation scribus krename xournal neofetchDetails:
- mc: Midnight Commander, a CLI file explorer, because I like to manage files with it sometimes, especially when moving large chunks from drive to drive.
- micro: a CLI text editor, “sudo micro” is my go-to when I need to edit config files. It has Ctrl+C, Ctrl+V, Ctrl+Q and Ctrl+S kind of reasonable shortcuts.
- zim: my local wiki, where I write a lot of personal manuals. They often get turned into tutorials on my blog later.
- qimgv: my favorite image viewer, it doesn’t have many fancy options, but it’s lightning fast.
- audacity: Swiss Knife advanced audio editor, I use it to edit voice over recordings for my tutorials, or when I need to change sound fx for my videos.
- audacious: An audio player, I use it to quickly listen to wav and mp3 on the fly while recording. I also like its support with plugins ( audacious-plugins ) for old console sound emulation.
- clementine: Everyone has their favourite audio player, here I still love Clementine: it has a precise visualization of the song timeline, I can navigate long songs with comfort.
- vlc: VLC Media Player, the famous video player. It’s probably the only software I know that accompanied my computer system before 2000. An old friend.
- treesheets: a free form data organizer, I use it for brainstorming and mind mapping when I do scenarios.
- gnome-disk-utility: a tool to manage hard disk, SSD, pen drive, burn ISO, etc. I really like the features and clarity of this application.
- meld: A tool to compare two or three plain text files. I use it to compare scenarios, but also code, svgs, etc.
- fontforge: A tool for editing or creating fonts.
- peek A small application that can take a short screenshot of a region of the screen as a gif. Great for tutorials or bug reports (deprecated in 2026, enjoy 24.04 ecosystem for that!).
- filezilla: A tool I have been using for probably 20 years. Publishers, studios, clients, delivering files via sFTP is still a professional standard.
- konversation: A full-featured IRC client for Plasma.
- scribus: A desktop publishing tool I use for the printed books of Pepper&Carrot.
- krename: Sometimes you need to prefix or suffix a lot of files, or delete the same pattern between them. krename does all this very well.
- xournal: I use it to edit PDFs, more specifically to draw on them. Useful for signing paper, filling out forms without having to print them, filling them out and scanning them.
- neofetch: If you type ‘neofetch’ in the console after installing this package, you’ll get information about your system (deprecated in 2026: will be replaced by fastfetch, enjoy 24.04 ecosystem for that!).
c. Buggy package:
As a general rule, be prepared to get many clashes between the newest KDE and Qt version of KDE Neon Team and Qt/KDE software from repository. That’s the case for Calibre, impossible to install, but also for more. Also, many software were developed for X11, and will run poorly, or crash, when run under a XWayland windows. Here is a list of emblematic cases:
- Mypaint: crashes immediately at launch. use the Flatpak or appimage instead. askubuntu.com/questions/1513818/
- Inkscape: crashes immediately at launch. use the Flatpak or the ppa instead. work item on gitlab/inkscape
- Libreoffice Writer: crashes immediately at launch. Uninstall all deb packages, and reinstall the Flatpak version.
- Calibre: Package conflict with the Qt version of KDE Neon, uninstallable.
C. Flatpak
In 2026, I use more and more Flatpak. Except their really big size on disk that can really go crazy (prepare 100GB on your system partition for managing them), I find them very convenient. Their biggest advantage: it’s possible to downgrade a Flatpak if one of your application has an issue after an update. I’ll demonstrate it with a how-to in this chapter.
a. Installing/Removing them
I install Flatpak from Discover, the app store of KDE Neon. You have to check the top-right corner of the application, and select the Flatpak version when it’s more convenient. Sometime, some application will not be listed on Discover, for that, I go directly to Flathub https://flathub.org/en and click the install, then, Discover finds the package.
b. The Krita special case
For a long time, the Krita developers only recommended the Appimage package from krita.org on GNU/Linux. It’s a reliable way for them to ship their own patched Qt and dependencies (to avoid you many bugs). That’s why I recommend it too (see later on this guide).
But the Flatpak Krita page has the “by Krita Foundation” and “KDE verified badge” on it, so it sounds like an official Flatpak support is really assumed by now.
So, if you are looking for convenience, the Krita Flatpak maintained by vulongm tries nowadays to apply the same set of patch and it’s an option. You’ll have the version 5.3.1 running on a XWayland window: you’ll not have access to color management options for Wayland but the overall experience with context menu, tooltip will be better than in 6.0.1.
c. Big Software
- Kdenlive: My favorite video editor, for all the videos I make for my Youtube and Peertube channel.
- Inkscape My vector editor of choice, has an excellent Flatpak, I use it to enter all speechbubbles on Pepper&Carrot.
- LibreOffice The office suite!
- Darktable: the way I organize and develop my photos.
- OBS Studio: Screen capture and audio capture, it also handles live-streaming.
- Blender: THE 3D software, I use it mainly to do mockup of my landscape, interiors, as a helper to draw or paint over my rendering later.
d. Smaller projects
- DisplayCAL Display calibration and profiling set of tools.
- BeeRef: a tool for managing image references.
- Video Trimmer: A small application to quickly cut the beginning and end of a video without re-encoding.
- Identity: A small application able to compare images and videos. Useful for analyzing compression.
- Detwinner: Find and manage duplicate files. A cleaning tool, useful when merging a lot of data.
- Losslesscut I have long VHS video I digitalized, I use this one to extract shorter videos.
- Nomacs: an image viewer, I use it as a secondary one for certain options (like the ability to keep the zoom while browsing a series with the same resolution).
e. Communication and utilities
- Signal: A messaging client, some groups I follow are exclusively on it.
- Element Matrix (ex Riot) To chat on Matrix Room (mainly: Pepper&Carrot, krita, kdenlive, krita-users and kde-input-handling)
- Nextcloud: I have a Debian headless server at home, Nextcloud is on it; with this desktop application I can synchronize the directory on my machine with the server.
f. Permission management
Flatpak are application running inside a container. This containerisation process, when badly done (it happens often, unfortunately) will prevent part of the software to access file on the file system, or save things. To workaround this common issue, you’ll find in System Settings an “Application Permissions” sub section with basic options.
For more advanced options, installing Flatseal (as a Flatpak too) will help you.
g. Downgrading a Flatpak
That’s where Flatpak shines, in case of trouble with a new version, you can quickly come back to the previously packaged version. Unfortunately, you need to use command line to use this precious feature:
Find the application ID:
$ flatpak listor if you know already the name of the app
$ flatpak search <NAME>I’ll use Kdenlive here as an example, so I got the
org.kde.kdenlive ID name, now, list the available
versions:
$ flatpak remote-info --log flathub org.kde.kdenliveRollback to a previous version listed (the big number):
flatpak update --commit=ec07ad6c54e803d1428e5580426a41315e50a14376af033458e7a65bfb2b64f0 org.kde.kdenliveDone! But now Discover will warn you to update Kdenlive to the newer version, because it detected you are using an old version. To prevent it to update, we need to mask the package:
flatpak mask org.kde.kdenliveOnce the bug hitting you was fixed (Note: (here is how I report a bug) ), and a new version is published; you can lift of the mask with:
flatpak mask --remove org.kde.kdenliveD. Appimage
As I wrote in the Flatpak section, you can install Krita as Flatpak ( but not via deb default package) and it might be easier than following this section. But the Krita team packages a version with a custom QT and set of library to lower the amount of bug on it. In any case, in case of an issue, they’ll require you to also test your bug on the appimage version.
Also, the 6.0.1 appimage will allow us to use Color Management (not by default, see later). But expect bugs with this version: it’s still in alpha for a reason.
In fact, you better sacrifice color management a bit and use 6.0.1 or even better 5.3 under Xwayland right now.
a. Instalation
- Download the latest appimage from krita.org
- Put the file on the directory of your choice (eg.
/home/<yourusername>/sources/krita). - Right-click on it, Properties, Permission (Tab) and check “Allow executing file as a program”. Press OK.
- To run it, now, just double-click it.
b. System integration
Unfortunately, Appimage packages don’t have the best and easiest system integration. I mean by that: you’ll not have a new launcher in your start menu, and when you’ll double-click your Krita kra files, they’ll not be associated with the Appimage.
It’s something easy to DIY in Plasma, in less than 5 minutes.
c. Launcher
The main menu of Plasma (your application launcher on the task bar) has an option: Right click on the icon, and “Edit application”, you can launch it also this way:
Start > System > Menu Editor
With this app, installed by default, you can create as many launchers as you want for your appimage.
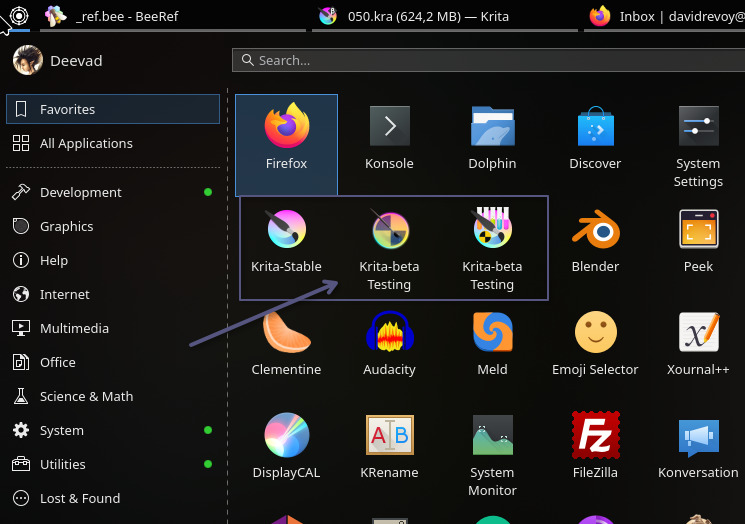
My krita stable is 5.3 XWayland, My testing is 6.x with the Wayland
environment variable, the third one is a script to launch any Krita
appimage (see under)
d. File Association
Find a Krita kra file (or a JPG, PNG, or any image file you want to associate with Krita), right click on it, go to Properties and in General(tab), locate the button Change. In this dialog you press the “+ Add” button. It will be easy to find your Krita launcher in this list.
After that, you can also sort the application in the list: the top one will be the one able to control the “double-click” Open action, the one under will be proposed within the right-click “Open With” menu.
I often do this only once for all my images format, tiff, png, jpg, using Krita to “Open With”. I like to keep Gwenview, the default image viewer of KDE, to open on double-click (Note: Gwenview can also preview Krita kra files).
e. A beta-testing setup
If you want to test unstable package, you can simply use two (or
more) launchers as seen previously. For this KDE Neon setup, I recommend
at least: - Krita Testing: a 6.0.1 with the environment
variable QT_QPA_PLATFORM=wayland (an option in the launcher
editor). This environment variable will unlock color management. -
Krita: a 6.0.1 more stable (but without advanced color
management) running on XWayland windows.
I already have a month of production with this rig. Only one time I had to go to a 5.3 (to use the text-tool ‘font-family’ drop down) because yes: prepare to get issue with right-click menus and pop-up, global color picker, font-family menu selection and more. Nothing that could prevent me to have hundreds of hours already of stability while painting, but little paper-cuts here and there, that I hope will be polished with time.
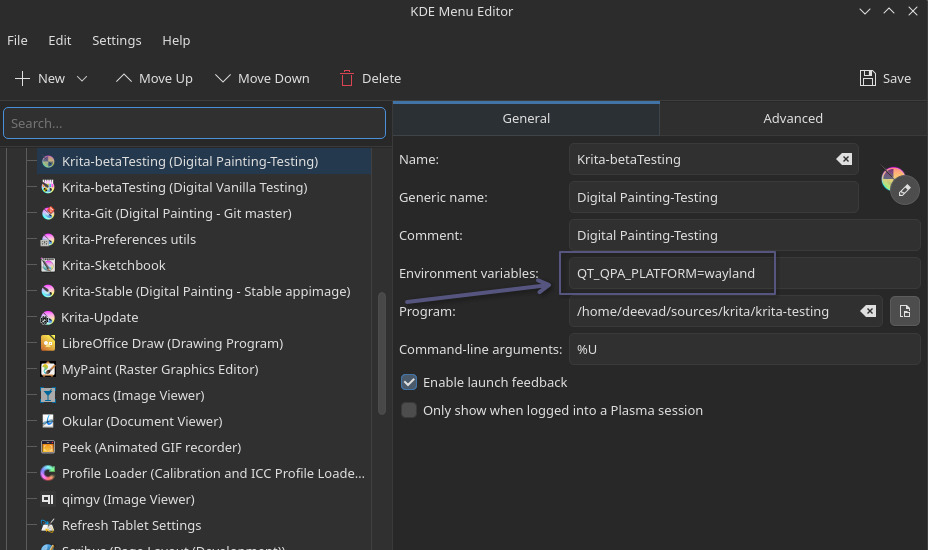
For Color Management and Wayland native Krita, you’ll have to make a
launcher this way on Krita 6.x appimage series. Otherwise, it will run
as a XWayland windows, uncolor managed.
f. A script if you test Appimages frequently
The Krita developpers often build appimage for testing new feature. But that’s also true on many other projects. If you want to give feedback, you’ll need a way to download quickly an appimage and test it. I made myself a bash script that brings me quality of life to my beta-testing. I’m happy to share it!
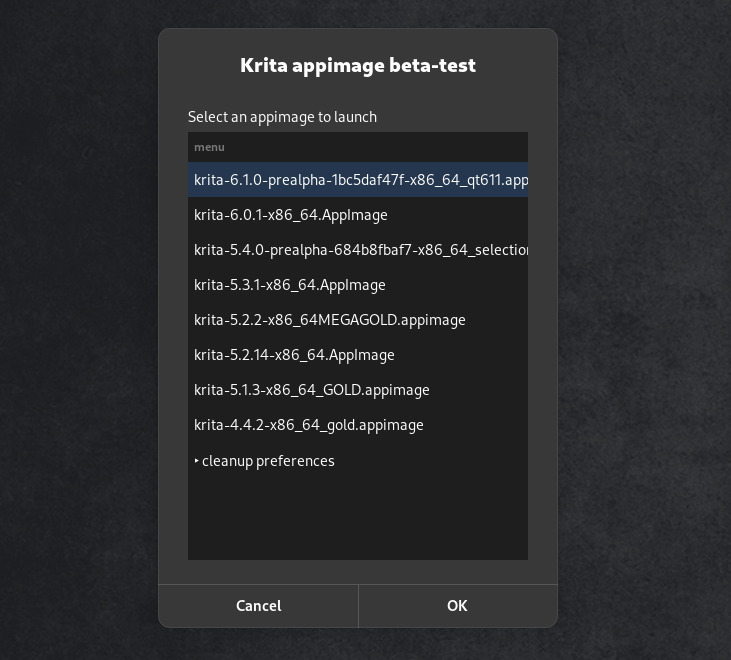
My bash script that list me all my appimage, and can run them
isolated from my preferences
Usage: The script will list all the appimages stored inside a directory. Clicking on one item of the list will launch the appimage inside a Konsole windows (useful while testing to check logs), and with all preferences stored on the directory where the appimage are stored (to not mess with your own Krita install and settings). A convenient button “‣ cleanup preferences” will cleanup the preference saved in the appimage directory, to test the appimage with a reset to factory default. You also only need to download the appimage on your target folder: the script manage automatically to set the appimage to be executed as a program.
Install: Open Kate or Kwrite (or the editor of your
choice) and copy/paste the script under. Then save your file with the
.sh extension (eg.
/home/<yourusername>/sources/krita/krita-appimage-betatest.sh).
After that, you need to customise the path on top of the script to point
to one of your directory with your downloaded appimage. This script also
require you to install the Zenity library
(sudo apt install zenity) to have the user interface, and
also require the Konsole terminal (installed by default on KDE Neon).
Once, saved, right-click on it, Properties, Permission (Tab) and check
“Allow executing file as a program”. Press OK. Then, you can make
yourself a Launcher as seen previously in C. Appimage/b. Sytem
Integration/Launcher with a good looking icon.
#!/bin/bash
#: Title       : Krita appimage betatest
#: Author      : David REVOY <info@davidrevoy.com>
#: License     : GPL

# CONFIG: your directory with appimage:
appimage_dir='/home/deevad/sources/krita'

# Create directories
if [ ! -d ${appimage_dir} ]; then
  mkdir -p ${appimage_dir}
fi
mkdir -p ${appimage_dir}/.share
mkdir -p ${appimage_dir}/.config
mkdir -p ${appimage_dir}/.cache

# Switch environment
export XDG_DATA_DIRS=$QTDIR/share:${appimage_dir}/share:$XDG_DATA_DIRS:/usr/share
export XDG_CONFIG_DIRS=${appimage_dir}/etc/xdg:$XDG_CONFIG_DIRS:/etc/xdg
export XDG_DATA_HOME=${appimage_dir}/.share
export XDG_CONFIG_HOME=${appimage_dir}/.config
export XDG_CACHE_HOME=${appimage_dir}/.cache

# Build Menu
for appimages in $(find ${appimage_dir} -maxdepth 1 -name "*mage" -printf '%fn' | sort -r ); do
  items+=( "${appimages}" )
done
  items+=( "‣ cleanup preferences" )
menuchoice=$(zenity --list --title="Krita appimage beta-test"
            --width=400 --height=600
            --text='Select an appimage to launch'
            --column='menu' "${items[@]}");
menuchoicecleaned=${menuchoice%|*}

# Triage results:
if [ "${menuchoicecleaned}" = "‣ cleanup preferences" ]; then
  if [ -d ${appimage_dir}/.share ]; then
    rm -R ${appimage_dir}/.share
  fi
  if [ -d ${appimage_dir}/.config ]; then
    rm -R ${appimage_dir}/.config
  fi
  if [ -d ${appimage_dir}/.cache ]; then
    rm -R ${appimage_dir}/.cache
  fi
  zenity --info --text="Preferences cleaned for your appimage directory"
  bash "$0"
elif [ "${menuchoicecleaned}" = "" ]; then
  echo "Cancel button pressed by user -> exit."
  exit
else
  echo "Launching the appimage: ${menuchoicecleaned}"
    chmod +x ${appimage_dir}/${menuchoicecleaned}
    command="${appimage_dir}/${menuchoicecleaned}"
    konsole -e /bin/bash --rcfile <(echo "$command")
fi
10. Misc
A. Mousewheel zoom in Gwenview and Inkscape
As a graphist, I’m using my mouse scrollwheel to zoom. I like that, I feel it’s logic, and many apps make it default this days. Unfortunately, some apps still don’t do that: Inkscape still scroll vertically instead of zooming the canvas, and same for Gwenview.
In Inkscape, it’s very cryptic, set the preference this way:
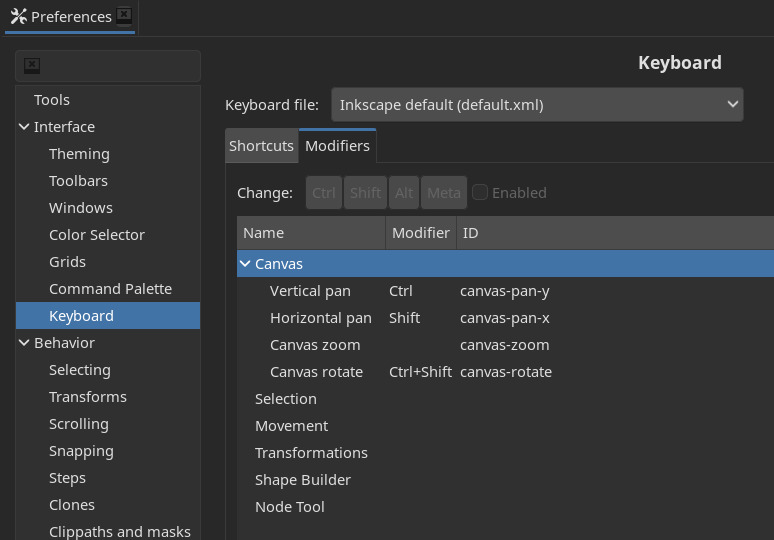
Replicate this as you can with the GUI :)
In Gwenview, set the preference here:
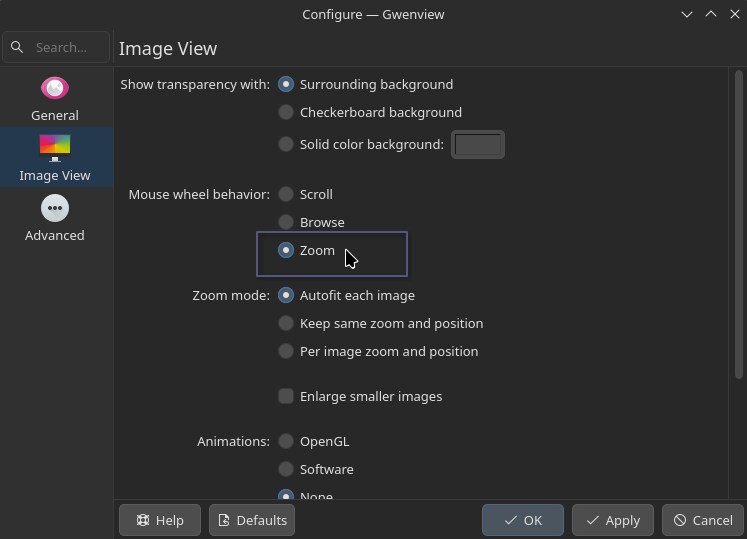
Gwenview as a beautiful layout for this
B. Patch for the XpPen Deco 01 V3 Pen
I’m using the XpPen Deco 01 V3 when I travel on my laptop (I installed also KDE Neon on it), unfortunately, my second barrel button is hard-coded to be a “eraser mode” (hold and draw while holding it in Krita to erase). And this behavior is not customizable yet. If you want to patch it for a right click, install udev-hid-bpf (just get the latest release, and run the ./install bash script) and then do this:
Download and extract the patch https://www.davidrevoy.com/data/images/blog/2025/2025-04-04_XPPen_Deco01V3_BPF_second-stylus-button-rightclick_by_Nicholas-Lapointe.tar.gz
Copy the two files inside it to your operating system:
sudo cp 0009-XPPen__Deco01V3.bpf.o /usr/lib/x86_64-linux-gnu/bpf/
sudo cp 0010-XPPen__Deco01V3.bpf.o /usr/lib/x86_64-linux-gnu/bpf/
Done!
Note: this section show you that once you have udev-hid-bpf installed, you can load new rules on the fly. It’s useful for testing the support of new tablet inside udev-hid-bpf Merge Requests.
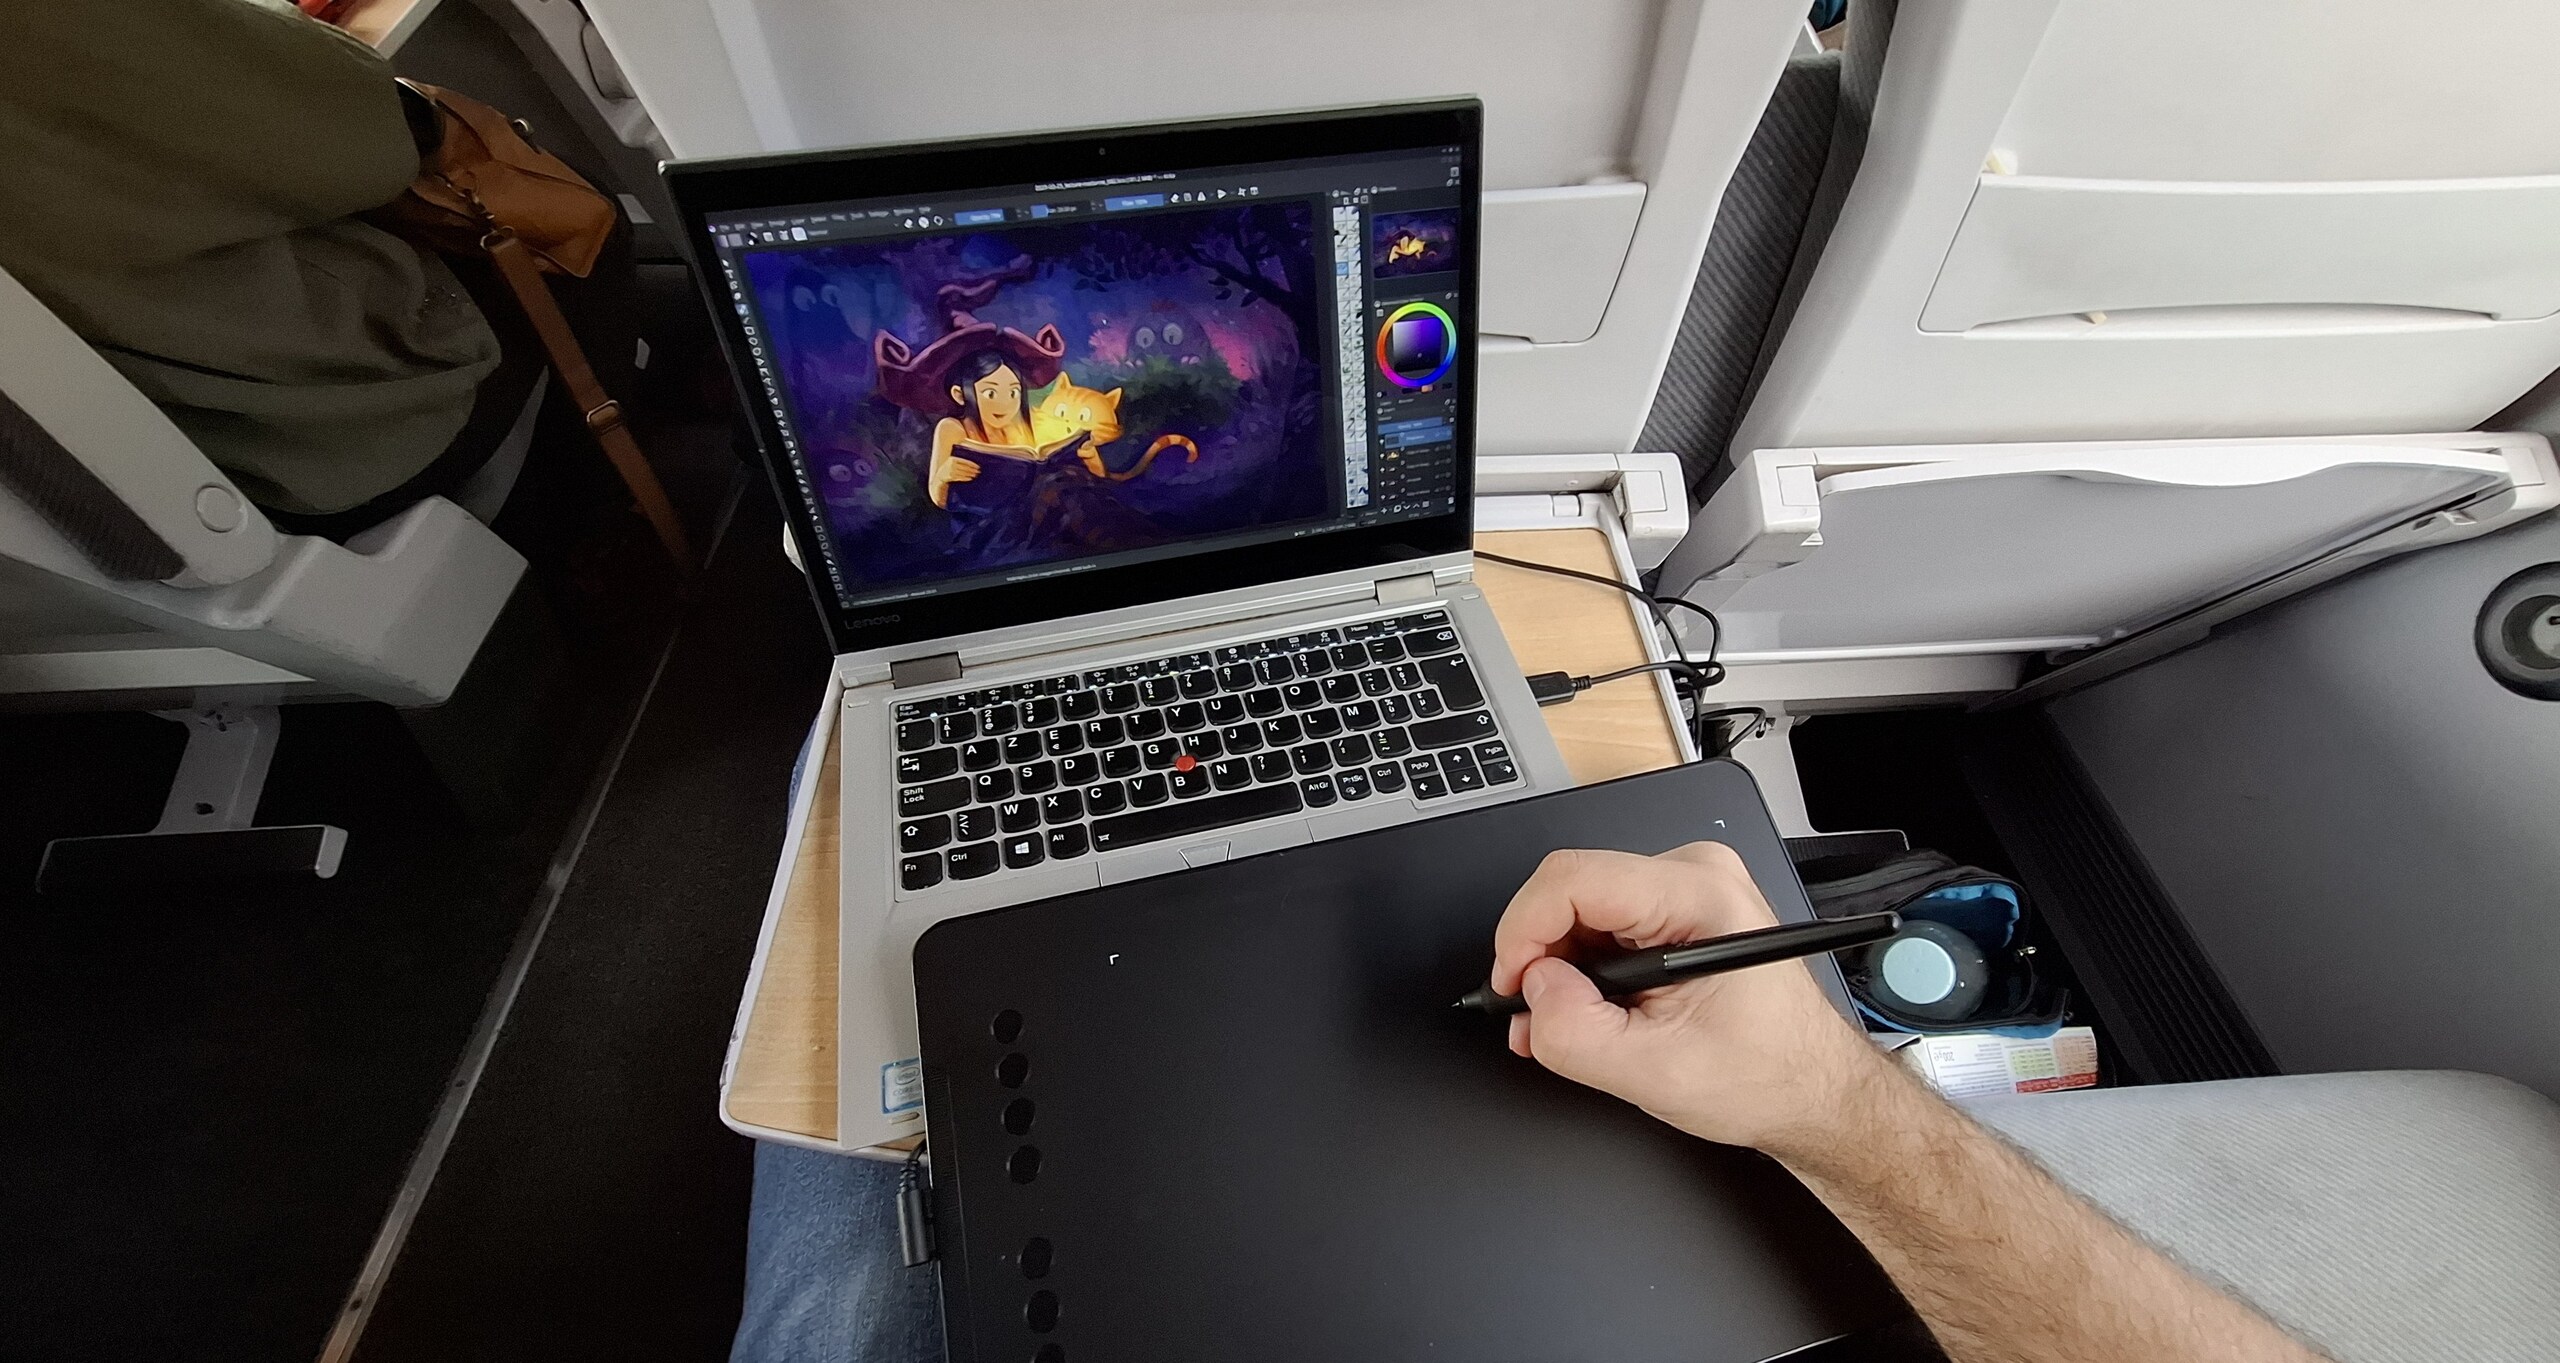
My favorite setup in the train and for conference and demo
C. Localhost PHP development
I’m a bit old school for my web development (I learned in 2000), all I needs is PHP and modules like XML handling, Image Manipulation (GD) and URL rewriting. My website here https://www.davidrevoy.com and https://www.peppercarrot.com still are only made of that.
a. Install the LAMP stack
sudo apt install apache2
echo "ServerName localhost" | sudo tee /etc/apache2/conf-available/fqdn.conf
sudo a2enconf fqdn
sudo a2enmod rewrite
sudo apt install php libapache2-mod-php php-gd php-xml php-mbstring
sudo systemctl reload apache2
b. Symlinks custom folders
By default, the local server use the directory
/var/www/html, but I prefer to work on a subdirectory of my
home directory to ease my backups and file syncing with the laptop. So,
here is how I handle this redirection with symlinks, as an example. I
start to remove the default file in www/html, then I recreate it:
sudo rm -r /var/www/html
sudo mkdir /var/www/html
After that, I link from this place my web development directories:
sudo ln -s ~/www/peppercarrot/ /var/www/html/peppercarrot
sudo ln -s ~/www/.test.peppercarrot/ /var/www/html/peppercarrot-test
sudo ln -s ~/www/davidrevoy /var/www/html/davidrevoy
c. Permissions
To allows URL rewrite and .htaccess on local folders:
sudo micro /etc/apache2/sites-available/000-default.confAdd the following to the end of the file :
<Directory "/var/www/html">
  AllowOverride All
</Directory>
If you often tweak files created via apache/php; a good tip is to add your user to the www-data group, for my user ‘deevad’ it looks like that:
sudo usermod -a -G www-data deevad
id deevad
groups deevad
Restart and enjoy
sudo systemctl restart apache2It’s now good, you can connect with your web-browser to your folders with this type of address [http://localhost/davidrevoy/]. When the website are ready; I upload changes with Filezilla to my distant server via sFTP. But I also automatized that with time using a rsync script over SSH that help at doing the synchronization. If you want to know more about this method; look at the upload script on Pepper&Carrot tool repository.
D. Oxipng
oxipng is a CLI compression tool for PNG with simply the best results, in my experience, in terms of speed and compression. It really saves a lot of MB on my rendering process at the core of the Pepper&Carrot project. Unfortunately: it’s not packaged yet, so we need to install it manually. For that, just pick the latest deb on https://github.com/oxipng/oxipng/releases
Once on disk, double click it, and the app store of KDE Neon (Discover) will open and propose to install it. Don’t be afraid by the poor description of the package, with many weird symbol and a wall of text: I think the Oxipng developers just pasted their README in markdown on the package description.
E. Inkscape PPA, for CLI usage
As I wrote in the “notable bug” Software section: the default Inkscape deb package 1.2.2 will crash on Wayland immediately. I tested the Inkscape Flatpak as an alternative and it was nice ( that’s why I recommend it on the Flatpak section), but unfortunately it was also a pain for running the Flatpak a CLI tool: I could do it, but then I couldn’t parallax multiple “Flatpak Inkscape CLI rendering” side by side. To get a solid package that can do CLI parralal conversion, I went with the official PPA:
sudo add-apt-repository ppa:inkscape.dev/stable
sudo apt update
sudo apt install inkscape
Reference: https://inkscape.org/release/inkscape-1.4.3/gnulinux/ubuntu/ppa/dl/
F. Increase Imagemagick memories
By default, Imagemagick, a command line tool to manipulate raster images, is installed with a very low tolerance to large files. If we want to convert 300ppi PNG or JPG from CLI, or to convert to CMYK, this limited default will refuse to render our files. To level up the possibilities of this fantastic library:
sudo micro /etc/ImageMagick-6/policy.xml Scroll the lines and upgrade the limit manually with the text editor. My setup use that:
<policy domain="resource" name="memory" value="4GiB"/>
<policy domain="resource" name="map" value="4GiB"/>
<policy domain="resource" name="area" value="16GP"/>
<policy domain="resource" name="width" value="128KP"/>
<policy domain="resource" name="height" value="128KP"/>
<policy domain="resource" name="area" value="4GiB"/>
<policy domain="resource" name="disk" value="6GiB"/>
11. Conclusion
I’ve only been using this operating system for more than a full month: including my weekly comic production, a website update, and color managed big poster commissions for a festival, the recording of the full making of a comic with OBS, and more. And this install already survived two big waves of update of the full KDE DE: 6.6.4 and 6.6.5.
I really hope this stability will continue, despite the rolling updates and changes. In one month, this guide might become totally obsolete if something bad hits the updates. In any case, I’ll update this article. So far, this is the best option I found to use and recommand in spring 2026.
I hope you enjoyed these instructions, I spent a lot of time on that. Thank you to all my supporters who offers me the possibility to make this type of full investigation and article. If you want to join them, check the support page on my webcomic here.
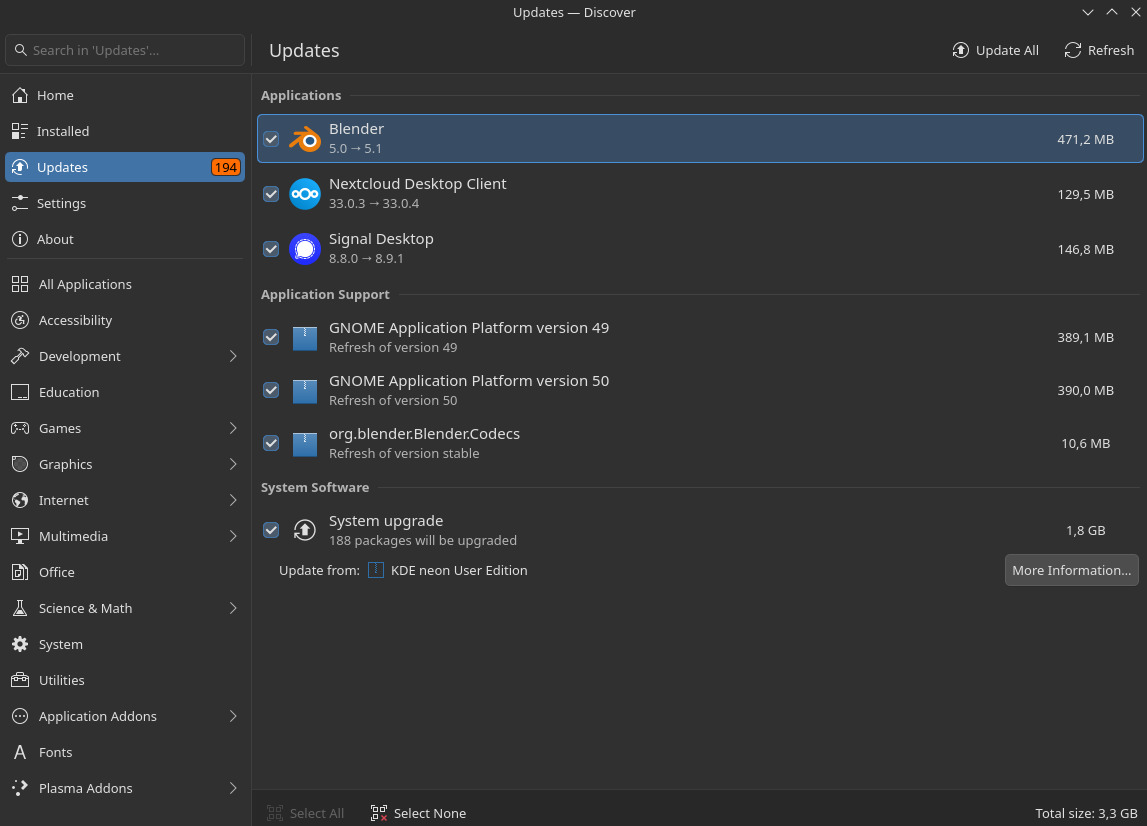
With batch of 188 packages each KDE release, I can’t garantee the
stability of this system
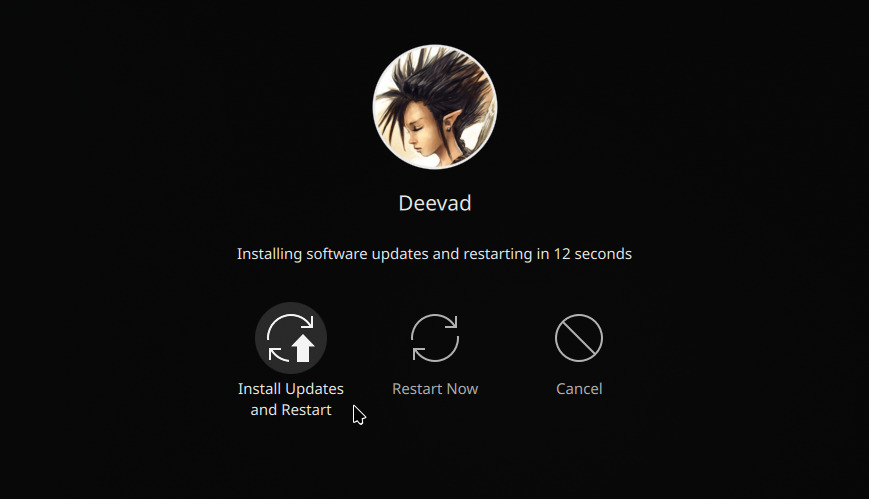
Let’s hope I’ll not end this cool adventure with this distro after
clicking one of this button
12. Links
A basic set of useful links to go further:
- KDE Neon main website: https://neon.kde.org/
- KDE Neon repositories: https://invent.kde.org/neon
- Ktabletconfig repositories: https://invent.kde.org/redstrate/ktabletconfig
- Udev-Hid-Bpf repository: https://gitlab.freedesktop.org/libevdev/udev-hid-bpf/
- Krita on Wayland documentation: https://docs.krita.org/en/reference_manual/preferences/color_management_settings.html#on-systems-using-wayland
- Color management on Wayland: https://wayland.freedesktop.org/docs/book/Color.html
- Flathub portal: https://flathub.org/en