
 View history
 Edit
Edit
Transcripts
Table of Contents
- What you need
- Workflow
- Python methods
- Python interactive method
- Python drag&drop method
- Python command line
- SVG generation from a transcript file
- Framagit pipeline
- Curating the Transcripts
- Structure
As an optional feature, translators can provide transcripts of Pepper&Carrot episodes.
What is a transcript?
In short, it's a text file that contain the content of the speech bubbles.
Gunchleoc and Andrej Ficko have created some scripts to automate this as much as possible. However, you will still need to check the results and do some manual edits where the number and order of text objects doesn't match the original.
Quick tips:
- Don't waste time copying and pasting the text from the svg file. (Just in case)
- Avoid changing the order of text objects in layers in Inkscape. (And END, HOME buttons)
- Avoid changing the number of text fields in the .svg file, or you'll have to fix it manually.
- We recommend filling out the dictionary file first.
- If you started translating from the markdown file, we also have a SVG generator.
- If you have text in Inkscape that you don't want in the transcript, put it under the layer named 'notes'.
What you need
-
Python 3 for running the scripts. (Windows 7 users should get Python 3.8.10 )
We also have an alternative method without Python: CI pipeline job -
A good plain-text editor for editing the transcripts.
For example, Geany is available for all desktop computers.
For Windows, Notepad++ is also quite popular.
Workflow
These are the steps for generating and curating transcripts:
-
Extract an episode's translations from SVG files to Markdown (
*.mdfile)
In this step, you will generate a Markdown file with annotated text for the translations of an episode.
The translations will be enriched with information about who is speaking, and there will also be some formatting controls available to you.
This step, which we will refer to as "transcript generation," can be done in several ways.
If your translation is not based on the English version, we recommend that you generate it with Python. -
Generate HTML files for the episode's translation
In this step, you will turn the annotated translations in the Markdown file of an episode and turn them into HTML snippets that will be integrated into the website.
This step, which we will refer to as "HTML generation," can be done in several ways. -
Check the
.htmlfiles in the browser and compare it to the webcomic page.
If something's wrong, edit the Markdown manually and continue from step 2. -
If you are satisfied,
git committhe Markdown files only. HTML snippets are a temporary resource and are hidden from Git.
If you see a broken pipeline after uploading files, see chapter Framagit pipeline
Python methods
All transcript-related Python scripts are located in webcomics / 0_transcripts. (they are interconnected)
Our scripts are designed to be used in multiple ways. The methods are ordered by ease of use and each method can generate transcript and HTML.
If you don't have Python available, see Generating Files with GitLab.
Python interactive method
Some scripts have an interactive option that allow you to just run it and type-in your arguments.
Linux users should run it with ipython or use the command line method.
Transcript generation
regenerate_transcripts.py example to generate transcripts:
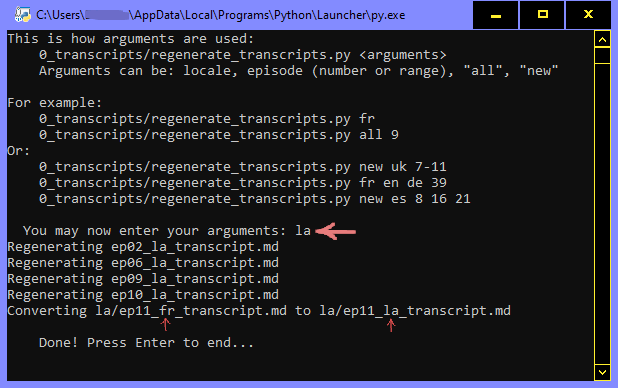
If you type new uk 9-11 16 and press enter, it will generate Ukrainian transcripts for episodes 9,10,11 and 16. (Argument order is not important, 9-11 uk 16 new would do the same.)
If your translation is not based on the English version, we recommend copying the .md file into your translation folder and 'regenerating' it with the script above. This will convert it with corrected speaker names.
HTML generation
Use combined_html_generator.py to generate (combined) HTML files.
(Note: new lines start with - to better distinguish them.)
Its default output directory is 0_transcripts/lang/html and if you'd like to see them next to the .svg files, add the svg argument. e.g. svg it 14 30-32 will generate Italian HTML files for episodes 14,30,31 and 32. Note: svg argument only works if language and episodes are specified.
If you don't use episode number as argument (or add bundle), all episodes will be exported to a single file. This can be used to copy all the text into e.g. LibreOffice Writer and turn on the spell checker for a quick overview.
Python drag&drop method
This method only works in Windows. (Some Windows 11 users might have problems with it.)
You can drag and drop the translation folder or any of its containing files to run generation. See picture below.
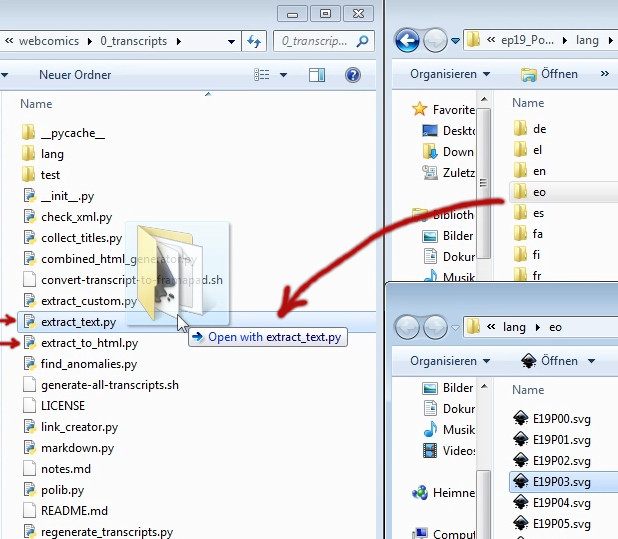
extract_text generates (or updates) a transcript file.
extract_to_html generates .html files out of a transcript. Output: <episode>/hi-res/html/*
combined_html_generator.py generates a single HTML file next to the transcript file.
If your translation is not based on the English version, we recommend that you copy the .md file to your translation folder and drag&drop it to extract_custom.py. This will generate a new file with correctly converted speaker names.
Python command line
This is the method for advanced users. All Python commands are run from the webcomics base folder to ease ep##_* name suggestion with tab.
Otherwise, you can run them from the 0_transcripts folder.
Windows tip: if you enter cmd into the path bar (e.g. C:\users\pepper\webcomics\) it will be executed with that path as working directory.
Linux tip: some file managers use F4 key or right click 'open terminal' to run it with the working directory.
Extracting Text from SVG Files to Markdown
0_transcripts/extract_text.py <episode> <locale>

For example:
0_transcripts/extract_text.py ep01_Potion-of-Flight fr
If you have made changes to multiple episodes in your language, you can use the quick regenerator:
0_transcripts/regenerate_transcripts.py frThis will execute extract_text.py for each existing *.md file of the given language.
You can add arguments for more languages, filter by episodes and generate 'new' transcripts. Run it without arguments for a quick manual.
Generating HTML Snippets from Markdown
0_transcripts/extract_to_html.py <episode> <locale>

For example:
0_transcripts/extract_to_html.py ep01_Potion-of-Flight fr
We also have a script to generate all the transcripts for the specified language into one file:
0_transcripts/combined_html_generator.py frIts default output directory is 0_transcripts/lang/html and if you'd like to see them next to the .svg files, add the svg argument. e.g. svg it 14 30-32 will generate Italian HTML files for episodes 14,30,31 and 32. Note: svg argument only works if language and episodes are specified.
If you don't use episode number as argument (or add bundle), all episodes will be exported to a single file. This can be used to copy all the text into e.g. LibreOffice Writer and turn on the spell-checker for a quick overview.
If you wish to know more about our Python tools, see Python scripts structure chapter.
SVG generation from a transcript file
Features:
- Copies source SVGs and inserts them text in the same order as extraction.
- Line structure is deliberately not kept, review all the output.
- Automatic font replacement (pulls from langs.json).
Font replacement only activates if family is not Lavi. If you for some reason want to disable it, make langs.json invalid (rename it or break syntax).
Interactive way
This is the easy way, allowing you to specify the source language, e.g. /en/ep39_fr_transcript.md
As this script allows you to generate several episodes at once, a backup of the transcript will be created if you don't specify the source language.
Run regenerate_transcripts.py (direct or cmd) and add svg argument to it.

Core script
This script requires exact transcript file name (same language in name as folder).
Only command line method is available:
0_transcripts/transcript_to_svg.py <episode> <target-locale> <optional: source-locale>
Framagit pipeline
There is an automated job that checks if the transcript files change when they are regenerated and warns you if they do. It is designed to detect if you forgot to update them after changing the .svg files or updating the .po file. This requires some consideration when fixing, as it can easily override your manual fixes.
My pipeline broke
View from Merge Request. Similar can be seen within Code - Commits, select your branch top left, select last commit, and inside it you can find Pipeline section.
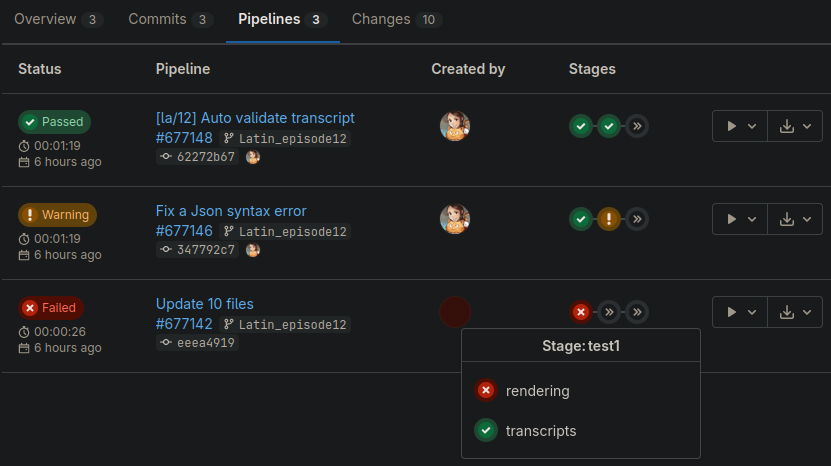
You will normally see 2 types of errors:
1. Test1: render - failed (severe, causes errors when rendering comics)
There are 3 possible problems: (only the first one is common)
- Invalid JSON - See info.json manual. (The most common error is related to the comma.)
- Unable to identify title -
E__P00.svgfiles must contain text with ID 'episode-title' to be extractable. - Found file:/// link - see end of report to fix it with a text editor or 'image properties' in Inkscape.
2. Test2: status - warning (minor, detected inconsistency between a transcript and .svg files)
Test 2 actually summarizes the status and warns about problems found in Test1: transcripts.
You can open Test1: transcripts to see which files are incorrect and download corrected files.
There is an old comment with further explanation of this case.
Generating Files with GitLab
We recommend generating the files yourself with Python, because it will save you time. If you can't do that, you can let GitLab generate the files for you:
- In the webcomics GitLab repository, click on CI / CD.
- Find the entry for your branch that has the "latest" label.
If you don't have a branch yet, use the "master" branch.
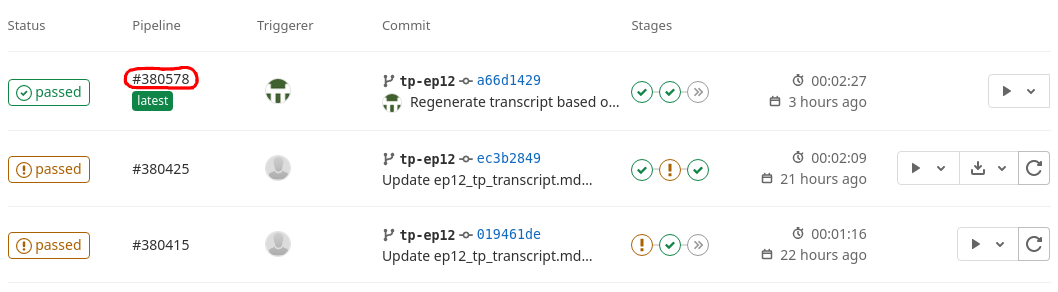
- Click on the number in the "Pipeline" column to select this run. You can now
see the individual jobs that make up the pipeline.
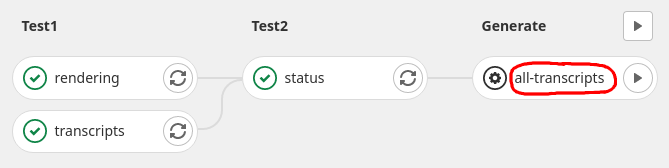
- Click on the the "all-transcripts" job in the "Generate" stage (the whole pill-shaped button, not the play button).
- On the next page you can specify your locale to speed up the build. Write
langin the "Key" field and your locale in the "Value" field.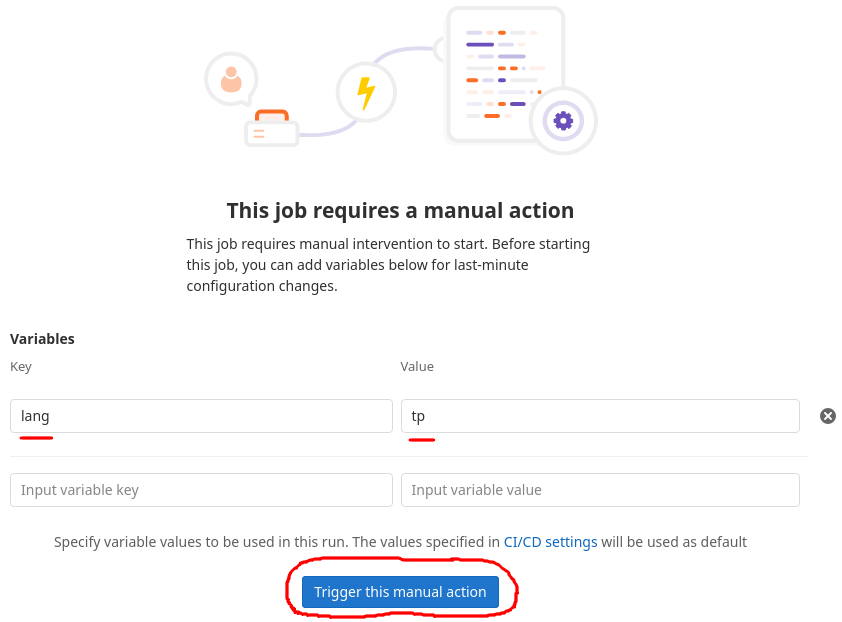
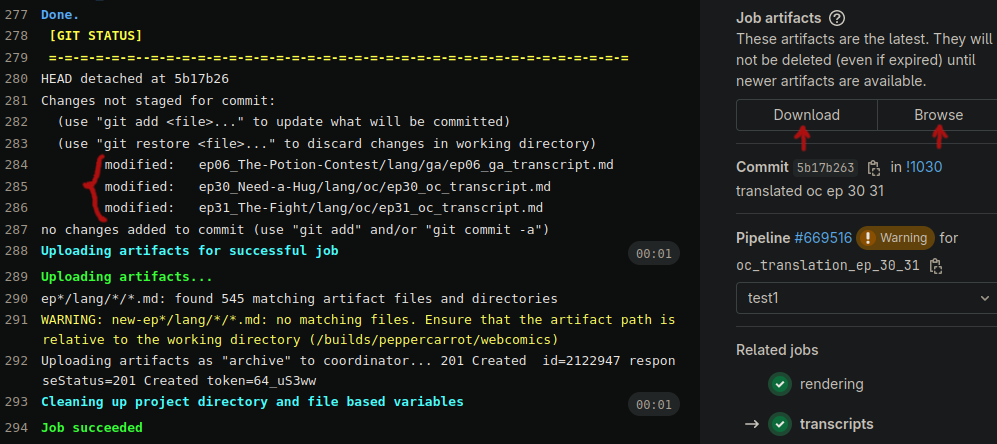
- You should now be seeing an execution log. Once the job has finished
running, you can download or browse the generated files from the
"Job artifacts" on the right-hand side.
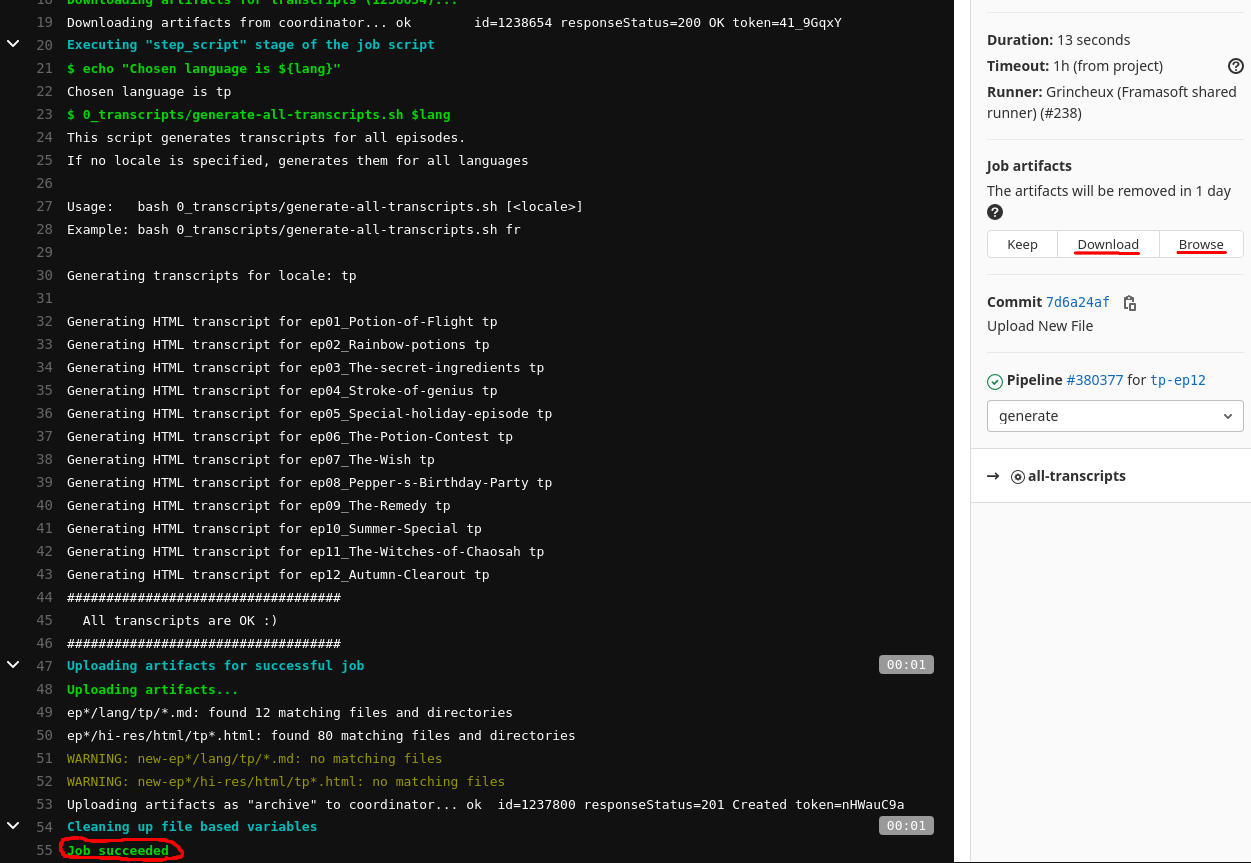
- Find the *.md file for the episode you're working on and edit it as you see fit. Once you're done, commit it to the directory of the language you're working on, either with the Git method or using your web browser.
If there is already a markdown file committed and you want to have your changes to it rendered as HTML to more easily see your edits, there's no need to manually start the job generating all transcripts. Once you've made the changes you want to verify to your branch, stop at step 3 and click on the "transcripts" job of the "Test1" stage instead. You'll be able to access the transcripts as described in step 6 from there.
Curating the Transcripts
Process
Open the episode that you are working on in your browser, then open the generated HTML files one by one in a separate browser tab and compare their contents with the webcomic's pages. If something's wrong, open the episode's Markdown file, edit it as explained below, Generate the html again and reload the HTML snippet in your browser to check the updated version.
The first time you generate the Markdown, the script will use en locale's files for reference.
So, if your number and order of text objects is identical to the English version,
you will not need to fix anything.
Once you have generated your translation's file, it will become the new
reference for the text extraction instead.
Fixing tips
If you discover some problems with wrong text order, it might be easier to fix it inside the ˙.svg` file.
Inkscape -> right click on any object -> Layers and objects
Left: Disordered | Right: English reference
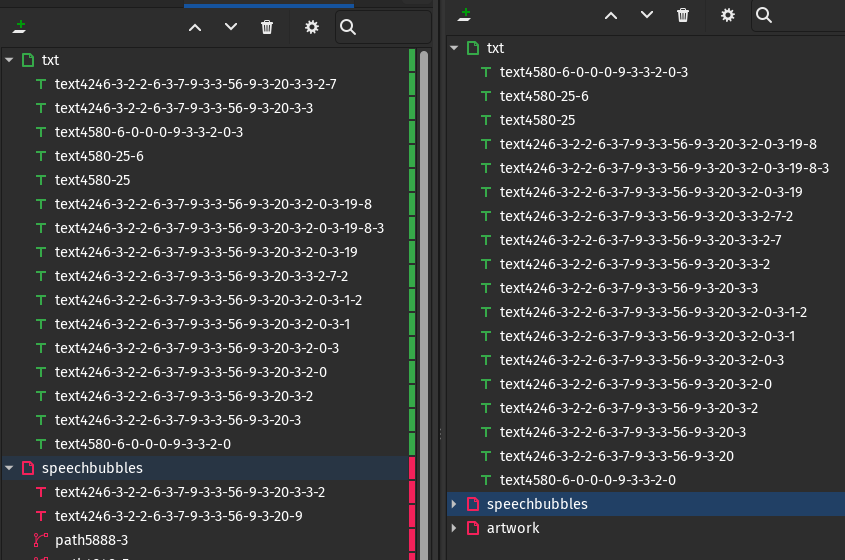
Note that sometimes object names don't match (this case has 1 missmatch) and in such cases it is advisable to check inside the comic that the objects are at the same place. The object name is not important, the order of the text objects is. If the number of objects is lower, you may need to fix it manually, see file format.
Commonly problematic areas:
(Note that the cause listed may cause problems for other elements on the same comic page.)
- E02 P05 (Sound effects split into letters)
- E06 P05 (splitted text)
- E08 P05 (splitted text)
- E09 P05 (animal screams)
- E14 P06 (sign) - extra nowhitespaces
- E27 P04&05 (BZZZ)
- E31 P04 (KABUMM)
- E31 P07 (diploma) - Some languages translate "Degree of Chaosah" as 2 words.
- E32 P03 (diploma) - An easy solution is to keep an unneeded one, generate transcript and remove it from
.svgand.mdin the same step.
Structure
Names dictionary
We also use .po files in translation-names-references folder to translate speaker names.
If you see any English for a speaker's name in the result, it means that you are
missing a translation in XX.po.
Add your translation there, then run the extraction script again to get the names
translated automatically.
Edit the PO reference files
You can edit Po files with a simple text editor or a softwares for Po files. Poedit is a good Free/Libre and open-source software for that. The files are composed mainly of three type of entries. Here is a sample item from fr.po:
#. A student witch of Hippiah and also an elf, with red hair.
msgid "Cinnamon"
msgstr "Cannelle"
- First line (always starts by #.) is a comment to help you to get context
- The a line starting by msgid with the English reference (to leave as it is).
- Finally, the line starting by msgstr is the most important and the one to translate. (Note: keep the word wrapped between ")
Updating names
When you update an existing name translation, the old name remains in the transcript files and is not updated. You can run the python script "0_transcripts/find_anomalies.py fr" to see them. You can do the following trick on XX.po file to update them automatically:
| Field | Starting state | Between state | Final state |
|---|---|---|---|
| msgid | English name | old name | English name |
| msgstr | old name | new name | new name |
Repeat the transcript generation between each state.
Markdown file Format
File Header
The Markdown files start with a title and a Notes section, followed by a Pages section, like this:
## Notes

Any text you like.

In as many paragraphs as you like.

## Pages

### P00

Name|Position|Concatenate|Text|Whitespace (Optional)
----|--------|-----------|----|---------------------
Title|1|False|Episode 1: The Potion of Flight

### P01
...
Do not edit any of the titles! You can make any change you like within the Notes section though, it will be remembered as long as you don't change the title.
Pages
For every text object found in the SVG, there will be a line in the Markdown file. It is very important that you do not change the order or number of lines in the Markdown file, because we need to keep this stable in case you want to enhance your translation at a later point in time.
Each entry in a page's table has 4-5 columns, separated by |:
| Speaker | Order | Combine | Text | Whitespace (Optional) |
|---|---|---|---|---|
The person speaking, or Narrator, Note, Credits etc. Use <hidden> if you wish to hide the row, e.g. if it contains translators' instructions. |
The sequential order that this text segment should get in the generated HTML snippet. We need this because we can't easily control the text order in the SVG files. | If True, the text segment following this one will be added to the end of this one. False if you don't want to combine anything. |
The extracted text. Do not edit. | nowhitespace if you wish to suppress whitespace, e.g. for sounds that can be assembled from multiple segments. For normal text, don't add this column. |
(Note: nowhitespace also removes the space when combining current and previous text objects.)
For example, if we have a Markdown table like this:
Sound|4|True|Glup
Sound|5|True|Glup
Sound|6|False|Glup
Writing|1|True|WARNING
Writing|3|False|PROPERTY
Writing|2|True|WITCH
The 3 "Writing" segments on the bottom will be combined in the correct order, and the 3 "Sound" segments are also combined:
Writing
    WARNING WITCH PROPERTY
Sound
    Glup Glup Glup
And this is how to get rid of unwanted whitespace:
Sound|1|True|s
Sound|2|True|pl|nowhitespace
Sound|3|True|up|nowhitespace
Sound|4|True|g
Sound|5|True|l|nowhitespace
Sound|6|False|up ! !|nowhitespace
Sound|7|False|B Z Z Z I IO O|nowhitespace
Will result in:
Sound
    splup glup!!
    BZZZIIOO
If your text contains any |, it will be escaped using \|.
Handling of hyphen
After combining lines of text, the hyphen is processed using theese regex rules:
hyp- -word & hyp- word & hyp -word are replaced with hyp-word
If you used word breaks and do not want the hyphens to appear in the transcript, add nohyphen to the end of the text's internal name. (Inkscape: Layers and objects) E.g. text4246-3-9-0-6-nohyphen
SVG files
Nested layers/groups are extracted before the text fields. If both text types <text> and <flow> are present, they are ordered separately.
Note that the script has a built-in filter to skip unrelated text objects such as translation notes.
All .svg layers named (notes, note, translatornotes, transla-notes) are ignored, with the exception of some Clap and Haha texts.

Python scripts structure

Many tools have a manual at their beginning and a quick guide when run without arguments.
polib, svg and markdown are libraries and cannot be executed.
check_xml.py and run_tests.py are part of the pipeline test.
Short description of non-transcript related tools:
-
link_creator.pycreates soft links to ease navigation in a single language, e.g./fr/(E01P00-E38P09).svg
It can also download hi-res.pngfiles from the website and connect them as new link to be accessible in linked.svgfiles. -
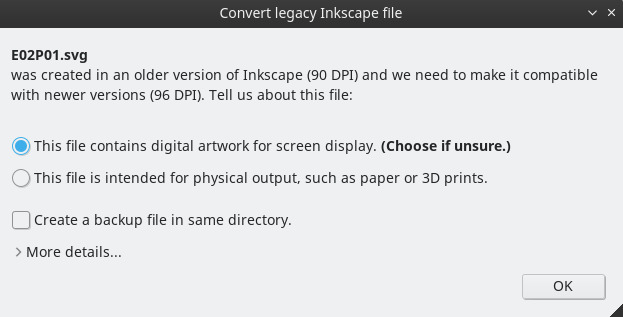
svg_dimension_checker.pyto fix wrongly converted legacy Inkscape files. You should respond like this -
find_anomalies.pyWIP tool to find anomalies in transcript and svg files. (See its manual)